Chromium插件(Plugin)模块(Module)加载过程分析
在Chromium中,每一个Plugin都对应一个Module,称为Plugin Module。一个Plugin Module可创建多个Plugin Instance。每一个Plugin Instance对应于网页中的一个
Plugin Module的加载过程如图1所示:
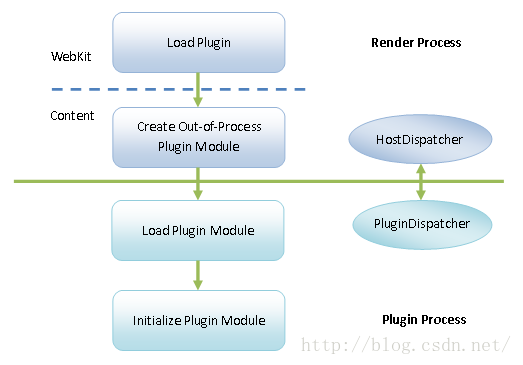
图1 Plugin Module的加载过程
WebKit请求Content层为网页中的
Content层在创建Out-of-Process Plugin Module的过程中,会请求Browser进程创建一个Plugin进程,并且请求该Plugin进程加载指定的Plugin Module。每一个Plugin Module都会有一个导出函数PPP_InitializeModule。Plugin Module加载完成之后,它导出的函数PPP_InitializeModule就会被调用,用来执行初始化工作。
Plugin进程启动起来之后,它与Render进程之间的通信是通过一个PluginDispatcher对象进行的。与此同时,Render进程也会通过一个HostDispatcher对象与Plugin进程进行通信。例如,Content层请求Plugin进程加载指定的Plugin Module,就是通过Render进程中的HostDispatcher对象向Plugin进程中的PluginDispatcher对象发送IPC消息进行的。
Content层在请求Browser进程创建一个Plugin进程加载一个Plugin Module之前,必须要知道这个Plugin Module的信息,例如它的SO文件路径。用户当前安装的所有Plugin是由Chromium中的一个Plugin Service进行管理的,因此Content层可以通过这个Plugin Service获得要加载的Plugin Module的信息。
在分析Plugin Module的加载之前,我们先分析Plugin Service的启动过程。在启动的过程中,它就会注册所有内建(Built-In)的Plugin以及用户安装的Plugin在内部的一个List中。从前面Chromium扩展(Extension)加载过程分析一文可以知道,Chromium的Browser进程在启动的时候,会调用BrowserMainLoop类的成员函数CreateStartupTasks创建一系列的Startup Task。其中的一个Startup Task就是用来启动Plugin Service的,如下所示:
void BrowserMainLoop::CreateStartupTasks() {
      ......

      // First time through, we really want to create all the tasks
      if (!startup_task_runner_.get()) {
    #if defined(OS_ANDROID)
        startup_task_runner_ = make_scoped_ptr(new StartupTaskRunner(
            base::Bind(&BrowserStartupComplete),
            base::MessageLoop::current()->message_loop_proxy()));
    #else
        startup_task_runner_ = make_scoped_ptr(new StartupTaskRunner(
            base::Callback<void(int)>(),
            base::MessageLoop::current()->message_loop_proxy()));
    #endif
        StartupTask pre_create_threads =
            base::Bind(&BrowserMainLoop::PreCreateThreads, base::Unretained(this));
        startup_task_runner_->AddTask(pre_create_threads);

        ......
      }
    #if defined(OS_ANDROID)
      if (!BrowserMayStartAsynchronously()) {
        // A second request for asynchronous startup can be ignored, so
        // StartupRunningTasksAsync is only called first time through. If, however,
        // this is a request for synchronous startup then it must override any
        // previous call for async startup, so we call RunAllTasksNow()
        // unconditionally.
        startup_task_runner_->RunAllTasksNow();
      }
    #else
      startup_task_runner_->RunAllTasksNow();
    #endif
    }
这个函数定义在文件external/chromium_org/content/browser/browser_main_loop.cc中。
这个Startup Task绑定了BrowserMainLoop类的成员函数PreCreateThreads,在创建各种Browser线程之前执行,执行过程如下所示:
int BrowserMainLoop::PreCreateThreads() {
      ......

    #if defined(ENABLE_PLUGINS)
      // Prior to any processing happening on the io thread, we create the
      // plugin service as it is predominantly used from the io thread,
      // but must be created on the main thread. The service ctor is
      // inexpensive and does not invoke the io_thread() accessor.
      {
        TRACE_EVENT0("startup", "BrowserMainLoop::CreateThreads:PluginService");
        PluginService::GetInstance()->Init();
      }
    #endif

      ......
      return result_code_;
    }
这个函数定义在文件external/chromium_org/content/browser/browser_main_loop.cc中。
从这里可以看到,只有在编译时定义了宏ENABLE_PLUGINS,Chromium才会支持Plugin机制。在这种情况下,BrowserMainLoop类的成员函数PreCreateThreads首先会调用PluginService类的静态成员函数GetInstance获得一个PluginServiceImpl对象,如下所示:
PluginService* PluginService::GetInstance() {
      return PluginServiceImpl::GetInstance();
    }
这个函数定义在文件external/chromium_org/content/browser/plugin_service_impl.cc中。
PluginService的静态成员函数GetInstance又是通过调用PluginServiceImpl类的静态成员函数GetInstance获得一个PluginServiceImpl对象的,如下所示:
PluginServiceImpl* PluginServiceImpl::GetInstance() {
      return Singleton<PluginServiceImpl>::get();
    }
这个函数定义在文件external/chromium_org/content/browser/plugin_service_impl.cc中。
从这里可以看到,PluginServiceImpl类的静态成员函数GetInstance返回的PluginServiceImpl对象在当前进程(即Browser进程)是唯一的。这个PluginServiceImpl对象返回给BrowserMainLoop类的成员函数PreCreateThreads之后,后者会调用它的成员函数Init执行初始化工作,如下所示:
void PluginServiceImpl::Init() {
      ......

      RegisterPepperPlugins();

      ......
    }
这个函数定义在文件external/chromium_org/content/browser/plugin_service_impl.cc中。
PluginServiceImpl类的成员函数Init会调用另外一个成员函数RegisterPepperPlugins注册那些Built-In Plugin以及用户安装的Plugin到Plugin Service中去,如下所示:
void PluginServiceImpl::RegisterPepperPlugins() {
      ComputePepperPluginList(&ppapi_plugins_);
      for (size_t i = 0; i < ppapi_plugins_.size(); ++i) {
        RegisterInternalPlugin(ppapi_plugins_[i].ToWebPluginInfo(), true);
      }
    }
这个函数定义在文件external/chromium_org/content/browser/plugin_service_impl.cc中。
PluginServiceImpl类的成员函数RegisterPepperPlugins首先调用函数ComputePepperPluginList获得那些Built-In Plugin和用户安装的Plugin,如下所示:
void ComputePepperPluginList(std::vector<PepperPluginInfo>* plugins) {
      GetContentClient()->AddPepperPlugins(plugins);
      ComputePluginsFromCommandLine(plugins);
    }
这个函数定义在文件external/chromium_org/content/common/pepper_plugin_list.cc中。
这里我们假设当前分析的是Chrome浏览器。在这种情况下,PluginServiceImpl类的成员函数RegisterPepperPlugins调用函数GetContentClient获得的是一个ChromeContentClient对象。调用这个ChromeContentClient对象的成员函数AddPepperPlugin即可以获得Built-In Plugin,如下所示:
void ChromeContentClient::AddPepperPlugins(
        std::vector<content::PepperPluginInfo>* plugins) {
      ComputeBuiltInPlugins(plugins);
      AddPepperFlashFromCommandLine(plugins);

      content::PepperPluginInfo plugin;
      if (GetBundledPepperFlash(&plugin))
        plugins->push_back(plugin);
    }
这个函数定义在文件external/chromium_org/chrome/common/chrome_content_client.cc中。
ChromeContentClient类的成员函数AddPepperPlugin首先调用函数ComputeBuiltInPlugins获得一些重要的Built-In Plugin,例如NaCl Plugin和PDF Plugin,如下所示:
void ComputeBuiltInPlugins(std::vector<content::PepperPluginInfo>* plugins) {
      // PDF.
      //
      // Once we're sandboxed, we can't know if the PDF plugin is available or not;
      // but (on Linux) this function is always called once before we're sandboxed.
      // So the first time through test if the file is available and then skip the
      // check on subsequent calls if yes.
      static bool skip_pdf_file_check = false;
      base::FilePath path;
      if (PathService::Get(chrome::FILE_PDF_PLUGIN, &path)) {
        if (skip_pdf_file_check || base::PathExists(path)) {
          content::PepperPluginInfo pdf;
          pdf.path = path;
          pdf.name = ChromeContentClient::kPDFPluginName;
          if (CommandLine::ForCurrentProcess()->HasSwitch(
                  switches::kOutOfProcessPdf)) {
            pdf.is_out_of_process = true;
            content::WebPluginMimeType pdf_mime_type(kPDFPluginOutOfProcessMimeType,
                                                     kPDFPluginExtension,
                                                     kPDFPluginDescription);
            pdf.mime_types.push_back(pdf_mime_type);
            // TODO(raymes): Make print preview work with out of process PDF.
          } else {
            content::WebPluginMimeType pdf_mime_type(kPDFPluginMimeType,
                                                     kPDFPluginExtension,
                                                     kPDFPluginDescription);
            content::WebPluginMimeType print_preview_pdf_mime_type(
                kPDFPluginPrintPreviewMimeType,
                kPDFPluginExtension,
                kPDFPluginDescription);
            pdf.mime_types.push_back(pdf_mime_type);
            pdf.mime_types.push_back(print_preview_pdf_mime_type);
          }
          pdf.permissions = kPDFPluginPermissions;
          plugins->push_back(pdf);

          skip_pdf_file_check = true;
        }
      }

      // Handle Native Client just like the PDF plugin. This means that it is
      // enabled by default for the non-portable case.  This allows apps installed
      // from the Chrome Web Store to use NaCl even if the command line switch
      // isn't set.  For other uses of NaCl we check for the command line switch.
      // Specifically, Portable Native Client is only enabled by the command line
      // switch.
      static bool skip_nacl_file_check = false;
      if (PathService::Get(chrome::FILE_NACL_PLUGIN, &path)) {
        if (skip_nacl_file_check || base::PathExists(path)) {
          content::PepperPluginInfo nacl;
          nacl.path = path;
          nacl.name = ChromeContentClient::kNaClPluginName;
          content::WebPluginMimeType nacl_mime_type(kNaClPluginMimeType,
                                                    kNaClPluginExtension,
                                                    kNaClPluginDescription);
          nacl.mime_types.push_back(nacl_mime_type);
          if (!CommandLine::ForCurrentProcess()->HasSwitch(
                  switches::kDisablePnacl)) {
            content::WebPluginMimeType pnacl_mime_type(kPnaclPluginMimeType,
                                                       kPnaclPluginExtension,
                                                       kPnaclPluginDescription);
            nacl.mime_types.push_back(pnacl_mime_type);
          }
          nacl.permissions = kNaClPluginPermissions;
          plugins->push_back(nacl);

          skip_nacl_file_check = true;
        }
      }

      ......
    }
这个函数定义在文件external/chromium_org/chrome/common/chrome_content_client.cc。
除了NaCl Plugin和PDF Plugin,还有一个重析Built-In Plugin,就是Flash Plugin。回到ChromeContentClient对象的成员函数AddPepperPlugin中,它首先调用函数AddPepperFlashFromCommandLine检查Browser进程的命令行参数是否包含了switches::kPpapiFlashPath("ppapi-flash-path")启动选项。如果包含了,那么该选项的值就指定了一个Flash Plugin作为Chromium默认使用的Flash Plugin,如下所示:
void AddPepperFlashFromCommandLine(
        std::vector<content::PepperPluginInfo>* plugins) {
      const CommandLine::StringType flash_path =
          CommandLine::ForCurrentProcess()->GetSwitchValueNative(
              switches::kPpapiFlashPath);
      if (flash_path.empty())
        return;

      // Also get the version from the command-line. Should be something like 11.2
      // or 11.2.123.45.
      std::string flash_version =
          CommandLine::ForCurrentProcess()->GetSwitchValueASCII(
              switches::kPpapiFlashVersion);

      plugins->push_back(
          CreatePepperFlashInfo(base::FilePath(flash_path), flash_version));
    }
这个函数定义在文件external/chromium_org/chrome/common/chrome_content_client.cc。
如果Browser进程的命令行参数没有包含switches::kPpapiFlashPath启动选项,那么ChromeContentClient类的成员函数AddPepperPlugin将会调用另外一个函数GetBundledPepperFlash获得一个由Chromium自己实现的Flash Plugin,如下所示:
bool GetBundledPepperFlash(content::PepperPluginInfo* plugin) {
    #if defined(FLAPPER_AVAILABLE)
      CommandLine* command_line = CommandLine::ForCurrentProcess();

      // Ignore bundled Pepper Flash if there is Pepper Flash specified from the
      // command-line.
      if (command_line->HasSwitch(switches::kPpapiFlashPath))
        return false;

      ......

      base::FilePath flash_path;
      if (!PathService::Get(chrome::FILE_PEPPER_FLASH_PLUGIN, &flash_path))
        return false;

      *plugin = CreatePepperFlashInfo(flash_path, FLAPPER_VERSION_STRING);
      return true;
    #else
      return false;
    #endif  // FLAPPER_AVAILABLE
    }
这个函数定义在文件external/chromium_org/chrome/common/chrome_content_client.cc。
这个Flash Plugin称为Flapper。只有在编译Chromium时,定义了宏FLAPPER_AVAILABLE,Chromium才会包含这个名为Flapper的Flash Plugin。并且只有在Browser进程的命令行参数没有包含switches::kPpapiFlashPath启动选项时,这个名为Flapper的Flash Plugin才会被使用。
这一步执行完成后,Chromium就获得了所有的Built-In Plugin。回到前面分析的函数ComputePepperPluginList中,它接下来调用函数ComputePluginsFromCommandLine获得用户安装的Plugin,如下所示:
void ComputePluginsFromCommandLine(std::vector<PepperPluginInfo>* plugins) {
      ......

      bool out_of_process = true;
      if (CommandLine::ForCurrentProcess()->HasSwitch(switches::kPpapiInProcess))
        out_of_process = false;

      const std::string value =
          CommandLine::ForCurrentProcess()->GetSwitchValueASCII(
              switches::kRegisterPepperPlugins);
      if (value.empty())
        return;

      // FORMAT:
      // command-line = <plugin-entry> + *( LWS + "," + LWS + <plugin-entry> )
      // plugin-entry =
      //    <file-path> +
      //    ["#" + <name> + ["#" + <description> + ["#" + <version>]]] +
      //    *1( LWS + ";" + LWS + <mime-type> )
      std::vector<std::string> modules;
      base::SplitString(value, ',', &modules);
      ......

      for (size_t i = 0; i < plugins_to_register; ++i) {
        std::vector<std::string> parts;
        base::SplitString(modules[i], ';', &parts);
        ......

        std::vector<std::string> name_parts;
        base::SplitString(parts[0], '#', &name_parts);

        PepperPluginInfo plugin;
        plugin.is_out_of_process = out_of_process;
    #if defined(OS_WIN)
        // This means we can't provide plugins from non-ASCII paths, but
        // since this switch is only for development I don't think that's
        // too awful.
        plugin.path = base::FilePath(base::ASCIIToUTF16(name_parts[0]));
    #else
        plugin.path = base::FilePath(name_parts[0]);
    #endif

        ......

        plugins->push_back(plugin);
      }
    }
这个函数定义在文件external/chromium_org/content/common/pepper_plugin_list.cc中。
如果Chromium允许加载Plugin,那么它的Browser进程在启动的时候,会将用户安装的Plugin收集起来,并且会将收集到的信息设置在一个switches::kRegisterPepperPlugins启动选项中。函数函数ComputePluginsFromCommandLine通过解析这个启动选项,就可以获得用户安装的Plugin了。
在默认情况下,用户安装的Plugin都是要运行在一个独立的Plugin进程中的。不过,如果Browser进程的命令行参数包含了switches::kPpapiInProcess启动选项,那么它们就不会运行在一个独立的Plugin进程中,而是直接运行在Render进程中。
这一步执行完成之后,Chromium就获得了所有的Built-In Plugin以及用户安装的Plugin。回到PluginServiceImpl类的成员函数RegisterPepperPlugins中,它接下来就会将前面获得每一个Built-In Plugin以及用户安装的Plugin注册在Plugin Service内部的一个List中。这是通过调用PluginServiceImpl类的成员函数RegisterInternalPlugin实现的,如下所示:
void PluginServiceImpl::RegisterInternalPlugin(
        const WebPluginInfo& info,
        bool add_at_beginning) {
      ......
      PluginList::Singleton()->RegisterInternalPlugin(info, add_at_beginning);
    }
这个函数定义在文件external/chromium_org/content/browser/plugin_service_impl.cc中。
参数info指向的一个WebPluginInfo对象描述的就是前面获得的一个Built-In Plugin或者用户安装的Plugin。Browser进程存在一个PluginList单例对象。这个PluginList单例对象描述的就是Plugin Service内部用来保存Plugin信息的一个List。因此,调用这个PluginList单例对象的成员函数RegisterInternalPlugin就可以将参数info描述的Plugin注册在Plugin Service的内部,如下所示:
void PluginList::RegisterInternalPlugin(const WebPluginInfo& info,
                                            bool add_at_beginning) {
      base::AutoLock lock(lock_);

      internal_plugins_.push_back(info);
      if (add_at_beginning) {
        // Newer registrations go earlier in the list so they can override the MIME
        // types of older registrations.
        extra_plugin_paths_.insert(extra_plugin_paths_.begin(), info.path);
      } else {
        extra_plugin_paths_.push_back(info.path);
      }
    }
这个函数定义在文件external/chromium_org/content/common/plugin_list.cc中。
从前面的分析可以知道,参数info描述的不管是Built-In Plugin还是用户安装的Plugin,它们都是Pepper Plugin。Pepper Plugin在PluginList类中称为Internal Plugin。这些Internal Plugin将会保存在成员变量internal_plugins_描述的一个std::vector中。如果Chromium支持NPAPI Plugin,则它们的信息就不会保存在这个std::vector中,而是保存在另外一个成员变量extra_plugin_paths_描述的一个std::vector中。
注意,Pepper Plugin的信息同样会保存在成员变量extra_plugin_paths_描述的std::vector中。这样,当Chromium需要获得一个Plugin的信息时,不管它是Pepper Plugin,还是NPAPI Plugin,均可以通过成员变量extra_plugin_paths_描述的std::vector获得。
这一步执行完成后,Chromium的Browser进程就初始化好了一个Plugin Service,并且将所有的Built-In Plugin和用户安装的Plugin注册在了这个Plugin Service内部的一个List中。这个List称为Plugin List。接下来,我们就继续分析Plugin Module的加载过程。
根据前面Chromium网页DOM Tree创建过程分析一文的分析,我们可以知道,WebKit在解析网页的时候,如果碰到一个
HTMLEmbedElement类的成员函数loadPlugin是从父类HTMLPlugInElement继承下来的,它的实现如下所示:
bool HTMLPlugInElement::loadPlugin(const KURL& url, const String& mimeType, const Vector<String>& paramNames, const Vector<String>& paramValues, bool useFallback, bool requireRenderer)
    {
        LocalFrame* frame = document().frame();
        ......

        RefPtr<Widget> widget = m_persistedPluginWidget;
        if (!widget) {
            ......
            widget = frame->loader().client()->createPlugin(this, url, paramNames, paramValues, mimeType, loadManually, policy);
        }

        ......

        return true;
    }
这个函数定义在文件external/chromium_org/third_party/WebKit/Source/core/html/HTMLPlugInElement.cpp中。
HTMLEmbedElement类的成员函数loadPlugin首先调用成员函数document获得当前网页的Document对象。有了这个Document对象之后,就可以调用它的成员函数frame获得一个LocalFrame对象。调用这个LocalFrame对象的成员函数loader又可以获得一个FrameLoader对象。调用这个FrameLoader对象的成员函数client又可以获得一个FrameLoaderClientImpl对象。通过这个FrameLoaderClientImpl对象,WebKit可以请求它的使用者,即Chromium的Content层,执行指定的操作。例如,HTMLEmbedElement类的成员函数loadPlugin就是通过调用这个FrameLoaderClientImpl的成员函数createPlugin请求Content层为当前正在处理的
注意,当HTMLEmbedElement类的成员变量m_persistedPluginWidget的值不等于NULL时,它指向的是一个Widget对象。在这种情况下,就表示WebKit已经为当前正在处理的
接下来,我们继续分析WebKit为
PassRefPtr<Widget> FrameLoaderClientImpl::createPlugin(
        HTMLPlugInElement* element,
        const KURL& url,
        const Vector<String>& paramNames,
        const Vector<String>& paramValues,
        const String& mimeType,
        bool loadManually,
        DetachedPluginPolicy policy)
    {
        ......

        WebPluginParams params;
        params.url = url;
        params.mimeType = mimeType;
        params.attributeNames = paramNames;
        params.attributeValues = paramValues;
        params.loadManually = loadManually;

        WebPlugin* webPlugin = m_webFrame->client()->createPlugin(m_webFrame, params);
        if (!webPlugin)
            return nullptr;

        // The container takes ownership of the WebPlugin.
        RefPtr<WebPluginContainerImpl> container =
            WebPluginContainerImpl::create(element, webPlugin);

        if (!webPlugin->initialize(container.get()))
            return nullptr;

        ......

        return container;
    }
这个函数定义在文件external/chromium_org/third_party/WebKit/Source/web/FrameLoaderClientImpl.cpp中。
FrameLoaderClientImpl类的成员变量m_webFrame指向的是一个WebLocalFrameImpl对象。调用这个WebLocalFrameImpl对象的成员函数client可以获得一个WebFrameClient接口。这个WebFrameClient接口由WebKit的使用者实现的。在我们这个情景中,WebKit的使用者即为Chromium的Content层。调用这个WebFrameClient接口的成员函数createPlugin即可为参数element描述的
Content层的RenderFrameImpl类实现了WebFrameClient接口。因此,WebKit实际上是通过调用RenderFrameImpl类的成员函数createPlugin为网页的
Plugin Module加载完成之后,Content层就会请求创建它的一个Instance。从前面Chromium的Plugin进程启动过程分析一文可以知道,这个Plugin Instance在Render进程中使用一个PepperWebPluginImpl对象描述。
有了上述的PepperWebPluginImpl对象之后, FrameLoaderClientImpl类的成员函数createPlugin接下来会调用它的成员函数initialize对它进行初始化。在初始化的过程中,Render进程会请求Plugin进程创建一个真正的Plugin Instance。从前面Chromium插件(Plugin)机制简要介绍和学习计划一文可以知道,这个Plugin Instance使用一个pp::Instance对象描述。
在调用PepperWebPluginImpl类的成员函数initialize请求Plugin进程创建Plugin Instance之前,FrameLoaderClientImpl类的成员函数createPlugin会为参数element描述的
从前面Chromium的Plugin进程启动过程分析一文可以知道,Plugin进程在加载了Plugin Module之后,会对该Plugin Module进行初始化,这是通过调用Plugin Module导出的函数PPP_InitializeModule实现的。
函数PPP_InitializeModule的实现如下所示:
static pp::Module* g_module_singleton = NULL;
    ......

    PP_EXPORT int32_t PPP_InitializeModule(PP_Module module_id,
                                           PPB_GetInterface get_browser_interface) {
      pp::Module* module = pp::CreateModule();
      if (!module)
        return PP_ERROR_FAILED;

      if (!module->InternalInit(module_id, get_browser_interface)) {
        delete module;
        return PP_ERROR_FAILED;
      }
      g_module_singleton = module;
      return PP_OK;
    }
这个函数定义在文件external/chromium_org/ppapi/cpp/ppp_entrypoints.cc中。
Chromium要求每一个Pepper Plugin都要导出一个pp::CreateModule函数。例如,我们在Chromium插件(Plugin)机制简要介绍和学习计划一文提到的GLES2 Example导出的函数pp::CreateModule的实现如下所示:
namespace pp {
    // Factory function for your specialization of the Module object.
    Module* CreateModule() {
      return new GLES2DemoModule();
    }
    }  // namespace pp
这个函数定义在文件external/chromium_org/ppapi/examples/gles2/gles2.cc中。
这个导出的函数pp::CreateModule所要做的事情就是创建一个自定义的pp::Module。对于GLES2 Example,它自定义的pp::Module为GLES2DemoModule,也就是GLES2DemoModule类是从pp::Module类继承下来的。
回到前面分析的函数PPP_InitializeModule中,通过Pepper Plugin导出的函数pp::CreateModule函数创建的自定义pp::Module将会保存在一个全局变量g_module_singleton中,以后通过这个全局变量就可以访问到Pepper Plugin自定义的pp::Module了。
函数PPP_InitializeModule在将自定义pp::Module保存在全局变量g_module_singleton之前,还会对其执行初始化操作。这是通过调用它从父类pp::Module继承下来的成员函数InternalInit实现的。初始化过程如下所示:
bool Module::InternalInit(PP_Module mod,
                              PPB_GetInterface get_browser_interface) {
      pp_module_ = mod;
      get_browser_interface_ = get_browser_interface;

      // Get the core interface which we require to run.
      const PPB_Core* core = reinterpret_cast<const PPB_Core*>(GetBrowserInterface(
          PPB_CORE_INTERFACE));
      if (!core)
        return false;
      core_ = new Core(core);

      return Init();
    }
这个函数定义在文件external/chromium_org/ppapi/cpp/module.cc中。
参数mod的类型为PP_Module。PP_Module定义为一个int32_t,它是用来描述一个Plugin Module ID的。也就是说,每一个Plugin Module都有一个ID。这个ID将会保存在pp::Module类的成员变量pp_module_中。
从前面Chromium的Plugin进程启动过程分析一文可以知道,参数get_browser_interface指向的是一个函数。这个函数为PluginDispatcher类的静态成员函数GetBrowserInterface,它将会保存在pp::Module类的成员变量get_browser_interface_中。以后通过这个函数可以获得Chromium提供给Plugin使用的接口。例如,pp::Module类的成员函数InternalInit接下来就会通过这个函数获得一个类型为PPB_CORE_INTERFACE的接口。这个接口会封装在一个Core对象中,并且这个Core对象会保存在pp::Module类的成员变量core_中。
接下来,我们就继续分析Plugin获得类型为PPB_CORE_INTERFACE的接口的过程。从这个过程我们还可以看到Chromium提供给Plugin使用的其它类型的接口。pp::Module类的成员函数InternalInit获得类型为PPB_CORE_INTERFACE的接口是通过调用成员函数GetBrowserInterface实现的,如下所示:
const void* Module::GetBrowserInterface(const char* interface_name) {
      return get_browser_interface_(interface_name);
    }
这个函数定义在文件external/chromium_org/ppapi/cpp/module.cc中。
pp:Module类的成员函数GetBrowserInterface通过调用成员变量get_browser_interface_描述的函数获取类型为PPB_CORE_INTERFACE的接口。前面提到,pp::Module类的成员变量get_browser_interface_为PluginDispatcher类的静态成员函数GetBrowserInterface。因此,接下来我们继续分析PluginDispatcher类的静态成员函数GetBrowserInterface的实现,如下所示:
// static
    const void* PluginDispatcher::GetBrowserInterface(const char* interface_name) {
      ......

      return InterfaceList::GetInstance()->GetInterfaceForPPB(interface_name);
    }
这个函数定义在文件external/chromium_org/ppapi/proxy/plugin_dispatcher.cc中。
PluginDispatcher类的静态成员函数GetBrowserInterface首先调用InterfaceList类的静态成员函数GetInstance获得当前Plugin进程中的一个InterfaceList单例对象,如下所示:
// static
    InterfaceList* InterfaceList::GetInstance() {
      return Singleton<InterfaceList>::get();
    }
这个函数定义在文件external/chromium_org/ppapi/proxy/interface_list.cc中。
InterfaceList类的静态成员函数GetInstance通过模板类Singleton
接下来,我们就继续分析InterfaceList单例对象在创建过程中初始化接口的过程,如下所示:
InterfaceList::InterfaceList() {
      ......

      // Register the API factories for each of the API types. This calls AddProxy
      // for each InterfaceProxy type we support.
      #define PROXIED_API(api_name) \
          AddProxy(PROXY_API_ID(api_name), &PROXY_FACTORY_NAME(api_name));
      ......

      #define PROXIED_IFACE(iface_str, iface_struct) \
          AddPPB(iface_str, \
                 INTERFACE_THUNK_NAME(iface_struct)(), \
                 current_required_permission);
      ......

      {
        Permission current_required_permission = PERMISSION_NONE;
        ......
        #include "ppapi/thunk/interfaces_ppb_public_stable.h"
      }

      AddProxy(API_ID_RESOURCE_CREATION, &ResourceCreationProxy::Create);
      ......
      AddPPB(PPB_CORE_INTERFACE_1_0,
             PPB_Core_Proxy::GetPPB_Core_Interface(), PERMISSION_NONE);
      ......
      AddPPB(PPB_OPENGLES2_INTERFACE_1_0,
             PPB_OpenGLES2_Shared::GetInterface(), PERMISSION_NONE);
      ......
      AddProxy(API_ID_PPP_INSTANCE, &ProxyFactory<PPP_Instance_Proxy>);

      ......
    }
这个函数定义在文件external/chromium_org/ppapi/proxy/interface_list.cc中。
Chromium提供给Plugin使用的接口很多,这里我们只关注特定的几个接口。这几个接口与接下来我们分析Plugin Instance的创建以及Plugin的3D渲染有关。
第一个接口是一个Instance通信接口,接口ID为API_ID_PPB_INSTANCE。当Plugin进程中的Plugin Instance要与Render进程中对应的Plugin Instance通信时,就需要调用到该接口。这个接口是通过include文件interfaces_ppb_public_stable.h定义的,如下所示:
PROXIED_API(PPB_Instance);这个接口定义在文件external/chromium_org/ppapi/thunk/interfaces_ppb_public_stable.h中。
PROXIED_API是一个宏,定义在前面分析的InterfaceList类的构造函数中,展开后为:
AddProxy(PROXY_API_ID(PPB_Instance), &PROXY_FACTORY_NAME(PPB_Instance));PROXY_API_ID是一个宏,定义在为:
define PROXY_API_ID(api_name) PROXY_CLASS_NAME(api_name)::kApiID
这个宏定义在文件external/chromium_org/ppapi/proxy/interface_list.cc中。
PROXY_FACTORY_NAME也是一个宏,定义为:
#define PROXY_FACTORY_NAME(api_name) ProxyFactory<PROXY_CLASS_NAME(api_name)>这个宏定义在文件external/chromium_org/ppapi/proxy/interface_list.cc中。
对PROXY_API_ID和PROXY_FACTORY_NAME这两个宏进行展开,得到接口API_ID_PPB_INSTANCE的定义为:
AddProxy(PROXY_CLASS_NAME(PPB_Instance)::kApiID, &ProxyFactory<PROXY_CLASS_NAME(PPB_Instance)>)PROXY_CLASS_NAME是一个宏,定义为:
#define PROXY_CLASS_NAME(api_name) api_name##_Proxy这个宏定义在文件external/chromium_org/ppapi/proxy/interface_list.cc中。
对PROXY_CLASS_NAME这个宏进行展开,得到接口API_ID_PPB_INSTANCE的定义为:
AddProxy(PPB_Instance_Proxy::kApiID, &ProxyFactory<PPB_Instance_Proxy>);PPB_Instance_Proxy::kApiID定义在PPB_Instance_Proxy类内部的一个常量,如下所示:
class PPB_Instance_Proxy : public InterfaceProxy,
                               public PPB_Instance_Shared {
      ......

      static const ApiID kApiID = API_ID_PPB_INSTANCE;

      ......
    };
这个常量定义在文件external/chromium_org/ppapi/proxy/ppb_instance_proxy.h中。
对PPB_Instance_Proxy::kApiID进行常量替换后,得到接口API_ID_PPB_INSTANCE的定义为:
AddProxy(PPB_Instance_Proxy::kApiID, &ProxyFactory<PPB_Instance_Proxy>);实际上就是将其定义为一个模板函数ProxyFactory
template<typename ProxyClass>
    InterfaceProxy* ProxyFactory(Dispatcher* dispatcher) {
      return new ProxyClass(dispatcher);
    }
这个模板函数定义在文件external/chromium_org/ppapi/proxy/interface_list.cc中。
注意,这时候模板参数ProxyClass指定为PPB_Instance_Proxy,因此在调用模板函数ProxyFactory
上述模板函数ProxyFactory
void InterfaceList::AddProxy(ApiID id,
                                 InterfaceProxy::Factory factory) {
      ......

      int index = static_cast<int>(id);
      ......

      id_to_factory_[index] = factory;
    }
这个函数定义在文件external/chromium_org/ppapi/proxy/interface_list.cc中。
相当于执行了以下操作:
id_to_factory_[API_ID_PPB_INSTANCE] = &ProxyFactory<PPB_Instance_Proxy>;这样,我们就可以知道第一个接口API_ID_PPB_INSTANCE对应的函数为ProxyFactory
第二个接口是一个3D图形接口,接口ID为PPB_GRAPHICS_3D_INTERFACE_1_0。当Plugin进行3D渲染时,就需要调用到这个接口。这个接口也是通过include文件interfaces_ppb_public_stable.h定义的,如下所示:
PROXIED_IFACE(PPB_GRAPHICS_3D_INTERFACE_1_0, PPB_Graphics3D_1_0)这个接口定义在文件external/chromium_org/ppapi/thunk/interfaces_ppb_public_stable.h中。
PROXIED_IFACE是一个宏,定义在前面分析的InterfaceList类的构造函数中,展开后为:
AddPPB(PPB_GRAPHICS_3D_INTERFACE_1_0, INTERFACE_THUNK_NAME(PPB_Graphics3D_1_0)(), PERMISSION_NONE);INTERFACE_THUNK_NAME是一个宏,定义为:
#define INTERFACE_THUNK_NAME(iface_struct) thunk::Get##iface_struct##_Thunk这个宏定义在文件external/chromium_org/ppapi/proxy/interface_list.cc中。
对INTERFACE_THUNK_NAME这个宏进行展开,得到接口PPB_GRAPHICS_3D_INTERFACE_1_0的定义为:
AddPPB(PPB_GRAPHICS_3D_INTERFACE_1_0, thunk::GetPPB_Graphics3D_1_0_Thunk(), PERMISSION_NONE);它会调用函数GetPPB_Graphics3D_1_0_Thunk获得一个PPB_Graphics3D_1_0对象,如下所示:
const PPB_Graphics3D_1_0 g_ppb_graphics3d_thunk_1_0 = {
      &GetAttribMaxValue,
      &Create,
      &IsGraphics3D,
      &GetAttribs,
      &SetAttribs,
      &GetError,
      &ResizeBuffers,
      &SwapBuffers
    };

    ......

    PPAPI_THUNK_EXPORT const PPB_Graphics3D_1_0* GetPPB_Graphics3D_1_0_Thunk() {
      return &g_ppb_graphics3d_thunk_1_0;
    }
这个函数定义在文件external/chromium_org/ppapi/thunk/ppb_graphics_3d_thunk.cc中。
从这里我们就可以看到,接口PPB_GRAPHICS_3D_INTERFACE_1_0提供给Plugin使用的函数,例如函数SwapBuffers,是Plugin执行3D渲染时用到的,用来实现eglSwapBuffers的功能。
上述获得的PPB_Graphics3D_1_0对象将会通过InterfaceList类的成员函数AddPPB保存在内部一个std::map中,如下所示:
void InterfaceList::AddPPB(const char* name,
                               const void* iface,
                               Permission perm) {
      ......
      name_to_browser_info_[name] = InterfaceInfo(iface, perm);
    }
这个函数定义在文件external/chromium_org/ppapi/proxy/interface_list.cc中。
相当于执行了以下操作:
name_to_browser_info_[PPB_GRAPHICS_3D_INTERFACE_1_0] = InterfaceInfo(g_ppb_graphics3d_thunk_1_0, PERMISSION_NONE);这样,我们就可以知道第二个接口PPB_GRAPHICS_3D_INTERFACE_1_0对应的是一个PPB_Graphics3D_1_0对象,以后调用这个接口将会执行该PPB_Graphics3D_1_0对象提供的相应函数。
第三个接口是一个Plugin Instance相关的接口,接口ID为PPB_INSTANCE_INTERFACE_1_0,。当Plugin进行3D渲染时,就需要调用到这个接口来执行一个OpenGL上下文绑定操作。这个接口也是通过include文件interfaces_ppb_public_stable.h定义的,如下所示:
PROXIED_IFACE(PPB_INSTANCE_INTERFACE_1_0, PPB_Instance_1_0)这个接口定义在文件external/chromium_org/ppapi/thunk/interfaces_ppb_public_stable.h中。
从这里可以看出,接口PPB_INSTANCE_INTERFACE_1_0与接口PPB_GRAPHICS_3D_INTERFACE_1_0一样,都是通过宏PROXIED_IFACE定义的。因此我们就可以容易知道,接口PPB_INSTANCE_INTERFACE_1_0是通过一个PPB_Instance_1_0对象实现的。这个PPB_Instance_1_0对象可以通过调用函数GetPPB_Instance_1_0_Thunk获得,如下所示:
const PPB_Instance_1_0 g_ppb_instance_thunk_1_0 = {
      &BindGraphics,
      &IsFullFrame
    };

    ......

    PPAPI_THUNK_EXPORT const PPB_Instance_1_0* GetPPB_Instance_1_0_Thunk() {
      return &g_ppb_instance_thunk_1_0;
    }
这个函数定义在文件external/chromium_org/ppapi/thunk/ppb_instance_thunk.cc中。
从这里我们就可以看到,接口PPB_INSTANCE_INTERFACE_1_0提供给Plugin使用的函数,例如函数BindGraphics,就是用来给一个Plugin Instance绑定OpenGL上下文的。
第四个接口是一个资源创建接口,接口ID为API_ID_RESOURCE_CREATION。Plugin进行3D渲染之前,需要请求Chromium为其创建一个3D上下文。3D上下文是一个资源对象,这时候就需要调用到这个接口进行创建。这个接口是通过调用前面分析的InterfaceList类的成员函数AddProxy定义的,即:
AddProxy(API_ID_RESOURCE_CREATION, &ResourceCreationProxy::Create);相当于执行了以下操作:
id_to_factory_[API_ID_RESOURCE_CREATION] = &ResourceCreationProxy::Create;这样,我们就可以知道第三个接口API_ID_RESOURCE_CREATION对应的函数是ResourceCreationProxy类的静态成员函数Create,以后调用这个接口就会调用到ResourceCreationProxy类的静态成员函数Create。
第五个接口提供给Plugin用来获取当前时间以及对资源进行管理等,接口ID为PPB_CORE_INTERFACE_1_0。这个接口是通过调用前面分析的InterfaceList类的成员函数AddPPB定义的,即:
AddPPB(PPB_CORE_INTERFACE_1_0, PPB_Core_Proxy::GetPPB_Core_Interface(), PERMISSION_NONE);它会调用PPB_Core_Proxy类的静态成员函数GetPPB_Core_Interface获得一个PPB_Core对象,如下所示:
const PPB_Core core_interface = {
      &AddRefResource,
      &ReleaseResource,
      &GetTime,
      &GetTimeTicks,
      &CallOnMainThread,
      &IsMainThread
    };

    ......

    const PPB_Core* PPB_Core_Proxy::GetPPB_Core_Interface() {
      return &core_interface;
    }
这个函数定义在文件external/chromium_org/ppapi/proxy/ppb_core_proxy.cc中。
从这里我们就可以看到,接口PPB_CORE_INTERFACE_1_0提供给Plugin使用的函数,例如函数GetTime,用来获得当前的时间。
上述获得的PPB_Core对象将会通过前面分析的InterfaceList类的成员函数AddPPB保存在内部一个std::map中,即:
name_to_browser_info_[PPB_CORE_INTERFACE_1_0] = InterfaceInfo(core_interface, PERMISSION_NONE);第六个接口提供给Plugin执行OpenGL函数,接口ID为PPB_OPENGLES2_INTERFACE_1_0。这个接口是通过调用前面分析的InterfaceList类的成员函数AddPPB定义的,即:
AddPPB(PPB_OPENGLES2_INTERFACE_1_0, PPB_OpenGLES2_Shared::GetInterface(), PERMISSION_NONE);它会调用PPB_OpenGLES2_Shared类的静态成员函数Get_Interface获得一个PPB_OpenGLES2对象,如下所示:
const PPB_OpenGLES2* PPB_OpenGLES2_Shared::GetInterface() {
      static const struct PPB_OpenGLES2 ppb_opengles2 = {
          &ActiveTexture,                       &AttachShader,
          &BindAttribLocation,                  &BindBuffer,
          &BindFramebuffer,                     &BindRenderbuffer,
          &BindTexture,                         &BlendColor,
          &BlendEquation,                       &BlendEquationSeparate,
          &BlendFunc,                           &BlendFuncSeparate,
          &BufferData,                          &BufferSubData,
          &CheckFramebufferStatus,              &Clear,
          ......
          &UseProgram,                          &ValidateProgram,
          &VertexAttrib1f,                      &VertexAttrib1fv,
          &VertexAttrib2f,                      &VertexAttrib2fv,
          &VertexAttrib3f,                      &VertexAttrib3fv,
          &VertexAttrib4f,                      &VertexAttrib4fv,
          &VertexAttribPointer,                 &Viewport};
      return &ppb_opengles2;
    }
这个函数定义在文件external/chromium_org/ppapi/shared_impl/ppb_opengles2_shared.cc中。
从这里我们就可以看到,接口PPB_OPENGLES2_INTERFACE_1_0提供给Plugin使用的函数,例如函数ActiveTexture,相当于就是OpenGL函数glActiveTexture。
上述获得的PPB_OpenGLES2对象将会通过前面分析的InterfaceList类的成员函数AddPPB保存在内部一个std::map中,即:
name_to_browser_info_[PPB_OPENGLES2_INTERFACE_1_0] = InterfaceInfo(ppb_opengles2, PERMISSION_NONE);第七个接口是一个Plugin Instance通信接口,接口ID为API_ID_PPP_INSTANCE。通过这个接口,Render进程中的Plugin Instance可以它在Plugin进行中对应的Plugin Instance进行通信。这个接口是通过调用前面分析的InterfaceList类的成员函数AddProxy定义的,即:
AddProxy(API_ID_PPP_INSTANCE, &ProxyFactory<PPP_Instance_Proxy>); 从前面的分析可以知道,函数ProxyFactory
上述模板函数ProxyFactory
id_to_factory_[API_ID_PPP_INSTANCE] = ProxyFactory<PPP_Instance_Proxy>;这样,我们就可以知道接口API_ID_PPP_INSTANCE对应的函数为ProxyFactory
这一步执行完成后,Plugin进程中的InterfaceList单例对象就在创建过程中初始化好了一系列的接口。这些接口可以被Plugin调用,用来与Chromium交互。其中,我们重点分析了以下七个接口的定义:
- API_ID_PPB_INSTANCE
2. PPB_GRAPHICS_3D_INTERFACE_1_0
3. PPB_INSTANCE_INTERFACE_1_0
4. API_ID_RESOURCE_CREATION
5. PPB_CORE_INTERFACE_1_0
6. PPB_OPENGLES2_INTERFACE_1_0
7. API_ID_PPP_INSTANCE
在接下来的两篇文章中,我们会看到这些接口的详细调用过程。通过这些调用过程,我们就会对Chromium的Plugin机制会更深刻的认识。
现在回到前面分析的PluginDispatcher类的静态成员函数GetBrowserInterface,这时候它通过调用Plugin进程中的InterfaceList单例对象的成员函数GetInterfaceForPPB获得一个类型为PPB_CORE_INTERFACE的接口,如下所示:
const void* InterfaceList::GetInterfaceForPPB(const std::string& name) {
      NameToInterfaceInfoMap::iterator found =
          name_to_browser_info_.find(name);
      if (found == name_to_browser_info_.end())
        return NULL;

      if (g_process_global_permissions.Get().HasPermission(
              found->second.required_permission)) {
        ......
        return found->second.iface;
      }
      return NULL;
    }
这个函数定义在文件external/chromium_org/ppapi/proxy/interface_list.cc中。
InterfaceList类的成员函数GetInterfaceForPPB首先在成员变量name_to_browser_info_描述的一个std::map检查是否存在一个类型为name的接口。如果存在,那么会继续检查当前进程是否具有该接口的使用权限。只有在具有权限的情况下,前面查找到的接口才会返回给调用者。
在我们这个情景中,要获得的接口是PPB_CORE_INTERFACE。接口PPB_CORE_INTERFACE与前面我们分析的PPB_CORE_INTERFACE_1_0是一样的,这一点可以参考以下宏定义:
#define PPB_CORE_INTERFACE_1_0 "PPB_Core;1.0"
    #define PPB_CORE_INTERFACE PPB_CORE_INTERFACE_1_0
这两个宏定义在文件external/chromium_org/ppapi/c/ppb_core.h中。
由于接口PPB_CORE_INTERFACE_1_0已经存在成员变量name_to_browser_info_描述的std::map中,并且它的使用权限为PERMISSION_NONE,即不需要请求权限,因此,InterfaceList类的成员函数GetInterfaceForPPB将会返回该接口给最初的调用者,即pp::Module类的成员函数InternalInit。后者获得这个接口后,会将其封装在一个Core对象中,并且将该Core对象保存在pp::Module类的成员变量core_中。
InterfaceList类还提供了另外一个成员函数GetFactoryForID,用来获得前面我们分析的那些保存在其成员变量id_to_factory_描述的InterfaceProxy::Factory数组中的接口,如下所示:
InterfaceProxy::Factory InterfaceList::GetFactoryForID(ApiID id) const {
      int index = static_cast<int>(id);
      COMPILE_ASSERT(API_ID_NONE == 0, none_must_be_zero);
      if (id <= 0 || id >= API_ID_COUNT)
        return NULL;
      return id_to_factory_[index];
    }
这个函数定义在文件external/chromium_org/ppapi/proxy/interface_list.cc中。
这意味着Plugin可以通过调用InterfaceList类的成员函数GetInterfaceForPPB和GetFactoryForID获得Chromium提供给它们的调用接口,也就是Chromium提供给Plugin的API。有了这些API之后,Plugin就可以完成自己的功能了。
至此,我们就分析完成了Plugin Module的加载过程和初始化过程。其中,加载过程的更详细分析可以参考前面Chromium的Plugin进程启动过程分析一文,初始化过程主要就是定义了一系列Plugin可以调用的API接口。在接下来的两篇文章中,我们将会逐步看到这些接口的调用过程。敬请关注!更多的信息也可以关注老罗的新浪微博:http://weibo.com/shengyangluo。