Chromium插件(Plugin)执行3D渲染的过程分析
Chromium为网页的
我们分析Plugin执行3D渲染的过程,更多的是为了理解Chromium与Plugin的交互过程,包括Chromium操作Plugin的过程,以及Plugin调用Chromium提供的接口的过程。接下来我们就以Chromium插件(Plugin)机制简要介绍和学习计划一文提到的GLES2 Example为例,分析Plugin执行3D渲染的过程。
从前面Chromium网页加载过程简要介绍和学习计划这个系列的文章可以知道,WebKit会将网页抽象为一个DOM Tree。网页中的每一个
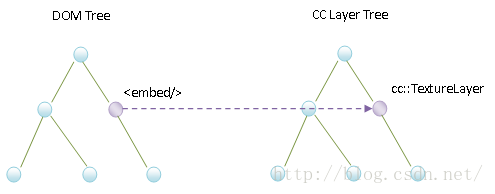
图1 DOM Tree中的
Plugin在调用Chromium提供的OpenGL接口的时候,实际上是将
在Android平台上,Chromium提供给Plugin调用的OpenGL接口称为PPB_OPENGLES2_INTERFACE接口。PPB_OPENGLES2_INTERFACE接口提供了一系列的函数,每一个函数都对应于一个glXXX接口,如图2所示:
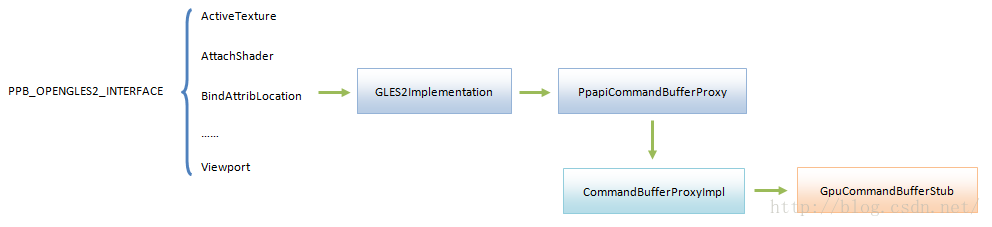
图2 Plugin调用OpenGL接口的过程
在调用PPB_OPENGLES2_INTERFACE接口提供的函数时,GLES2Implementation类的相应成员函数会被调用。例如,当PPB_OPENGLES2_INTERFACE接口提供的函数ActiveTexture被调用时,GLES2Implementation类的成员函数ActiveTexture。GLES2Implementation类的成员函数会将要执行的GPU命令写入到一个缓冲区中去,然后通过一个PpapiCommandBufferProxy对象通知Render进程执行缓冲区中的GPU命令。Render进程又会通过一个CommandBufferProxyImpl对象将要执行的GPU命令转发给GPU进程中的一个GpuCommandBufferStub处理。这意味Plugin最终是通过GPU进程执行GPU命令的。关于GLES2Implementation、CommandBufferProxyImpl和GpuCommandBufferStub这三类执行GPU命令的过程,可以参考前面Chromium硬件加速渲染的OpenGL命令执行过程分析一文。
Plugin在通过PPB_OPENGLES2_INTERFACE接口执行OpenGL函数(GPU命令)之前,首先要初始化一个OpenGL环境。这个初始化操作发生在Plugin第一次知道自己的视图大小时,也就是知道它对应的

图3 Plugin的OpenGL环境初始化过程
Plugin的视图大小是由WebKit计算出来的。计算出来之后,WebKit会通过运行在Render进程中的Plugin Instance Proxy,也就是一个PepperPluginInstanceImpl对象,向运行Plugin进程中的Plugin Instance发出通知。Plugin Instance获得了这个通知之后,就可以初始化一个OpenGL环境了。
Plugin Instance Proxy是通过调用PPP_INSTANCE_INTERFACE_1_1接口提供的一个函数DidChangeView向Plugin Instance发出通知的,后者又是通过向目标Plugin进程发送一个类型为PpapiMsg_PPPInstance_DidChangeView的IPC消息发出该通知的。
类型为PpapiMsg_PPPInstance_DidChangeView的IPC消息携带了一个参数PpapiMsg_PPPInstance_DidChangeView。这个参数描述的是一个Routing ID,表示Plugin进程要将类型为PpapiMsg_PPPInstance_DidChangeView的IPC消息交给一个PPP_Instance_Proxy对象处理。这个PPP_Instance_Proxy对象获得该消息后,又会在当前Plugin进程中获得一个PPP_INSTANCE_INTERFACE_1_1接口,并且调用该接口提供的函数DidChangeView。该函数会找到目标Plugin Instance,并且调用它的成员函数DidChangeView。这样,Plugin Instance就可以初始化OpenGL环境了。以我们在前面Chromium插件(Plugin)机制简要介绍和学习计划一文提到的GLES2 Example为例,它的成员函数DidChangeView就通过调用另外一个成员函数InitGL初始化OpenGL环境的。
Plugin在初始化OpenGL环境的过程中,有两件重要的事情要做。第一件事情是创建一个OpenGL上下文,过程如图4所示:
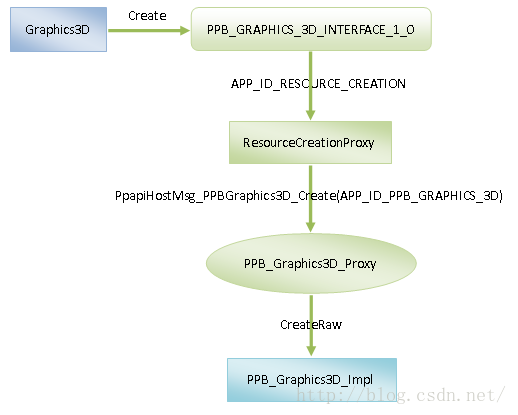
图4 Plugin的OpenGL上文创建过程
在Plugin进程中,OpenGL上下文通过Graphics3D类描述。因此,创建OpenGL上下文意味着是创建一个Graphics3D对象。这个Graphics3D对象在创建的过程中,会调用PPB_GRAPHICS_3D_INTERFACE_1_0接口提供的一个函数Create。该函数又会通过一个APP_ID_RESOURCE_CREATION接口向Render进程发送一个类型为PpapiHostMsg_PPBGraphics3D_Create的IPC消息。在Plugin进程中,APP_ID_RESOURCE_CREATION接口是通过一个ResourceCreationProxy对象实现的,因此,Plugin进程实际上是通过ResourceCreationProxy类向Render进程发送一个类型为PpapiHostMsg_PPBGraphics3D_Create的IPC消息的。
Plugin进程在向Render进程发送类型为PpapiHostMsg_PPBGraphics3D_Create的IPC消息时,会指定一个参数APP_ID_PPB_GRAPHICS_3D,表示Render进程在接收到该消息后,要将其分发给一个PPB_Graphics3D_Proxy对象处理。这个PPB_Graphics3D_Proxy对象又会通过调用PPB_Graphics3D_Impl类的静态成员函数CreateRaw创建一个PPB_Graphics3D_Impl对象。这个PPB_Graphics3D_Impl对象在Render进程描述的就是一个OpenGL上下文。
Plugin在初始化OpenGL环境的过程中做的第二件事情就是将刚刚创建出来的OpenGL上下文指定为当前要使用的OpenGL上下文。这个过程称为OpenGL上下文绑定,如图5所示:
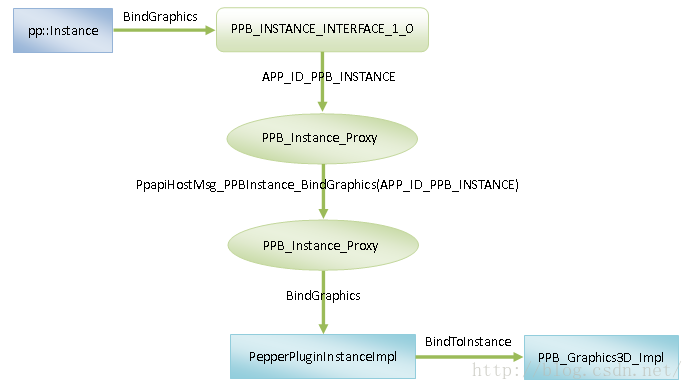
图5 Plugin绑定OpenGL上下文的过程
Plugin是通过调用PPB_INSTANCE_INTERFACE_1_0接口提供的函数BindGraphics进行OpenGL上下文绑定的。该函数又会通过一个APP_ID_PPB_INSTANCE接口向Render进程发送一个类型为PpapiHostMsg_PPBIntance_BindGraphics的IPC消息。在Plugin进程中,APP_ID_PPB_INSTANCE接口是通过一个PPB_Instance_Proxy对象实现的,因此,Plugin进程实际上是通过PPB_Instance_Proxy类向Render进程发送一个类型为PpapiHostMsg_PPBIntance_BindGraphics的IPC消息的。
Plugin进程在向Render进程发送类型为PpapiHostMsg_PPBIntance_BindGraphics的IPC消息时,会指定一个参数APP_ID_PPB_INSTANCE,表示Render进程在接收到该消息后,要将其分发给一个PPB_Instance_Proxy对象处理。这个PPB_Instance_Proxy对象又会找到目标Plugin Instance在Render进程中对应的Proxy,也就是一个PepperPluginInstanceImpl对象,并且调用该PepperPluginInstanceImpl对象的成员函数BindGraphics。
PepperPluginInstanceImpl类的成员函数BindGraphics在执行的过程中,会将指定的OpenGL上下文,也就是前面创建一个PPB_Graphics3D_Impl对象标记为被绑定,这样它接下来就会作为Plugin当前使用的OpenGL上下文了。
OpenGL环境初始化完成之后,Plugin就可以使用图2所示的PPB_OPENGLES2_INTERFACE接口来执行3D渲染了。一帧渲染完毕,Plugin需要交换当前使用的OpenGL上下文的前后两个缓冲区,也就是执行一个SwapBuffers操作。这个操作的执行过程如图6所示:
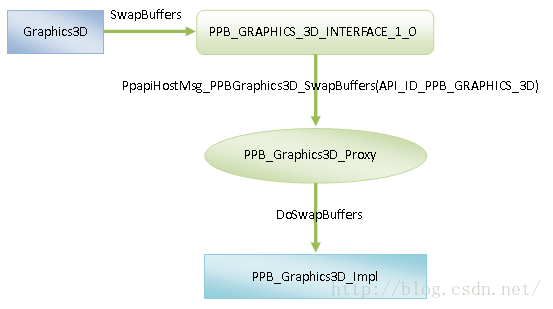
图6 Plugin执行SwapBuffers操作的过程
前面提到,在Plugin进程中,OpenGL上下文是通过一个Graphics3D对象描述的。这个Graphics3D对象可以通过PPB_GRAPHICS_3D_INTERFACE_1_0接口提供的成员函数SwapBuffers完成SwapBuffers操作。
PPB_GRAPHICS_3D_INTERFACE_1_0接口提供的成员函数SwapBuffers在执行的过程中,会向Render进程发送一个类型为PpapiHostMsg_PPBGraphics3D_SwapBuffers的IPC消息。这个消息携带了一个参数API_ID_PPB_GRAPHICS_3D,表示Render进程需要将该消息分发给一个PPB_Graphics3D_Proxy对象处理。这个PPB_Graphics3D_Proxy对象会找到Plugin当前绑定的OpenGL上下文,也就是一个PPB_Graphics3D_Impl对象,并且调用该PPB_Graphics3D_Impl对象的成员函数DoSwapBuffers。这时候就可以完成一个SwapBuffers操作,从而也完成一个帧的渲染流程。
接下来,我们就从WebKit通知Plugin视图大小开始,分析Plugin执行3D渲染的完整流程。从前面Chromium插件(Plugin)模块(Module)加载过程分析一文可以知道,WebKit为
void WebPluginContainerImpl::reportGeometry()
    {
        ......

        IntRect windowRect, clipRect;
        Vector<IntRect> cutOutRects;
        calculateGeometry(frameRect(), windowRect, clipRect, cutOutRects);

        m_webPlugin->updateGeometry(windowRect, clipRect, cutOutRects, isVisible());

        ......
    }
这个函数定义在文件external/chromium_org/third_party/WebKit/Source/web/WebPluginContainerImpl.cpp中。
WebPluginContainerImpl类的成员函数reportGeometry首先是调用成员函数calulateGeometry计算
接下来我们继续分析PepperWebPluginImpl类的成员函数updateGeometry的实现,以便了解Render进程通知Plugin它描述的
void PepperWebPluginImpl::updateGeometry(
        const WebRect& window_rect,
        const WebRect& clip_rect,
        const WebVector<WebRect>& cut_outs_rects,
        bool is_visible) {
      plugin_rect_ = window_rect;
      if (!instance_->FlashIsFullscreenOrPending()) {
        std::vector<gfx::Rect> cut_outs;
        for (size_t i = 0; i < cut_outs_rects.size(); ++i)
          cut_outs.push_back(cut_outs_rects[i]);
        instance_->ViewChanged(plugin_rect_, clip_rect, cut_outs);
      }
    }
这个函数定义在文件external/chromium_org/content/renderer/pepper/pepper_webplugin_impl.cc中。
PepperWebPluginImpl类的成员变量instance_指向的是一个PepperPluginInstanceImpl对象。从前面Chromium插件(Plugin)实例(Instance)创建过程分析一文可以知道,这个PepperPluginInstanceImpl对象是用来在Render进程中描述一个Plugin Instance Proxy的。
PepperWebPluginImpl类的成员函数updateGeometry首先调用上述PepperPluginInstanceImpl对象的成员函数FlashIsFullscreenOrPending判断当前正在处理的Plugin是否是一个Flash Plugin。如果是一个Flash Plugin,并且它当前处于全屏状态或者即将进入全屏状态,那么PepperWebPluginImpl类的成员函数updateGeometry就不会通知Plugin它描述的
我们假设当前正在处理的Plugin不是一个Flash Plugin。这时候PepperWebPluginImpl类的成员函数updateGeometry就会调用上述PepperPluginInstanceImpl对象的成员函数ViewChanged通知Plugin它描述的
PepperPluginInstanceImpl类的成员函数ViewChanged的实现如下所示:
void PepperPluginInstanceImpl::ViewChanged(
        const gfx::Rect& position,
        const gfx::Rect& clip,
        const std::vector<gfx::Rect>& cut_outs_rects) {
      ......

      view_data_.rect = PP_FromGfxRect(position);
      view_data_.clip_rect = PP_FromGfxRect(clip);
      ......

      SendDidChangeView();
    }
这个函数定义在文件external/chromium_org/content/renderer/pepper/pepper_plugin_instance_impl.cc中。
PepperPluginInstanceImpl类的成员函数ViewChanged首先将当前正在处理的Plugin描述的
PepperPluginInstanceImpl类的成员函数SendDidChangeView的实现如下所示:
void PepperPluginInstanceImpl::SendDidChangeView() {
      ......

      ScopedPPResource resource(
          ScopedPPResource::PassRef(),
          (new PPB_View_Shared(ppapi::OBJECT_IS_IMPL, pp_instance(), view_data_))
              ->GetReference());
      ......

      if (instance_interface_) {
        instance_interface_->DidChangeView(
            pp_instance(), resource, &view_data_.rect, &view_data_.clip_rect);
      }
    }
这个函数定义在文件external/chromium_org/content/renderer/pepper/pepper_plugin_instance_impl.cc中。
PepperPluginInstanceImpl类的成员函数SendDidChangeView首先是将成员变量view_data_描述的ppapi::ViewData对象封装在一个PPB_View_Shared对象。从前面的分析可以知道,被封装的ppapi::ViewData对象描述的当前正在处理的Plugin描述的
从前面Chromium插件(Plugin)实例(Instance)创建过程分析一文可以知道,PepperPluginInstanceImpl类的成员变量instance_interface_指向的是一个PPP_Instance_Combined对象。这个PPP_Instance_Combined对象描述的是一个PPP_INSTANCE_INTERFACE_1_1接口。运行在Render进程中的Plugin Instance Proxy可以通过这个接口与运行在Plugin进程中的Plugin Instance通信。
PepperPluginInstanceImpl类的成员函数SendDidChangeView主要就是调用上述PPP_INSTANCE_INTERFACE_1_1接口提供的函数DidChangeView通知运行在Plugin进程中的Plugin Instance,它描述的
PPP_Instance_Combined类的成员函数DidChangeView的实现如下所示:
void PPP_Instance_Combined::DidChangeView(PP_Instance instance,
                                              PP_Resource view_changed_resource,
                                              const struct PP_Rect* position,
                                              const struct PP_Rect* clip) {
      if (instance_1_1_.DidChangeView) {
        CallWhileUnlocked(
            instance_1_1_.DidChangeView, instance, view_changed_resource);
      }

      ......
    }
这个函数定义在文件external/chromium_org/ppapi/shared_impl/ppp_instance_combined.cc中。
从前面Chromium插件(Plugin)实例(Instance)创建过程分析一文可以知道,PPP_Instance_Combined类的成员变量instance_1_1_描述的是一个PPP_Instance_1_1对象。这个PPP_Instance_1_1对象描述的就是上述的PPP_INSTANCE_INTERFACE_1_1接口。PPP_Instance_Combined类的成员函数DidChangeView通过一个帮助函数CallWhilleUnlocked调用这个PPP_INSTANCE_INTERFACE_1_1接口提供的函数DidChangeView,以便向运行在Plugin进程中的Plugin Instance发出一个视图大小变化通知。
从前面Chromium插件(Plugin)实例(Instance)创建过程分析一文还可以知道,上述PPP_INSTANCE_INTERFACE_1_1接口提供的函数DidChangeView实现在ppp_instance_proxy.cc文件中,如下所示:
void DidChangeView(PP_Instance instance, PP_Resource view_resource) {
      HostDispatcher* dispatcher = HostDispatcher::GetForInstance(instance);

      EnterResourceNoLock<PPB_View_API> enter_view(view_resource, false);
      ......

      dispatcher->Send(new PpapiMsg_PPPInstance_DidChangeView(
          API_ID_PPP_INSTANCE, instance, enter_view.object()->GetData(),
          flash_fullscreen));
    }
这个函数定义在文件external/chromium_org/ppapi/proxy/ppp_instance_proxy.cc中。
参数instance的类型为PP_Instance。PP_Instance描述的实际上是一个32位的有符号整数。这个32位的有符号整数是用来描述一个Plugin的ID。通过这个ID,运行在Render进程中的Plugin Instance Proxy与运行在Plugin进程中的Plugin Instance就能一一对应起来的。
函数DidChangeView首先通过调用HostDispatcher类的静态成员函数GetForInstance获得一个HostDispatcher对象。从前面Chromium插件(Plugin)模块(Module)加载过程分析一文可以知道,每一个Plugin进程在Render进程中都有一个对应的HostDispatcher对象。这个HostDispatcher对象就是用来与它对应的Plugin进程通信的。给出一个PP_Instance,HostDispatcher类的静态成员函数GetForInstance就可以获得这个PP_Instance描述的Plugin Instance所运行在的Plugin进程对应的HostDispatcher对象。
获得了目标Plugin进程对应的HostDispatcher对象之后,就可以向它发送一个类型为PpapiMsg_PPPInstance_DidChangeView的IPC消息。这个IPC消息携带了四个参数:
- API_ID_PPP_INSTANCE,要求Plugin进程将该IPC消息分发给API_ID_PPP_INSTANCE接口处理。
2. instance,表示目标Plugin Instance。
- ppapi::ViewData,表示目标Plugin Instance的当前视图大小。
4. flash_fullscreen,表示目标Plugin Instance是否处于全屏状态。
其中,第3个参数描述的ppapi::ViewData对象来自于前面在PepperPluginInstanceImpl类的成员函数SendDidChangeView中封装的PPB_View_Shared对象。这个PPB_View_Shared对象对象是通过函数DidChangeView的第2个参数view_resource传递进来的。
函数DidChangeView首先将上述PPB_View_Shared对象封装在一个EnterResourceNoLock
从前面Chromium的Plugin进程启动过程分析一文可以知道,每一个Plugin进程都存在一个PluginDispatcher对象。Plugin进程将会通过这个PluginDispatcher对象的成员函数OnMessageReceived接收Render进程发送过来的IPC消息。这意味着前面从Render进程发送过来的类型为PpapiMsg_PPPInstance_DidChangeView的IPC消息是通过PluginDispatcher类的成员函数OnMessageReceived接收的。
PluginDispatcher类的成员函数OnMessageReceived是从父类Dispatcher继承下来的,它的实现如下所示:
bool Dispatcher::OnMessageReceived(const IPC::Message& msg) {
      ......

      InterfaceProxy* proxy = GetInterfaceProxy(
          static_cast<ApiID>(msg.routing_id()));
      ......

      return proxy->OnMessageReceived(msg);
    }
这个函数定义在文件external/chromium_org/ppapi/proxy/dispatcher.cc中。
从前面的分析可以知道,此时参数msg指向的Message对象描述的是一个类型为PpapiMsg_PPPInstance_DidChangeView的IPC消息,该消息的Routing ID为API_ID_PPP_INSTANCE,表示要将该消息分发给一个API_ID_PPP_INSTANCE接口处理。这个API_ID_PPP_INSTANCE接口可以通过调用调用另外一个成员函数GetInterfaceProxy获得。
在前面Chromium插件(Plugin)实例(Instance)创建过程分析一文中,我们已经分析过Dispatcher类的成员函数GetInterfaceProxy的实现,因此这里不再复述。再结合前面Chromium插件(Plugin)模块(Module)加载过程分析一文,我们可以知道,在Plugin进程中,API_ID_PPP_INSTANCE接口是由一个PPP_Instance_Proxy对象实现的,Dispatcher类的成员函数GetInterfaceProxy接下来会将参数msg描述的类型为PpapiMsg_PPPInstance_DidChangeView的IPC消息分发给它处理,也就是调用它的成员函数OnMessageReceived。
PPP_Instance_Proxy类的成员函数OnMessageReceived的实现如下所示:
bool PPP_Instance_Proxy::OnMessageReceived(const IPC::Message& msg) {
      ......

      bool handled = true;
      IPC_BEGIN_MESSAGE_MAP(PPP_Instance_Proxy, msg)
        ......
        IPC_MESSAGE_HANDLER(PpapiMsg_PPPInstance_DidChangeView,
                            OnPluginMsgDidChangeView)
        ......
        IPC_MESSAGE_UNHANDLED(handled = false)
      IPC_END_MESSAGE_MAP()
      return handled;
    }
这个函数定义在文件external/chromium_org/ppapi/proxy/ppp_instance_proxy.cc中。
从这里可以看到,PPP_Instance_Proxy类的成员函数OnMessageReceived将类型为PpapiMsg_PPPInstance_DidChangeView的IPC消息分发给另外一个成员函数OnPluginMsgDidChangeView处理,如下所示:
void PPP_Instance_Proxy::OnPluginMsgDidChangeView(
        PP_Instance instance,
        const ViewData& new_data,
        PP_Bool flash_fullscreen) {
      ......

      combined_interface_->DidChangeView(instance, resource,
                                         &new_data.rect,
                                         &new_data.clip_rect);
    }
这个函数定义在文件external/chromium_org/ppapi/proxy/ppp_instance_proxy.cc中。
从前面Chromium插件(Plugin)实例(Instance)创建过程分析一文可以知道,PPP_Instance_Proxy类的成员变量combined_interface_指向的是一个PPP_Instance_Combined对象。PPP_Instance_Proxy类的成员函数OnPluginMsgDidChangeView主要是调用这个PPP_Instance_Combined对象的成员函数DidChangeView通知参数instance描述的Plugin Instance,它的视图大小发生了变化。
PPP_Instance_Combined类的成员函数DidChangeView的实现如下所示:
void PPP_Instance_Combined::DidChangeView(PP_Instance instance,
                                              PP_Resource view_changed_resource,
                                              const struct PP_Rect* position,
                                              const struct PP_Rect* clip) {
      if (instance_1_1_.DidChangeView) {
        CallWhileUnlocked(
            instance_1_1_.DidChangeView, instance, view_changed_resource);
      }
      ......
    }
这个函数定义在文件external/chromium_org/ppapi/shared_impl/ppp_instance_combined.cc中。
从前面Chromium插件(Plugin)实例(Instance)创建过程分析一文可以知道,PPP_Instance_Combined类的成员变量instance_1_1_指向的是一个PPP_Instance对象。这个PPP_Instance对象的成员变量DidChangeView是一个函数指针,它指向的函数为Instance_DidChangeView。PPP_Instance_Combined类的成员函数DidCreate主要是调用这个函数通知参数instance描述的Plugin Instance,它的视图大小发生了变化。
函数Instance_DidChangeView的实现,如下所示:
void Instance_DidChangeView(PP_Instance pp_instance,
                                PP_Resource view_resource) {
      Module* module_singleton = Module::Get();
      ......
      Instance* instance = module_singleton->InstanceForPPInstance(pp_instance);
      ......
      instance->DidChangeView(View(view_resource));
    }
这个函数定义在文件external/chromium_org/ppapi/cpp/module.cc中。
函数Instance_DidChangeView首先调用Module类的静态成员函数Get获得当前Plugin进程中的一个pp::Module单例对象。从前面Chromium插件(Plugin)模块(Module)加载过程分析一文可以知道,这个pp::Module单例对象描述的就是在当前Plugin进程中加载的Plugin Module。
从前面Chromium插件(Plugin)实例(Instance)创建过程分析一文可以知道,一个Plugin Module创建的所有Plugin Instance都会以它们的ID为键值,保存在一个std::map中。因此,函数Instance_DidChangeView可以在这个std::map中找到与参数pp_instance对应的Plugin Instance,即一个pp::Instance对象。这个通过调用前面获得的pp::Module单例对象的成员函数InstanceForPPInstance实现的。获得了目标pp::Instance对象之后,就可以调用它的成员函数DidChangeView,以便通知它视图大小发生了变化。
我们在开发一个Plugin的时候,会自定义一个pp::Instance类。例如,在前面Chromium插件(Plugin)机制简要介绍和学习计划一文提到的GLES2 Example,它自定义的pp::Instance类为GLES2DemoInstance。自定义的GLES2DemoInstance类是从pp::Instance类继承下来的,并且会重写成员函数DidChangeView。这意味着接下来GLES2DemoInstance类的成员函数DidChangeView会被调用。
GLES2DemoInstance类的成员函数DidChangeView的实现如下所示:
void GLES2DemoInstance::DidChangeView(
        const pp::Rect& position, const pp::Rect& clip_ignored) {
      ......
      plugin_size_ = position.size();

      // Initialize graphics.
      InitGL(0);
    }
这个函数定义在文件external/chromium_org/ppapi/examples/gles2/gles2.cc中。
参数position描述的一个pp::Rect对象记录了当前正在处理的Plugin Instance的当前视图大小。GLES2DemoInstance类的成员函数DidChangeView首先将这个视图大小记录在成员变量plugin_size_中,接下来又调用另外一个成员函数InitGL初始化一个OpenGL环境。
GLES2DemoInstance类的成员函数InitGL的实现如下所示:
void GLES2DemoInstance::InitGL(int32_t result) {
      ......

      if (context_) {
        context_->ResizeBuffers(plugin_size_.width(), plugin_size_.height());
        return;
      }
      int32_t context_attributes[] = {
        PP_GRAPHICS3DATTRIB_ALPHA_SIZE, 8,
        PP_GRAPHICS3DATTRIB_BLUE_SIZE, 8,
        PP_GRAPHICS3DATTRIB_GREEN_SIZE, 8,
        PP_GRAPHICS3DATTRIB_RED_SIZE, 8,
        PP_GRAPHICS3DATTRIB_DEPTH_SIZE, 0,
        PP_GRAPHICS3DATTRIB_STENCIL_SIZE, 0,
        PP_GRAPHICS3DATTRIB_SAMPLES, 0,
        PP_GRAPHICS3DATTRIB_SAMPLE_BUFFERS, 0,
        PP_GRAPHICS3DATTRIB_WIDTH, plugin_size_.width(),
        PP_GRAPHICS3DATTRIB_HEIGHT, plugin_size_.height(),
        PP_GRAPHICS3DATTRIB_NONE,
      };
      context_ = new pp::Graphics3D(this, context_attributes);
      ......
      assert(BindGraphics(*context_));

      ......

      FlickerAndPaint(0, true);
    }
这个函数定义在文件external/chromium_org/ppapi/examples/gles2/gles2.cc中。
初始化Plugin的OpenGL环境需要执行两个操作:
1. 创建一个OpenGL上下文。这个OpenGL上下文用一个pp::Graphics3D对象描述。
2. 将创建出来的OpenGL上下文与Plugin进行绑定,也就是将它指定为Plugin当前使用的OpenGL上下文。这可以通过调用父类pp::Instance继承下来的成员函数BindGraphics来完成。
GLES2DemoInstance类的成员变量context_就是用来描述Plugin当前使用的OpenGL上下文。如果这个OpenGL上下文还没有创建,那么GLES2DemoInstance类的成员函数InitGL就会根据Plugin当前的视图大小进行创建。否则的话,就只会改变这个OpenGL上下文描述的绘图缓冲区的大小。
完成以上两个操作之后,GLES2DemoInstance类的成员函数InitGL就会调用另外一个成员函数FlickerAndPaint渲染Plugin的视图。渲染出来的内容最后就会合成在网页的UI中显示出来。
接下来我们先分析OpenGL上下文的创建过程,也就是一个pp::Graphics3D对象的创建过程,我们pp::Graphics3D类的构造函数开始分析,它的实现如下所示:
Graphics3D::Graphics3D(const InstanceHandle& instance,
                           const int32_t attrib_list[]) {
      if (has_interface<PPB_Graphics3D_1_0>()) {
        PassRefFromConstructor(get_interface<PPB_Graphics3D_1_0>()->Create(
            instance.pp_instance(), 0, attrib_list));
      }
    }
这个函数定义在文件external/chromium_org/ppapi/cpp/graphics_3d.cc中。
pp::Graphics3D类的构造函数首行调用模板函数has_interface
从后面的分析我们可以知道,PPB_GRAPHICS_3D_INTERFACE_1_0接口提供的函数Create创建出来的OpenGL上下文用一个proxy::proxy::Graphics3D对象描述,不过它返回给调用者的是分配给proxy::proxy::Graphics3D对象的一个资源ID。pp::Graphics3D类的构造函数会调用从父类pp::Resource继承下来的成员函数PassRefFromConstructor将这个资源ID保存在成员变量pp_resource_中,如下所示:
void Resource::PassRefFromConstructor(PP_Resource resource) {
      PP_DCHECK(!pp_resource_);
      pp_resource_ = resource;
    }
这个函数定义在文件external/chromium_org/ppapi/cpp/resource.cc中。
以后通过调用pp::Resource类的成员函数pp_resource即可以获得这个资源ID,如下所示:
class Resource {
     public:
      ......

      PP_Resource pp_resource() const { return pp_resource_; }

      ......
    };
这个函数定义在文件external/chromium_org/ppapi/cpp/resource.h中。
回到 pp::Graphics3D类的构造函数中,接下来我们首先分析PPB_GRAPHICS_3D_INTERFACE_1_0接口的获取过程,也就是模板函数get_interface
template <typename T> inline T const* get_interface() {
      static T const* funcs = reinterpret_cast<T const*>(
          pp::Module::Get()->GetBrowserInterface(interface_name<T>()));
      return funcs;
    }
这个模板函数定义在文件external/chromium_org/ppapi/cpp/module_impl.h中。
这里的模板参数T为PPB_Graphics3D_1_0,展开后得到模板函数get_interface
inline PPB_Graphics3D_1_0 const* get_interface() {
      static PPB_Graphics3D_1_0 const* funcs = reinterpret_cast<PPB_Graphics3D_1_0 const*>(
          pp::Module::Get()->GetBrowserInterface(interface_name<PPB_Graphics3D_1_0>()));
      return funcs;
    }
它首先会调用另外一个模板函数interface_name
我们首先分析模板函数interface_name
template <> const char* interface_name<PPB_Graphics3D_1_0>() {
      return PPB_GRAPHICS_3D_INTERFACE_1_0;
    }
这个模板函数定义在文件ppapi/cpp/graphics_3d.cc中。
从这里可以看到,要获取的接口名称为PPB_GRAPHICS_3D_INTERFACE_1_0,也就我们要获取的是PPB_GRAPHICS_3D_INTERFACE_1_0接口。这个接口可以通过调用前面获得的pp::Module单例对象的GetBrowserInterface获得。
在前面Chromium插件(Plugin)模块(Module)加载过程分析一文中,我们已经分析过了pp::Module类的GetBrowserInterface的实现,并且我们也知道,在Plugin进程中,PPB_GRAPHICS_3D_INTERFACE_1_0接口是由一个PPB_Graphics3D_1_0对象实现的。这个PPB_Graphics3D_1_0对象的定义如下所示:
const PPB_Graphics3D_1_0 g_ppb_graphics3d_thunk_1_0 = {
      &GetAttribMaxValue,
      &Create,
      &IsGraphics3D,
      &GetAttribs,
      &SetAttribs,
      &GetError,
      &ResizeBuffers,
      &SwapBuffers
    };
这个对象定义在文件external/chromium_org/ppapi/thunk/ppb_graphics_3d_thunk.cc中。
这个PPB_Graphics3D_1_0对象的成员变量Create是一个函数指针。这个函数指针指向了函数Create。这个函数也是定义在文件ppb_graphics_3d_thunk.cc中。
回到Graphics3D类的构造函数中,现在我们就可以知道,它实际上是通过调用上述函数Create请求Render进程为当前正在处理的Plugin创建一个OpenGL上下文的,如下所示:
PP_Resource Create(PP_Instance instance,
                       PP_Resource share_context,
                       const int32_t attrib_list[]) {
      ......
      EnterResourceCreation enter(instance);
      ......
      return enter.functions()->CreateGraphics3D(instance,
                                                 share_context,
                                                 attrib_list);
    }
这个函数定义在文件external/chromium_org/ppapi/thunk/ppb_graphics_3d_thunk.cc中。
OpenGL上下文属于一种资源。在Plugin中,创建资源要使用到接口API_ID_RESOURCE_CREATION。函数Create通过构造一个EnterResourceCreation对象来封装对接口API_ID_RESOURCE_CREATION的调用。封装过程如下所示:
EnterResourceCreation::EnterResourceCreation(PP_Instance instance)
        : EnterBase(),
          functions_(PpapiGlobals::Get()->GetResourceCreationAPI(instance)) {
      ......
    }
这个函数定义在文件external/chromium_org/ppapi/thunk/enter.cc中。
在Plugin进程中,存在一个PluginGlobals单例对象。这个PluginGlobals单例对象可以通过调用PpapiGlobals类的静态成员函数获得。注意,PluginGlobals类是从PpapiGlobals继承下来的。
获得上述PluginGlobals单例对象之后,EnterResourceCreation类的构造函数就调用它的成员函数GetResourceCreationAPI获得一个API_ID_RESOURCE_CREATION接口,如下所示:
thunk::ResourceCreationAPI* PluginGlobals::GetResourceCreationAPI(
        PP_Instance instance) {
      PluginDispatcher* dispatcher = PluginDispatcher::GetForInstance(instance);
      if (dispatcher)
        return dispatcher->GetResourceCreationAPI();
      return NULL;
    }
这个函数定义在文件external/chromium_org/ppapi/proxy/plugin_globals.cc中。
从前面Chromium的Plugin进程启动过程分析一文可以知道,在Plugin进程中加载的Plugin Module对应有一个PluginDispatcher对象。这个PluginDispatcher对象与运行在Render进程中的HostDispatcher对象对应。所有属于该Plugin Module的Instance都使用相同的PluginDispatcher对象与Render进程通信。
PluginGlobals类的成员函数GetResourceCreationAPI首先调用PluginDispatcher类的静态成员函数GetForInstance获得与参数instance描述的Plugin Instance对应的PluginDispatcher对象。有了这个PluginDispatcher对象之后,就可以调用它的成员函数GetResourceCreationAPI获得一个API_ID_RESOURCE_CREATION接口,如下所示:
thunk::ResourceCreationAPI* PluginDispatcher::GetResourceCreationAPI() {
      return static_cast<ResourceCreationProxy*>(
          GetInterfaceProxy(API_ID_RESOURCE_CREATION));
    }
这个函数定义在文件external/chromium_org/ppapi/proxy/plugin_dispatcher.cc中。
PluginDispatcher类的成员函数GetResourceCreationAPI调用另外一个成员函数GetInterfaceProxy获得一个API_ID_RESOURCE_CREATION接口。PluginDispatcher类的成员函数GetInterfaceProxy是从父类Dispatcher继承下来的,在前面Chromium插件(Plugin)实例(Instance)创建过程分析一文中,我们已经分析过它的实现了。
结合前面Chromium插件(Plugin)模块(Module)加载过程分析一文,我们可以知道,在Plugin进程中,API_ID_RESOURCE_CREATION接口被指定为ResourceCreationProxy类的静态成员函数Create,Dispatcher类的成员函数GetInterfaceProxy将会调用这个函数创建一个ResourceCreationProxy对象,如下所示:
InterfaceProxy* ResourceCreationProxy::Create(Dispatcher* dispatcher) {
      return new ResourceCreationProxy(dispatcher);
    }
这个函数定义在文件external/chromium_org/ppapi/proxy/resource_creation_proxy.cc中。
参数dispatcher指向的是一个PluginDispatcher对象。这个PluginDispatcher对象就是在前面分析的PluginGlobals类的成员函数GetResourceCreationAPI中获取的PluginDispatcher对象。ResourceCreationProxy类的静态成员函数Create使用该PluginDispatcher对象创建了一个ResourceCreationProxy对象,并且返回给最初的调用者,也就是EnterResourceCreation类的构造函数。EnterResourceCreation类的构造函数又会将这个ResourceCreationProxy对象保存在成员变量functions_中。
这一步执行完成后,回到前面分析的函数Create中。这时候就它构造了一个EnterResourceCreation对象,并且这个EnterResourceCreation对象的成员变量functions_指向了一个ResourceCreationProxy对象。
函数Create接下来会调用上述EnterResourceCreation对象的成员函数functions它的成员变量functions_指向的ResourceCreationProxy对象。有了这个ResourceCreationProxy对象之后,就可以调用它的成员函数CreateGraphics3D请求Render进程为当前正在处理的Plugin Instance创建一个OpenGL上下文了。
ResourceCreationProxy类的成员函数CreateGraphics3D的实现如下所示:
PP_Resource ResourceCreationProxy::CreateGraphics3D(
        PP_Instance instance,
        PP_Resource share_context,
        const int32_t* attrib_list) {
      return PPB_Graphics3D_Proxy::CreateProxyResource(
          instance, share_context, attrib_list);
    }
这个函数定义在文件external/chromium_org/ppapi/proxy/resource_creation_proxy.cc中。
ResourceCreationProxy类的成员函数CreateGraphics3D调用PPB_Graphics3D_Proxy类的静态成员函数CreateProxyResource请求Render进程为当前正在处理的Plugin Instance创建一个OpenGL上下文,如下所示:
PP_Resource PPB_Graphics3D_Proxy::CreateProxyResource(
        PP_Instance instance,
        PP_Resource share_context,
        const int32_t* attrib_list) {
      PluginDispatcher* dispatcher = PluginDispatcher::GetForInstance(instance);
      ......

      HostResource share_host;
      gpu::gles2::GLES2Implementation* share_gles2 = NULL;
      if (share_context != 0) {
        EnterResourceNoLock<PPB_Graphics3D_API> enter(share_context, true);
        if (enter.failed())
          return PP_ERROR_BADARGUMENT;

        PPB_Graphics3D_Shared* share_graphics =
            static_cast<PPB_Graphics3D_Shared*>(enter.object());
        share_host = share_graphics->host_resource();
        share_gles2 = share_graphics->gles2_impl();
      }

      std::vector<int32_t> attribs;
      if (attrib_list) {
        for (const int32_t* attr = attrib_list;
             attr[0] != PP_GRAPHICS3DATTRIB_NONE;
             attr += 2) {
          attribs.push_back(attr[0]);
          attribs.push_back(attr[1]);
        }
      }
      attribs.push_back(PP_GRAPHICS3DATTRIB_NONE);

      HostResource result;
      dispatcher->Send(new PpapiHostMsg_PPBGraphics3D_Create(
          API_ID_PPB_GRAPHICS_3D, instance, share_host, attribs, &result));
      ......

      scoped_refptr<Graphics3D> graphics_3d(new Graphics3D(result));
      if (!graphics_3d->Init(share_gles2))
        return 0;
      return graphics_3d->GetReference();
    }
这个函数定义在文件external/chromium_org/ppapi/proxy/ppb_graphics_3d_proxy.cc中。
PPB_Graphics3D_Proxy类的静态成员函数CreateProxyResource首先调用PluginDispatcher类的静态成员函数GetForInstance获得与参数instance描述的Plugin Instance对应的一个PluginDispatcher对象。后面将会通过这个PluginDispatcher对象向Render进程发送一个类型为PpapiHostMsg_PPBGraphics3D_Create的IPC消息,用来请求Render进程创建一个OpenGL上下文了。
类型为PpapiHostMsg_PPBGraphics3D_Create的IPC消息传递了4个参数给Render进程,分别是:
- API_ID_PPB_GRAPHICS_3D,表示Render进程要将该IPC消息分发给API_ID_PPB_GRAPHICS_3D接口处理。
2. instance,描述要创建OpenGL上下文的Plugin Instance。
3. share_host,描述另外一个OpenGL上下文,新创建的OpenGL上下文要与它在同一个共享组中。
4. attribs,描述新创建的OpenGL上下文应具有的属性。
Render进程根据要求为目标Plugin Instance创建了一个OpenGL上下文之后,会为该OpenGL上下文分配一个ID,并且会将该ID返回给Plugin进程。Plugin进程再将这个ID封装在一个HostResource对象,然后将这个HostResource对象返回给PPB_Graphics3D_Proxy类的静态成员函数CreateProxyResource。
PPB_Graphics3D_Proxy类的静态成员函数CreateProxyResource再根据获得的HostResource对象创建一个ppapi::proxy::Graphics3D对象,并且调用它的成员函数Init对它进行初始化,相当于是对新创建的OpenGL上下文进行初始化。初始化完成后,就可以进行使用了。
新创建的Graphics3D对象初始化完成之后,PPB_Graphics3D_Proxy类的静态成员函数CreateProxyResource再调用它的成员函数GetReference获得一个类型为PP_Resource的引用。以后通过这个引用就可以使用该Graphics3D对象,也就是新创建的OpenGL上下文。
接下来,我们首先分析Render进程为目标Plugin Instance创建OpenGL上下文的过程,即处理类型为PpapiHostMsg_PPBGraphics3D_Create的IPC消息的过程,然后再分析新创建的OpenGL上下文在Plugin进程的初始化过程。
前面提到,Render进程会将类型为PpapiHostMsg_PPBGraphics3D_Create的IPC消息分发给API_ID_PPB_GRAPHICS_3D接口处理。从前面Chromium插件(Plugin)实例(Instance)创建过程分析一文可以知道,在Render进程中,API_ID_PPB_GRAPHICS_3D接口是由一个PPB_Graphics3D_Proxy对象实现的,也就是Render进程会将类型为PpapiHostMsg_PPBGraphics3D_Create的IPC消息分发给该PPB_Graphics3D_Proxy对象处理,这是通过调用它的成员函数OnMessageReceived实现的。
类型为PpapiHostMsg_PPBGraphics3D_Create的IPC消息在Render进程中的分发过程类似我们在前面Chromium插件(Plugin)实例(Instance)创建过程分析一文提到的类型为PpapiMsg_PPPInstance_DidCreate的IPC消息在Plugin进程中的分发过程,因此这里不再详细描述。
接下来我们继续分析PPB_Graphics3D_Proxy类的成员函数OnMessageReceived处理类型为PpapiHostMsg_PPBGraphics3D_Create的IPC消息的过程,如下所示:
bool PPB_Graphics3D_Proxy::OnMessageReceived(const IPC::Message& msg) {
      bool handled = true;
      IPC_BEGIN_MESSAGE_MAP(PPB_Graphics3D_Proxy, msg)
    #if !defined(OS_NACL)
        IPC_MESSAGE_HANDLER(PpapiHostMsg_PPBGraphics3D_Create,
                            OnMsgCreate)
        ......
    #endif  // !defined(OS_NACL)

        ......
        IPC_MESSAGE_UNHANDLED(handled = false)

      IPC_END_MESSAGE_MAP()
      // FIXME(brettw) handle bad messages!
      return handled;
    }
这个函数定义在文件external/chromium_org/ppapi/proxy/ppb_graphics_3d_proxy.cc中。
从这里可以看到,PPB_Graphics3D_Proxy类的成员函数OnMessageReceived将类型为PpapiHostMsg_PPBGraphics3D_Create的IPC消息分发给另外一个成员函数OnMsgCreate处理,如下所示:
void PPB_Graphics3D_Proxy::OnMsgCreate(PP_Instance instance,
                                           HostResource share_context,
                                           const std::vector<int32_t>& attribs,
                                           HostResource* result) {
      ......

      thunk::EnterResourceCreation enter(instance);

      if (enter.succeeded()) {
        result->SetHostResource(
          instance,
          enter.functions()->CreateGraphics3DRaw(instance,
                                                 share_context.host_resource(),
                                                 &attribs.front()));
      }
    }
这个函数定义在文件external/chromium_org/ppapi/proxy/ppb_graphics_3d_proxy.cc中。
参数instance要描述的是要创建OpenGL上下文的Plugin Instance在Render进程中对应的Proxy,也就是一个PepperPluginInstanceImpl对象。PPB_Graphics3D_Proxy类的成员函数OnMsgCreate首先是使用它构造一个EnterResourceCreation对象。前面提到,EnterResourceCreation类是用来封装资源创建接口API_ID_RESOURCE_CREATION的。因此,有了前面构造的EnterResourceCreation对象之后,PPB_Graphics3D_Proxy类的成员函数OnMsgCreate就可以使用API_ID_RESOURCE_CREATION接口来为参数instance描述的Plugin Instance创建一个OpenGL上下文了。
EnterResourceCreation对象在Render进程的构造过程与在Plugin进程的构造过程是不一样的。前面我们已经分析过EnterResourceCreation对象在Plugin进程的构造过程,接下来我们继续分析EnterResourceCreation对象在Render进程的构造过程,以便了解Render进程是如何实现API_ID_RESOURCE_CREATION接口的。
我们从EnterResourceCreation类的构造函数开始分析EnterResourceCreation对象在Render进程的构造过程,它的实现如下所示:
EnterResourceCreation::EnterResourceCreation(PP_Instance instance)
        : EnterBase(),
          functions_(PpapiGlobals::Get()->GetResourceCreationAPI(instance)) {
      ......
    }
这个函数定义在文件external/chromium_org/ppapi/thunk/enter.cc中。
在Render进程中,存在一个HostGlobals单例对象。这个HostGlobals单例对象可以通过调用PpapiGlobals类的静态成员函数Get获得。HostGlobals类与前面提到的PluginGlobals类一样,都是从PpapiGlobals类继承下来的。
获得上述HostGlobals单例对象之后,EnterResourceCreation类的构造函数就调用它的成员函数GetResourceCreationAPI获得一个API_ID_RESOURCE_CREATION接口,如下所示:
ppapi::thunk::ResourceCreationAPI* HostGlobals::GetResourceCreationAPI(
        PP_Instance pp_instance) {
      PepperPluginInstanceImpl* instance = GetInstance(pp_instance);
      if (!instance)
        return NULL;
      return &instance->resource_creation();
    }
这个函数定义在文件external/chromium_org/content/renderer/pepper/host_globals.cc中。
HostGlobals类的成员函数GetResourceCreationAPI首先调用成员函数GetInstance获得参数pp_instance描述的一个Plugin Instance Proxy,也就是一个PepperPluginInstanceImpl对象。有了这个PepperPluginInstanceImpl对象之后,就可以调用它的成员函数resource_creation获得一个API_ID_RESOURCE_CREATION接口,如下所示:
class CONTENT_EXPORT PepperPluginInstanceImpl
        : public base::RefCounted<PepperPluginInstanceImpl>,
          public NON_EXPORTED_BASE(PepperPluginInstance),
          public ppapi::PPB_Instance_Shared,
          public NON_EXPORTED_BASE(cc::TextureLayerClient),
          public RenderFrameObserver {
     public:
      ......

      ppapi::thunk::ResourceCreationAPI& resource_creation() {
        return *resource_creation_.get();
      }

      ......

     private:
      ......

      scoped_ptr<ppapi::thunk::ResourceCreationAPI> resource_creation_;

      ......
    };
这个函数定义在文件external/chromium_org/content/renderer/pepper/pepper_plugin_instance_impl.h中。
PepperPluginInstanceImpl类的成员变量resource_creation_指向的是一个PepperInProcessResourceCreation对象。PepperPluginInstanceImpl类的成员函数resource_creation将这个PepperInProcessResourceCreation对象返回给调用者。这意味在Render进程中,API_ID_RESOURCE_CREATION接口是通过PepperInProcessResourceCreation类实现的。
这一步执行完成后,回到前面分析的PPB_Graphics3D_Proxy类的成员函数OnMsgCreate中。这时候就它构造了一个EnterResourceCreation对象,并且这个EnterResourceCreation对象的成员变量functions_指向了一个PepperInProcessResourceCreation对象。
PPB_Graphics3D_Proxy类的成员函数OnMsgCreate接下来会调用上述EnterResourceCreation对象的成员函数functions它的成员变量functions_指向的PepperInProcessResourceCreation对象。有了这个PepperInProcessResourceCreation对象之后,就可以调用它的成员函数CreateGraphics3DRaw为参数pp_instance描述的Plugin Instance创建一个OpenGL上下文。
PepperInProcessResourceCreation类的成员函数CreateGraphics3DRaw是从父类ResourceCreationImpl继承下来的,它的实现如下所示:
PP_Resource ResourceCreationImpl::CreateGraphics3DRaw(
        PP_Instance instance,
        PP_Resource share_context,
        const int32_t* attrib_list) {
      return PPB_Graphics3D_Impl::CreateRaw(instance, share_context, attrib_list);
    }
这个函数定义在文件external/chromium_org/content/renderer/pepper/resource_creation_impl.cc中。
ResourceCreationImpl类的成员函数CreateGraphics3DRaw调用PPB_Graphics3D_Impl类的静态成员函数CreateRaw为参数pp_instance描述的Plugin Instance创建一个OpenGL上下文,如下所示:
PP_Resource PPB_Graphics3D_Impl::CreateRaw(PP_Instance instance,
                                               PP_Resource share_context,
                                               const int32_t* attrib_list) {
      PPB_Graphics3D_API* share_api = NULL;
      if (share_context) {
        EnterResourceNoLock<PPB_Graphics3D_API> enter(share_context, true);
        if (enter.failed())
          return 0;
        share_api = enter.object();
      }
      scoped_refptr<PPB_Graphics3D_Impl> graphics_3d(
          new PPB_Graphics3D_Impl(instance));
      if (!graphics_3d->InitRaw(share_api, attrib_list))
        return 0;
      return graphics_3d->GetReference();
    }
这个函数定义在文件external/chromium_org/content/renderer/pepper/ppb_graphics_3d_impl.cc中。
在Render进程中,Plugin使用的OpenGL上下文通过一个PPB_Graphics3D_Impl对象描述。因此,PPB_Graphics3D_Impl类的静态成员函数CreateRaw会创建一个PPB_Graphics3D_Impl对象,并且调用它的成员函数InitRaw对它进行初始化,也就是对它描述的OpenGL上下文进行初始化。初始化完成后,就会获得它的一个PP_Resource引用。这个引用将会返回给Plugin进程。Plugin进程以后就可以通过这个引用来使用前面创建出来的OpenGL上下文了。
接下来我们继续分析Render进程为Plugin创建的OpenGL上下文的初始化过程,也就是PPB_Graphics3D_Impl类的成员函数InitRaw的实现,如下所示:
bool PPB_Graphics3D_Impl::InitRaw(PPB_Graphics3D_API* share_context,
                                      const int32_t* attrib_list) {
      ......

      RenderThreadImpl* render_thread = RenderThreadImpl::current();
      ......

      channel_ = render_thread->EstablishGpuChannelSync(
          CAUSE_FOR_GPU_LAUNCH_PEPPERPLATFORMCONTEXT3DIMPL_INITIALIZE);
      ......

      command_buffer_ = channel_->CreateOffscreenCommandBuffer(
          surface_size, share_buffer, attribs, GURL::EmptyGURL(), gpu_preference);
      ......

      return true;
    }
这个函数定义在文件external/chromium_org/content/renderer/pepper/ppb_graphics_3d_impl.cc中。
PPB_Graphics3D_Impl类的成员函数InitRaw首先调用RenderThreadImpl类的静态成员函数current获得一个RenderThreadImpl对象。这个RenderThreadImpl对象描述的是当前Render进程的Render线程。有了这个RenderThreadImpl对象之后,就可以调用它的成员函数EstablishGpuChannelSync创建一个GPU通道,也就是一个GpuChannelHost对象。这个GPU通道的详细创建过程,可以参考前面Chromium的GPU进程启动过程分析一文。
PPB_Graphics3D_Impl类的成员函数InitRaw接下来又会调用前面创建出来的GpuChannelHost对象的成员函数CreateOffscreenCommandBuffer请求GPU进程为其创建一个离屏渲染类型的OpenGL上下文。这个离屏渲染类型的OpenGL上下文是通过一个CommandBufferProxyImpl对象描述的。Render进程请求GPU进程创建OpenGL上下文的过程,可以参考前面Chromium硬件加速渲染的OpenGL上下文创建过程分析一文。以后Plugin执行GPU命令时,将会作用在上述离屏渲染的OpenGL上下文中。
这一步执行完成后,Render进程就为Plugin创建了一个OpenGL上下文。这个OpenGL上下文通过一个PPB_Graphics3D_Impl对象描述。这个PPB_Graphics3D_Impl对象会被分配一个ID,并且这个ID会返回给Plugin进程。如前所述,Plugin进程获得了这个ID之后,就会将其封装在一个Graphics3D对象中。这个Graphics3D对象是用来Plugin进程描述一个OpenGL上下文的。
回到前面分析的PPB_Graphics3D_Proxy类的成员函数CreateProxyResource中,这时候它就获得了一个OpenGL上下文之后。这个OpenGL上下文在Plugin进程中同样需要进行初始化。如前所述,这是通过调用ppapi::proxy::Graphics3D类的成员函数Init实现的。接下我们就继续分析Plugin进程初始化一个OpenGL上下文的过程,也就是分析ppapi::proxy::Graphics3D类的成员函数Init的实现,如下所示:
bool Graphics3D::Init(gpu::gles2::GLES2Implementation* share_gles2) {
      ......

      command_buffer_.reset(
          new PpapiCommandBufferProxy(host_resource(), dispatcher));

      return CreateGLES2Impl(kCommandBufferSize, kTransferBufferSize,
                             share_gles2);
    }
这个函数定义在文件external/chromium_org/ppapi/proxy/ppb_graphics_3d_proxy.cc中。
ppapi::proxy::Graphics3D类的成员函数Init首先会创建一个PpapiCommandBufferProxy对象。这个PpapiCommandBufferProxy对象是用来与前面在Render进程中创建的CommandBufferProxyImpl对象通信的,也就是前者会将提交给它的GPU命令转发给后者处理,后者又会将接收到的GPU命令发送给GPU进程执行。
ppapi::proxy::Graphics3D类的成员函数Init接下来又会调用成员函数CreateGLES2Impl根据上述PpapiCommandBufferProxy对象创建一个Command Buffer GL接口。有了这个Command Buffer GL接口之后,Plugin就可以调用它提供的OpenGL函数执行3D渲染了。
ppapi::proxy::Graphics3D类的成员函数CreateGLES2Impl是从父类PPB_Graphics3D_Shared继承下来的,它的实现如下所示:
bool PPB_Graphics3D_Shared::CreateGLES2Impl(
        int32 command_buffer_size,
        int32 transfer_buffer_size,
        gpu::gles2::GLES2Implementation* share_gles2) {
      gpu::CommandBuffer* command_buffer = GetCommandBuffer();
      DCHECK(command_buffer);

      // Create the GLES2 helper, which writes the command buffer protocol.
      gles2_helper_.reset(new gpu::gles2::GLES2CmdHelper(command_buffer));
      if (!gles2_helper_->Initialize(command_buffer_size))
        return false;

      // Create a transfer buffer used to copy resources between the renderer
      // process and the GPU process.
      const int32 kMinTransferBufferSize = 256 * 1024;
      const int32 kMaxTransferBufferSize = 16 * 1024 * 1024;
      transfer_buffer_.reset(new gpu::TransferBuffer(gles2_helper_.get()));
      ......

      // Create the object exposing the OpenGL API.
      gles2_impl_.reset(new gpu::gles2::GLES2Implementation(
          gles2_helper_.get(),
          share_gles2 ? share_gles2->share_group() : NULL,
          transfer_buffer_.get(),
          bind_creates_resources,
          lose_context_when_out_of_memory,
          GetGpuControl()));

      if (!gles2_impl_->Initialize(
               transfer_buffer_size,
               kMinTransferBufferSize,
               std::max(kMaxTransferBufferSize, transfer_buffer_size),
               gpu::gles2::GLES2Implementation::kNoLimit)) {
        return false;
      }

      ......

      return true;
    }
这个函数定义在文件external/chromium_org/ppapi/shared_impl/ppb_graphics_3d_shared.cc。
在Chromium中,Command Buffer GL接口是通过GLES2Implementation类描述的。因此,PPB_Graphics3D_Shared类的成员函数CreateGLES2Impl将会创建一个GLES2Implementation对象,并且保存在成员变量gles2_impl_中。
创建这个GLES2Implementation对象需要一个Command Buffer和一个Transfer Buffer。前者通过一个GLES2CmdHelper对象描述,后者通过一个TransferBuffer对象描述的。在创建GLES2CmdHelper对象的过程中,又需要用到前面创建的一个PpapiCommandBufferProxy对象,以便可以将Plugin要执行的GPU命令转发给Render进程处理。这个PpapiCommandBufferProxy对象可以通过调用PPB_Graphics3D_Shared类的成员函数GetCommandBuffer获得。关于Command Buffer GL接口的创建和使用,可以参考前面Chromium硬件加速渲染的OpenGL命令执行过程分析一文。
这一步执行完成后,回到前面分析的GLES2DemoInstance类的成员函数InitGL中,这时候它就创建了一个OpenGL上下文,并且这个OpenGL上下文已经初始化完成。接下来,GLES2DemoInstance类的成员函数InitGL会将前面创建出来的OpenGL上下文绑定到当前正在处理的Plugin Instance中去。执行了这个操作之后,Plugin Instance才可以在该OpenGL上下文中执行GPU命令。
给一个Plugin Instance绑定OpenGL上下文是通过调用pp::Instance类的成员函数BindGraphics实现的,如下所示:
bool Instance::BindGraphics(const Graphics3D& graphics) {
      if (!has_interface<PPB_Instance_1_0>())
        return false;
      return PP_ToBool(get_interface<PPB_Instance_1_0>()->BindGraphics(
          pp_instance(), graphics.pp_resource()));
    }
这个函数定义在文件external/chromium_org/ppapi/cpp/instance.cc中。
pp::Instance类的成员函数BindGraphics需要通过PPB_INSTANCE_INTERFACE_1_0接口为当前正在处理的Plugin Instance绑定一个OpenGL上下文。这个OpenGL上下文由参数graphics指向的一个Graphics3D对象描述。
因此,pp::Instance类的成员函数BindGraphics首先会检查当前的Plugin进程是否支持PPB_INSTANCE_INTERFACE_1_0接口。如果支持的话,那么就会通过一个模板函数get_interface
template <typename T> inline T const* get_interface() {
      static T const* funcs = reinterpret_cast<T const*>(
          pp::Module::Get()->GetBrowserInterface(interface_name<T>()));
      return funcs;
    }
这个模板函数定义在文件external/chromium_org/ppapi/cpp/module_impl.h中。
这里的模板参数T为PPB_Instance_1_0,展开后得到模板函数get_interface
inline PPB_Instance_1_0 const* get_interface() {
      static PPB_Instance_1_0 const* funcs = reinterpret_cast<PPB_Instance_1_0 const*>(
          pp::Module::Get()->GetBrowserInterface(interface_name<PPB_Instance_1_0>()));
      return funcs;
    }
它首先会调用另外一个模板函数interface_name
我们首先分析模板函数interface_name
template <> const char* interface_name<PPB_Instance_1_0>() {
      return PPB_INSTANCE_INTERFACE_1_0;
    }
这个函数定义在文件external/chromium_org/ppapi/cpp/instance.cc中。
从这里可以看到,要获取的接口名称为PPB_INSTANCE_INTERFACE_1_0,也就我们要获取的是PPB_INSTANCE_INTERFACE_1_0接口。这个接口可以通过调用前面获得的pp::Module单例对象的GetBrowserInterface获得。
在前面Chromium插件(Plugin)模块(Module)加载过程分析一文中,我们已经分析过了pp::Module类的GetBrowserInterface的实现,并且我们也知道,在Plugin进程中,PPB_INSTANCE_INTERFACE_1_0接口是由一个PPB_Instance_1_0对象实现的。这个PPB_Graphics3D_1_0对象的定义如下所示:
const PPB_Instance_1_0 g_ppb_instance_thunk_1_0 = {
      &BindGraphics,
      &IsFullFrame
    };
这个对象定义在文件external/chromium_org/ppapi/thunk/ppb_instance_thunk.cc中。
这个PPB_Instance_1_0对象的成员变量BindGraphics是一个函数指针。这个函数指针指向了函数BindGraphics。这个函数也是定义在文件ppb_instance_thunk.cc中。
回到pp::Instance类的成员函数BindGraphics中,现在我们就可以知道,它实际上是通过调用上述函数BindGraphics请求Render进程为当前正在处理的Plugin绑定一个OpenGL上下文的,如下所示:
PP_Bool BindGraphics(PP_Instance instance, PP_Resource device) {
      ......
      EnterInstance enter(instance);
      ......
      return enter.functions()->BindGraphics(instance, device);
    }
这个函数定义在文件external/chromium_org/ppapi/thunk/ppb_instance_thunk.cc中。
函数BindGraphics需要通过另外一个接口API_ID_PPB_INSTANCE向Render进程发送一个IPC消息,以便请求后者为参数instance描述的Plugin Instance绑定另外一个参数device描述的OpenGL上下文。
函数BindGraphics是通过EnterInstance类来使用接口API_ID_RESOURCE_CREATION,因此它首先会构造一个EnterInstance对象,如下所示:
EnterInstance::EnterInstance(PP_Instance instance)
        : EnterBase(),
          functions_(PpapiGlobals::Get()->GetInstanceAPI(instance)) {
      ......
    }
这个函数定义在文件external/chromium_org/ppapi/thunk/enter.cc中。
前面提到,在Plugin进程中,存在一个PluginGlobals单例对象。这个PluginGlobals单例对象可以通过调用PpapiGlobals类的静态成员函数获得。获得了这个PluginGlobals单例对象之后,EnterInstance类的构造函数就调用它的成员函数GetInstanceAPI获得一个API_ID_PPB_INSTANCE接口,如下所示:
thunk::PPB_Instance_API* PluginGlobals::GetInstanceAPI(PP_Instance instance) {
      PluginDispatcher* dispatcher = PluginDispatcher::GetForInstance(instance);
      if (dispatcher)
        return dispatcher->GetInstanceAPI();
      return NULL;
    }
这个函数定义在文件external/chromium_org/ppapi/proxy/plugin_globals.cc中。
PluginGlobals类的成员函数GetInstanceAPI首先调用PluginDispatcher类的静态成员函数GetForInstance获得一个与参数instance描述的Plugin Instance对应的PluginDispatcher对象。有了这个PluginDispatcher对象之后,再调用它的成员函数GetInstanceAPI获得一个API_ID_PPB_INSTANCE接口,如下所示:
thunk::PPB_Instance_API* PluginDispatcher::GetInstanceAPI() {
      return static_cast<PPB_Instance_Proxy*>(
          GetInterfaceProxy(API_ID_PPB_INSTANCE));
    }
这个函数定义在文件external/chromium_org/ppapi/proxy/plugin_dispatcher.cc中。
PluginDispatcher类的成员函数GetInstanceAPI调用另外一个成员函数GetInterfaceProxy获得一个API_ID_PPB_INSTANCE接口。PluginDispatcher类的成员函数GetInterfaceProxy是从父类Dispatcher继承下来的。Dispatcher类的成员函数GetInterfaceProxy的实现,可以参考前面Chromium插件(Plugin)实例(Instance)创建过程分析一文中。
再结合前面Chromium插件(Plugin)模块(Module)加载过程分析一文,我们可以知道,在Plugin进程中,API_ID_PPB_INSTANCE接口被指定为模板函数ProxyFactory
回到前面分析的函数BindGraphics,这时候就它构造了一个EnterInstance对象,并且这个EnterInstance对象的成员变量functions_指向了一个PPB_Instance_Proxy对象。这个PPB_Instance_Proxy对象可以通过调用上述构造的EnterInstance对象的成员函数functions获得。有了这个PPB_Instance_Proxy对象之后,函数BindGraphics就可以调用它的成员函数BindGraphics向Render进程发送一个IPC消息,以便请求它为当前正在处理的Plugin绑定一个OpenGL上下文,如下所示:
PP_Bool PPB_Instance_Proxy::BindGraphics(PP_Instance instance,
                                             PP_Resource device) {
      // If device is 0, pass a null HostResource. This signals the host to unbind
      // all devices.
      HostResource host_resource;
      PP_Resource pp_resource = 0;
      if (device) {
        Resource* resource =
            PpapiGlobals::Get()->GetResourceTracker()->GetResource(device);
        if (!resource || resource->pp_instance() != instance)
          return PP_FALSE;
        host_resource = resource->host_resource();
        pp_resource = resource->pp_resource();
      } else {
        // Passing 0 means unbinding all devices.
        dispatcher()->Send(new PpapiHostMsg_PPBInstance_BindGraphics(
            API_ID_PPB_INSTANCE, instance, 0));
        return PP_TRUE;
      }

      // We need to pass different resource to Graphics 2D and 3D right now.  Once
      // 3D is migrated to the new design, we should be able to unify this.
      EnterResourceNoLock<PPB_Compositor_API> enter_compositor(device, false);
      EnterResourceNoLock<PPB_Graphics2D_API> enter_2d(device, false);
      EnterResourceNoLock<PPB_Graphics3D_API> enter_3d(device, false);
      if (enter_compositor.succeeded() || enter_2d.succeeded()) {
        dispatcher()->Send(new PpapiHostMsg_PPBInstance_BindGraphics(
            API_ID_PPB_INSTANCE, instance, pp_resource));
        return PP_TRUE;
      } else if (enter_3d.succeeded()) {
        dispatcher()->Send(new PpapiHostMsg_PPBInstance_BindGraphics(
            API_ID_PPB_INSTANCE, instance, host_resource.host_resource()));
        return PP_TRUE;
      }
      return PP_FALSE;
    }
这个函数定义在文件external/chromium_org/ppapi/proxy/ppb_instance_proxy.cc中。
PPB_Instance_Proxy类的成员函数BindGraphics首先判断参数device的值是否不等于NULL。如果不等于NULL,那么它描述的就是一个OpenGL上下文,并且这个OpenGL上下文要与参数instance描述的Plugin Instance进行绑定。否则的话,就说明要将参数instance描述的Plugin Instance当前使用的OpenGL上下文设置为NULL。
在我们这个情景中,参数device的值不等于NULL。在这种情况下,PPB_Instance_Proxy类的成员函数BindGraphics首先会根据这个参数获得一个Resource对象。这个Resource对象描述的就是一个OpenGL上下文。这个OpenGL上下文可能是用来执行2D渲染的,也可能是用来执行3D渲染的。PPB_Instance_Proxy类的成员函数BindGraphics会对这两种情况进行区别,不过最终都会向Render进程发送一个类型为PpapiHostMsg_PPBInstance_BindGraphics的IPC消息。这个IPC消息携带了3个参数:
-
API_ID_PPB_INSTANCE,要求Render进程将该IPC消息分发给API_ID_PPB_INSTANCE接口处理。
- instance,表示目标Plugin Instance。
3. 通过参数device获得一个PP_Resource对象,描述的是一个要与目标Plugin Instance进行绑定的OpenGL上下文。
Render进程接收类型为PpapiHostMsg_PPBInstance_BindGraphics的IPC消息的过程与前面分析的类型为PpapiHostMsg_PPBGraphics3D_Create的IPC消息是类似的,只不过前者最后会分发给API_ID_PPB_INSTANCE接口处理,而后者会分发给API_ID_PPB_GRAPHICS_3D接口处理。它们在Render进程的分发过程都可以参考在前面Chromium插件(Plugin)实例(Instance)创建过程分析一文提到的类型为PpapiMsg_PPPInstance_DidCreate的IPC消息在Plugin进程的分发过程。
从前面Chromium插件(Plugin)实例(Instance)创建过程分析一文还可以知道,在Render进程中,API_ID_PPB_INSTANCE接口是由一个PPB_Instance_Proxy对象实现的,也就是Render进程会将类型为PpapiHostMsg_PPBInstance_BindGraphics的IPC消息分发给该PPB_Instance_Proxy对象处理,这是通过调用它的成员函数OnMessageReceived实现的,如下所示:
bool PPB_Instance_Proxy::OnMessageReceived(const IPC::Message& msg) {
      ......

      bool handled = true;
      IPC_BEGIN_MESSAGE_MAP(PPB_Instance_Proxy, msg)
    #if !defined(OS_NACL)
        ......
        IPC_MESSAGE_HANDLER(PpapiHostMsg_PPBInstance_BindGraphics,
                            OnHostMsgBindGraphics)
        ......
    #endif  // !defined(OS_NACL)

        ......

        IPC_MESSAGE_UNHANDLED(handled = false)
      IPC_END_MESSAGE_MAP()
      return handled;
    }
这个函数定义在文件external/chromium_org/ppapi/proxy/ppb_instance_proxy.cc中。
从这里可以看到,PPB_Instance_Proxy类的成员函数OnMessageReceived会将类型为PpapiHostMsg_PPBInstance_BindGraphics的IPC消息分发给另外一个成员函数OnHostMsgBindGraphics处理,如下所示:
void PPB_Instance_Proxy::OnHostMsgBindGraphics(PP_Instance instance,
                                                   PP_Resource device) {
      // Note that we ignroe the return value here. Otherwise, this would need to
      // be a slow sync call, and the plugin side of the proxy will have already
      // validated the resources, so we shouldn't see errors here that weren't
      // already caught.
      EnterInstanceNoLock enter(instance);
      if (enter.succeeded())
        enter.functions()->BindGraphics(instance, device);
    }
这个函数定义在文件external/chromium_org/ppapi/proxy/ppb_instance_proxy.cc中。
参数instance要描述的是要绑定OpenGL上下文的Plugin Instance在Render进程中对应的Proxy,也就是一个PepperPluginInstanceImpl对象。PPB_Instance_Proxy类的成员函数OnHostMsgBindGraphics首先是使用它构造一个EnterInstanceNoLock对象。这个EnterInstanceNoLock对象是用来封装一个Instance API的。这个Instance API可以用来给一个Plugin Instance Proxy绑定一个OpenGL上下文。
接下来我们从EnterInstanceNoLock类的构造函数开始分析一个EnterInstanceNoLock对象的构造过程,如下所示:
EnterInstanceNoLock::EnterInstanceNoLock(PP_Instance instance)
        : EnterBase(),
          functions_(PpapiGlobals::Get()->GetInstanceAPI(instance)) {
      ......
    }
这个函数定义在文件external/chromium_org/ppapi/thunk/enter.cc中。
前面提到,在Render进程中,存在一个HostGlobals单例对象。这个HostGlobals单例对象可以通过调用PpapiGlobals类的静态成员函数Get获得。获得了这个HostGlobals单例对象之后,EnterInstanceNoLock类的构造函数就调用它的成员函数GetInstanceAPI获得一个Instance API,如下所示:
ppapi::thunk::PPB_Instance_API* HostGlobals::GetInstanceAPI(
        PP_Instance instance) {
      // The InstanceAPI is just implemented by the PluginInstance object.
      return GetInstance(instance);
    }
这个函数定义在文件external/chromium_org/content/renderer/pepper/host_globals.cc中。
HostGlobals类的成员函数GetInstanceAPI调用另外一个成员函数GetInstance获得参数instance描述的一个Plugin Instance Proxy,也就是一个PepperPluginInstanceImpl对象,如下所示:
PepperPluginInstanceImpl* HostGlobals::GetInstance(PP_Instance instance) {
      ......
      InstanceMap::iterator found = instance_map_.find(instance);
      if (found == instance_map_.end())
        return NULL;
      return found->second;
    }
这个函数定义在文件external/chromium_org/content/renderer/pepper/host_globals.cc。
在Render进程中,每一个Plugin Instance Proxy都会以分配给它的ID保存在HostGlobals类的成员变量instance_map_描述的一个std::map中。因此,给出一个ID,就可以在这个std::map中找到它对应的Plugin Instance Proxy,也就是一个PepperPluginInstanceImpl对象。
在Render进程中,Instance API是通过PPB_Instance_API类描述的。PepperPluginInstanceImpl类又是从PPB_Instance_API类继承下来的。因此,一个PepperPluginInstanceImpl对象可以当作一个Instance API使用。这个PepperPluginInstanceImpl对象将会返回给EnterInstanceNoLock类的构造函数,并且保存在EnterInstanceNoLock类的成员变量functions_中。
这一步执行完成后,回到前面分析的PPB_Instance_Proxy类的成员函数OnMessageReceived中。这时候就它构造了一个EnterInstanceNoLock对象,并且这个EnterInstanceNoLock对象的成员变量functions_指向了一个PepperInProcessResourceCreation对象。注意,这个PepperPluginInstanceImpl对象在用作Instance API的同时,也是即将要绑定OpenGL上下文的Plugin Instance Proxy。这个绑定操作是通过调用它的成员函数BindGraphics实现的,如下所示:
PP_Bool PepperPluginInstanceImpl::BindGraphics(PP_Instance instance,
                                                   PP_Resource device) {
      ......

      scoped_refptr<ppapi::Resource> old_graphics = bound_graphics_3d_.get();
      if (bound_graphics_3d_.get()) {
        bound_graphics_3d_->BindToInstance(false);
        bound_graphics_3d_ = NULL;
      }
      if (bound_graphics_2d_platform_) {
        bound_graphics_2d_platform_->BindToInstance(NULL);
        bound_graphics_2d_platform_ = NULL;
      }
      if (bound_compositor_) {
        bound_compositor_->BindToInstance(NULL);
        bound_compositor_ = NULL;
      }

      ......

      const ppapi::host::PpapiHost* ppapi_host =
          RendererPpapiHost::GetForPPInstance(instance)->GetPpapiHost();
      ppapi::host::ResourceHost* host = ppapi_host->GetResourceHost(device);
      PepperGraphics2DHost* graphics_2d = NULL;
      PepperCompositorHost* compositor = NULL;
      if (host) {
        if (host->IsGraphics2DHost()) {
          graphics_2d = static_cast<PepperGraphics2DHost*>(host);
        } else if (host->IsCompositorHost()) {
          compositor = static_cast<PepperCompositorHost*>(host);
        }
        ......
      }

      EnterResourceNoLock enter_3d(device, false);
      PPB_Graphics3D_Impl* graphics_3d =
          enter_3d.succeeded()
              ? static_cast(enter_3d.object())
              : NULL;

      if (compositor) {
        if (compositor->BindToInstance(this)) {
          bound_compositor_ = compositor;
          ......
          return PP_TRUE;
        }
      } else if (graphics_2d) {
        if (graphics_2d->BindToInstance(this)) {
          bound_graphics_2d_platform_ = graphics_2d;
          ......
          return PP_TRUE;
        }
      } else if (graphics_3d) {
        // Make sure graphics can only be bound to the instance it is
        // associated with.
        if (graphics_3d->pp_instance() == pp_instance() &&
            graphics_3d->BindToInstance(true)) {
          bound_graphics_3d_ = graphics_3d;
          ......
          return PP_TRUE;
        }
      }

      // The instance cannot be bound or the device is not a valid resource type.
      return PP_FALSE;
    }
这个函数定义在文件external/chromium_org/content/renderer/pepper/pepper_plugin_instance_impl.cpp。
Plugin Instance不仅可以将UI渲染在一个2D上下文或者一个3D上下文中,还可以渲染在一个Compositor上下文中。一个2D上下文和一个3D上下文描述的都只是一个Layer,而一个Compositor上下文可以描述多个Layer。也就是说,Plugin Instance可以通过Compositor上下文将自己的UI划分为多个Layer进行渲染。Chromium提供了一个PPB_COMPOSITOR_INTERFACE_0_1接口,Plugin Instance可以通过这个接口为自己创建一个Compositor上下文。
其中,2D上下文通过一个PepperGraphics2DHost类描述,3D上下文通过PPB_Graphics3D_Impl类描述,而Compositor上下文通过PepperCompositorHost类描述。PepperPluginInstanceImpl类分别通过bound_graphics_2dplatform、bound_graphics_3d_和bound_compositor_三个成员变量描述上述三种不同的绘图上下文。
PepperPluginInstanceImpl类的成员函数BindGraphics主要做的工作就是将参数device描述的绘图上下文绑定为当前正在处理的Plugin Instance Proxy的绘图上下文。如果当前正在处理的Plugin Instance Proxy以前绑定过其它的绘图上下文,那么PepperPluginInstanceImpl类的成员函数BindGraphics就会先解除对它们的绑定。
PepperPluginInstanceImpl类的成员函数BindGraphics接下来再判断参数device描述的绘图上下文是2D上下文、3D上下文,还是Compositor上下文,并且获取它所对应的PepperGraphics2DHost对象、PPB_Graphics3D_Impl对象和PepperCompositorHost对象,然后保存在对应的成员变量中。这样,当前正在处理的Plugin Instance Proxy就知道了自己最新绑定的绘图上下文是什么。最后,这些获得的PepperGraphics2DHost对象、PPB_Graphics3D_Impl对象和PepperCompositorHost对象的成员函数BindToInstance也会被调用,表示它们当前处于被绑定状态。
在我们这个情景中,参数device描述的绘图上下文是一个3D上下文,也就是一个3D的OpenGL上下文。因此, PepperPluginInstanceImpl类的成员函数BindGraphics最终会获得一个PPB_Graphics3D_Impl对象,并且保存在成员变量bound_graphics_3d_中。最后,这个PPB_Graphics3D_Impl对象的成员函数BindToInstance会被调用,表示它当前处于被绑定的状态,如下所示:
bool PPB_Graphics3D_Impl::BindToInstance(bool bind) {
      bound_to_instance_ = bind;
      return true;
    }
这个函数定义在文件external/chromium_org/content/renderer/pepper/ppb_graphics_3d_impl.cc中。
从前面的调用过程可以知道,参数bind的值等于true。这时候PPB_Graphics3D_Impl类的成员变量bound_to_instance_的值也会被设置为true,表示当前正在处理的PPB_Graphics3D_Impl对象描述的3D上下文处于被绑定状态。
这一步执行完成后,GLES2DemoInstance类就通过PPB_GRAPHICS_3D_INTERFACE_1_0和PPB_INSTANCE_INTERFACE_1_0这两个接口创建和绑定了一个OpenGL上下文,也就是初始化好一个OpenGL环境。接下来,GLES2DemoInstance类就可以通过PPB_OPENGLES2_INTERFACE接口进行3D渲染了。这个PPB_OPENGLES2_INTERFACE接口是在GLES2DemoInstance类的构造函数中获取的,如下所示:
GLES2DemoInstance::GLES2DemoInstance(PP_Instance instance, pp::Module* module)
        : pp::Instance(instance), pp::Graphics3DClient(this),
          callback_factory_(this),
          module_(module),
          context_(NULL),
          fullscreen_(false) {
      assert((gles2_if_ = static_cast<const PPB_OpenGLES2*>(
          module->GetBrowserInterface(PPB_OPENGLES2_INTERFACE))));
      ......
    }
这个函数定义在文件external/chromium_org/ppapi/examples/gles2/gles2.cc中。
GLES2DemoInstance类的构造函数是通过调用参数module指向的一个pp::Module对象的成员函数GetBrowserInterface获取PPB_OPENGLES2_INTERFACE接口的。在前面Chromium插件(Plugin)模块(Module)加载过程分析一文中,我们已经分析过了pp::Module类的GetBrowserInterface的实现,并且我们也知道,在Plugin进程中,PPB_OPENGLES2_INTERFACE接口是由一个PPB_OpenGLES2对象实现的。这个PPB_OpenGLES2对象的定义如下所示:
  static const struct PPB_OpenGLES2 ppb_opengles2 = {
          &ActiveTexture,                       &AttachShader,
          &BindAttribLocation,                  &BindBuffer,
          &BindFramebuffer,                     &BindRenderbuffer,
          &BindTexture,                         &BlendColor,
          &BlendEquation,                       &BlendEquationSeparate,
          &BlendFunc,                           &BlendFuncSeparate,
          &BufferData,                          &BufferSubData,
          &CheckFramebufferStatus,              &Clear,
          ......
          &UseProgram,                          &ValidateProgram,
          &VertexAttrib1f,                      &VertexAttrib1fv,
          &VertexAttrib2f,                      &VertexAttrib2fv,
          &VertexAttrib3f,                      &VertexAttrib3fv,
          &VertexAttrib4f,                      &VertexAttrib4fv,
          &VertexAttribPointer,                 &Viewport};
这个对象定义在文件这个函数定义在文件external/chromium_org/ppapi/shared_impl/ppb_opengles2_shared.cc中。
从这里我们就可以看到PPB_OPENGLES2_INTERFACE接口提供的函数,例如函数Clear,就相当于是OpenGL函数glClear。
有了这个PPB_OPENGLES2_INTERFACE接口之后,GLES2DemoInstance类就会在成员函数FlickerAndPaint中调用它提供的函数进行3D渲染,如下所示:
void GLES2DemoInstance::FlickerAndPaint(int32_t result, bool paint_blue) {
      ......

      float r = paint_blue ? 0 : 1;
      float g = 0;
      float b = paint_blue ? 1 : 0;
      float a = 0.75;
      gles2_if_->ClearColor(context_->pp_resource(), r, g, b, a);
      gles2_if_->Clear(context_->pp_resource(), GL_COLOR_BUFFER_BIT);
      ......

      context_->SwapBuffers(cb);
      ......
    }
这个函数定义在文件external/chromium_org/ppapi/examples/gles2/gles2.cc中。
GLES2DemoInstance类的成员函数FlickerAndPaint执行的3D渲染很简单,仅仅是调用PPB_OPENGLES2_INTERFACE接口提供的函数ClearColor和Clear绘制一个背景色,相当于是调用了OpenGL函数glClearColor和glClear绘制一个背景色。在实际开发中,我们可以调用PPB_OPENGLES2_INTERFACE接口提供的其它函数完成更复杂的3D渲染效果。
从前面的分析可以知道,GLES2DemoInstance类的成员变量context_指向的是一个pp::Graphics3D对象。这个Graphics3D描述的是一个OpenGL上下文。每完成一帧渲染,GLES2DemoInstance类的成员函数FlickerAndPaint都需要调用这个pp::Graphics3D对象的成员函数SwapBuffers,用来交换当前使用的OpenGL上下文的前后两个缓冲区,相当于是调用了EGL函数eglSwapBuffers。
接下来,我们就以PPB_OPENGLES2_INTERFACE接口提供的函数Clear的执行过程为例,分析Plugin是如何通过PPB_OPENGLES2_INTERFACE接口执行3D渲染操作的,它的实现如下所示:
void Clear(PP_Resource context_id, GLbitfield mask) {
      Enter3D enter(context_id, true);
      if (enter.succeeded()) {
        ToGles2Impl(&enter)->Clear(mask);
      }
    }
这个函数定义在文件external/chromium_org/ppapi/shared_impl/ppb_opengles2_shared.cc中。
Enter3D定义为一个thunk::EnterResource
typedef thunk::EnterResource<thunk::PPB_Graphics3D_API> Enter3D;这个类定义在文件external/chromium_org/ppapi/shared_impl/ppb_opengles2_shared.cc中。
回到函数Clear中, 它的参数context_id描述的是一个OpenGL上下文资源ID。函数Clear首先将这个资源ID封装在一个EnterResource
template<typename ResourceT, bool lock_on_entry = true>
    class EnterResource
        : public subtle::LockOnEntry<lock_on_entry>,  // Must be first; see above.
          public subtle::EnterBase {
     public:
      EnterResource(PP_Resource resource, bool report_error)
          : EnterBase(resource) {
        Init(resource, report_error);
      }
      ......
    };
这个函数定义在文件external/chromium_org/ppapi/thunk/enter.h中。
EnterResource
EnterBase::EnterBase(PP_Resource resource)
        : resource_(GetResource(resource)),
          retval_(PP_OK) {
      PpapiGlobals::Get()->MarkPluginIsActive();
    }
这个函数定义在文件external/chromium_org/ppapi/thunk/enter.cc中。
从前面的分析可以知道,这个资源对象实际上就是一个ppapi::proxy::Graphics3D对象。与此同时,EnterBase的构造函数会通过调用Plugin进程的一个PluginGlobals单例对象的成员函数MarkPluginIsActive将当前正在执行3D渲染操作的Plugin标记为Active状态。
回到EnterResource
template<typename ResourceT, bool lock_on_entry = true>
    class EnterResource
        : public subtle::LockOnEntry<lock_on_entry>,  // Must be first; see above.
          public subtle::EnterBase {
     public:
      .......

      ResourceT* object() { return object_; }
      ......

     private:
      void Init(PP_Resource resource, bool report_error) {
        if (resource_)
          object_ = resource_->GetAs<ResourceT>();
        ......
      }

      ResourceT* object_;

      ......
    };
这个函数定义在文件external/chromium_org/ppapi/thunk/enter.h中。
EnterResource
注意,ppapi::proxy::Graphics3D类是从ppapi::PPB_Graphics3D_Shared类继承下来的,ppapi::PPB_Graphics3D_Shared类又是从thunk::PPB_Graphics3D_API类继承下来的,因此,我们可以将ppapi::proxy::Graphics3D对象转换为一个thunk::PPB_Graphics3D_API对象。
这一步执行完成后,回到前面分析的函数函数Clear中,这时候它就构造了一个EnterResource
gpu::gles2::GLES2Implementation* ToGles2Impl(Enter3D* enter) {
      ......
      return static_cast<PPB_Graphics3D_Shared*>(enter->object())->gles2_impl();
    }
这个函数定义在文件ternal/chromium_org/ppapi$ vi shared_impl/ppb_opengles2_shared.cc中。
函数ToGles2Impl首先调用参数enter指向的EnterResource
前面提到,由于EnterResource
有了这个ppapi::PPB_Graphics3D_Shared对象之后,函数ToGles2Impl就可以调用它的成员函数gles2_impl获得它内部维护的一个GLES2Implementation对象。这个GLES2Implementation对象就是在前面分析的ppapi::proxy::Graphics3D类的成员函数CreateGLES2Impl中创建的。
函数ToGles2Impl最后会将获得的GLES2Implementation对象返回给函数Clear。函数Clear获得了这个GLES2Implementation对象之后,就会调用它的成员函数Clear给参数context_id描述的OpenGL上下文设置一个背景色。
从前面Chromium硬件加速渲染的OpenGL命令执行过程分析一文可以知道,当我们调用GLES2Implementation类的成员函数执行GPU命令时,这些GPU命令实际上只是写入到了一个Command Buffer中。这个Command Buffer在合适的时候将会调用它的成员函数WaitForGetOffsetInRange通知GPU进程执行它里面的GPU命令。
从前面的分析可以知道,为Plugin创建的GLES2Implementation对象所用的Command Buffer是通过一个PpapiCommandBufferProxy对象描述的。当这个WaitForGetOffsetInRange对象的成员函数WaitForGetOffsetInRange被调用的时候,它实际上只是向Render进程发送一个类型为PpapiHostMsg_PPBGraphics3D_WaitForGetOffsetInRange的IPC消息,如下所示:
void PpapiCommandBufferProxy::WaitForTokenInRange(int32 start, int32 end) {
      ......

      bool success;
      gpu::CommandBuffer::State state;
      if (Send(new PpapiHostMsg_PPBGraphics3D_WaitForTokenInRange(
              ppapi::API_ID_PPB_GRAPHICS_3D,
              resource_,
              start,
              end,
              &state,
              &success)))
        UpdateState(state, success);
    }
这个函数定义在文件external/chromium_org/ppapi/proxy/ppapi_command_buffer_proxy.cc中。
这个类型为PpapiHostMsg_PPBGraphics3D_WaitForGetOffsetInRange的IPC消息携带了一个参数ppapi::API_ID_PPB_GRAPHICS_3D,表示Render进程接收到这个IPC消息之后,要分发一个API_ID_PPB_GRAPHICS_3D接口处理。
前面提到,在Render进程中,API_ID_PPB_GRAPHICS_3D接口是由一个PPB_Graphics3D_Proxy对象实现的,也就是Render进程会将类型为PpapiHostMsg_PPBGraphics3D_WaitForGetOffsetInRange的IPC消息分发给该PPB_Graphics3D_Proxy对象处理,这是通过调用它的成员函数OnMessageReceived实现的,如下所示:
bool PPB_Graphics3D_Proxy::OnMessageReceived(const IPC::Message& msg) {
      bool handled = true;
      IPC_BEGIN_MESSAGE_MAP(PPB_Graphics3D_Proxy, msg)
    #if !defined(OS_NACL)
        ......
        IPC_MESSAGE_HANDLER(PpapiHostMsg_PPBGraphics3D_WaitForGetOffsetInRange,
                            OnMsgWaitForGetOffsetInRange)
        ......
    #endif  // !defined(OS_NACL)

        ......
        IPC_MESSAGE_UNHANDLED(handled = false)

      IPC_END_MESSAGE_MAP()
      // FIXME(brettw) handle bad messages!
      return handled;
    }
这个函数定义在文件external/chromium_org/ppapi/proxy/ppb_graphics_3d_proxy.cc。
从这里可以看到,PPB_Graphics3D_Proxy类的成员函数OnMessageReceived会将类型为PpapiHostMsg_PPBGraphics3D_WaitForGetOffsetInRange的IPC消息分发给另外一个成员函数OnMsgWaitForGetOffsetInRange处理,如下所示:
void PPB_Graphics3D_Proxy::OnMsgWaitForGetOffsetInRange(
        const HostResource& context,
        int32 start,
        int32 end,
        gpu::CommandBuffer::State* state,
        bool* success) {
      EnterHostFromHostResource<PPB_Graphics3D_API> enter(context);
      ......
      *state = enter.object()->WaitForGetOffsetInRange(start, end);
      *success = true;
    }
这个函数定义在文件external/chromium_org/ppapi/proxy/ppb_graphics_3d_proxy.cc。
从前面的分析可以知道,参数context描述的OpenGL上下文在Render进程中用一个PPB_Graphics3D_Impl对象描述。PPB_Graphics3D_Proxy类的成员函数OnMsgWaitForGetOffsetInRange会通过构造一个EnterHostFromHostResource
PPB_Graphics3D_Impl类的成员函数WaitForGetOffsetInRange的实现如下所示:
gpu::CommandBuffer::State PPB_Graphics3D_Impl::WaitForGetOffsetInRange(
        int32_t start,
        int32_t end) {
      GetCommandBuffer()->WaitForGetOffsetInRange(start, end);
      return GetCommandBuffer()->GetLastState();
    }
这个函数定义在文件external/chromium_org/content/renderer/pepper/ppb_graphics_3d_impl.cc中。
PPB_Graphics3D_Impl类的成员函数WaitForGetOffsetInRange首先调用成员函数GetCommandBuffer获得一个CommandBuffer对象,如下所示:
gpu::CommandBuffer* PPB_Graphics3D_Impl::GetCommandBuffer() {
      return command_buffer_;
    }
这个函数定义在文件external/chromium_org/content/renderer/pepper/ppb_graphics_3d_impl.cc中。
PPB_Graphics3D_Impl类的成员函数GetCommandBuffer返回的是成员变量command_buffer_指向的一个CommandBuffer对象。从前面的分析可以知道,这个CommandBuffer对象实现上是一个CommandBufferProxyImpl对象,它是在前面分析的PPB_Graphics3D_Impl类的成员函数InitRaw中创建的。
回到PPB_Graphics3D_Impl类的成员函数WaitForGetOffsetInRange中,它获得了一个CommandBufferProxyImpl对象之后,就会调用它的成员函数WaitForGetOffsetInRange通知GPU进程执行Plugin写入在Command Buffer中的GPU命令。这个通知过程可以参考前面Chromium硬件加速渲染的OpenGL命令执行过程分析一文。
这一步执行完成后,回到前面分析的GLES2DemoInstance类的成员函数FlickerAndPaint中,它通过PPB_OPENGLES2_INTERFACE接口提供的函数渲染好一帧后,就会调用其成员变量context_指向的一个pp::Graphics3D对象的成员函数SwapBuffers交换Plugin当前使用的OpenGL上下文的前后两个缓冲区,也就是相当于是执行EGL函数eglSwapBuffers。
接下来,我们就从pp::Graphics3D类的成员函数SwapBuffers开始,分析Plugin交换当前使用的OpenGL上下文的前后两个缓冲区的过程,如下所示:
int32_t Graphics3D::SwapBuffers(const CompletionCallback& cc) {
      ......

      return get_interface<PPB_Graphics3D_1_0>()->SwapBuffers(
          pp_resource(),
          cc.pp_completion_callback());
    }
这个函数定义在文件external/chromium_org/ppapi/cpp/graphics_3d.cc中。
pp::Graphics3D类的成员函数SwapBuffers首先调用我们前面分析过的模板函数get_interface
PPB_GRAPHICS_3D_INTERFACE_1_0接口提供的函数SwapBuffers的实现如下所示:
int32_t SwapBuffers(PP_Resource context,
                        struct PP_CompletionCallback callback) {
      ......
      EnterResource<PPB_Graphics3D_API> enter(context, callback, true);
      if (enter.failed())
        return enter.retval();
      return enter.SetResult(enter.object()->SwapBuffers(enter.callback()));
    }
这个函数定义在文件external/chromium_org/ppapi/thunk/ppb_graphics_3d_thunk.cc中。
与前面分析的PPB_OPENGLES2_INTERFACE接口提供的函数Clear类似,PPB_GRAPHICS_3D_INTERFACE_1_0接口提供的函数SwapBuffers也是通过构造一个EnterResource
ppapi::proxy::Graphics3D类的成员函数SwapBuffers是从父类ppapi::PPB_Graphics3D_Shared继承下来的,它的实现如下所示:
int32_t PPB_Graphics3D_Shared::SwapBuffers(
        scoped_refptr<TrackedCallback> callback) {
      ......
      return DoSwapBuffers();
    }
这个函数定义在文件external/chromium_org/ppapi/shared_impl/ppb_graphics_3d_shared.cc中。
ppapi::proxy::Graphics3D类的成员函数SwapBuffers又会调用由子类实现的成员函数DoSwapBuffers请求Render进程交换当前正在处理的ppapi::proxy::Graphics3D对象描述的OpenGL上下文的前后缓冲区。
在我们这个情景中,这个子类即为ppapi::proxy::Graphics3D,因此接下来ppapi::proxy::Graphics3D类的成员函数DoSwapBuffers会被调用,它的实现如下所示:
int32 Graphics3D::DoSwapBuffers() {
      gles2_impl()->SwapBuffers();
      IPC::Message* msg = new PpapiHostMsg_PPBGraphics3D_SwapBuffers(
          API_ID_PPB_GRAPHICS_3D, host_resource());
      msg->set_unblock(true);
      PluginDispatcher::GetForResource(this)->Send(msg);

      return PP_OK_COMPLETIONPENDING;
    }
这个函数定义在文件external/chromium_org/ppapi/proxy/ppb_graphics_3d_proxy.cc中。
ppapi::proxy::Graphics3D类的成员函数DoSwapBuffers首先是通过调用成员函数gles2_impl获得前面为Plugin创建的一个Command Buffer GL接口。有了这个Command Buffer GL接口之后,就可以调用它的成员函数SwapBuffers向Command Buffer写入一个gles2::cmds::SwapBuffers命令。GPU进程在执行这个命令的时候,就会交换当前正在处理的ppapi::proxy::Graphics3D对象描述的OpenGL上下文的前后缓冲区。
ppapi::proxy::Graphics3D类的成员函数DoSwapBuffers接下来又会调用PluginDispatcher类的静态成员函数GetForResource获得与当前正在处理的Plugin对应的一个PluginDispatcher对象,并且通过这个PluginDispatcher对象向Render进程发送一个类型为PpapiHostMsg_PPBGraphics3D_SwapBuffers的IPC消息,用来通知Render进程更新当前正在处理的Plugin在网页上的视图。这个IPC消息包含两个参数:
- API_ID_PPB_GRAPHICS_3D,表示Render进程要将该IPC消息分发给API_ID_PPB_GRAPHICS_3D接口处理。
2. 通过调用成员函数host_resource获得的一个HostResource对象,这个HostResource对象描述的就是要交换前面缓冲区的OpenGL上下文。
前面提到,在Render进程中,API_ID_PPB_GRAPHICS_3D接口是由一个PPB_Graphics3D_Proxy对象实现的,也就是Render进程会将类型为PpapiHostMsg_PPBGraphics3D_SwapBuffers的IPC消息分发给该PPB_Graphics3D_Proxy对象处理,这是通过调用它的成员函数OnMessageReceived实现的,如下所示:
bool PPB_Graphics3D_Proxy::OnMessageReceived(const IPC::Message& msg) {
      bool handled = true;
      IPC_BEGIN_MESSAGE_MAP(PPB_Graphics3D_Proxy, msg)
    #if !defined(OS_NACL)
        ......
        IPC_MESSAGE_HANDLER(PpapiHostMsg_PPBGraphics3D_SwapBuffers,
                            OnMsgSwapBuffers)
        ......
    #endif  // !defined(OS_NACL)

        ......
        IPC_MESSAGE_UNHANDLED(handled = false)

      IPC_END_MESSAGE_MAP()
      // FIXME(brettw) handle bad messages!
      return handled;
    }
这个函数定义在文件external/chromium_org/ppapi/proxy/ppb_graphics_3d_proxy.cc中。
从这里可以看到,PPB_Graphics3D_Proxy类的成员函数OnMessageReceived会将类型为PpapiHostMsg_PPBGraphics3D_SwapBuffers的IPC消息分发给另外一个成员函数OnMsgSwapBuffers处理,如下所示:
void PPB_Graphics3D_Proxy::OnMsgSwapBuffers(const HostResource& context) {
      EnterHostFromHostResourceForceCallback<PPB_Graphics3D_API> enter(
          context, callback_factory_,
          &PPB_Graphics3D_Proxy::SendSwapBuffersACKToPlugin, context);
      if (enter.succeeded())
        enter.SetResult(enter.object()->SwapBuffers(enter.callback()));
    }
这个函数定义在文件external/chromium_org/ppapi/proxy/ppb_graphics_3d_proxy.cc中。
参数context描述的是一个要交换前后缓冲区的OpenGL上下文。从前面的分析可以知道,在Render进程中,这个OpenGL上下文是通过一个PPB_Graphics3D_Impl对象描述的。PPB_Graphics3D_Proxy类的成员函数OnMsgSwapBuffers通过构造一个EnterHostFromHostResourceForceCallback
PPB_Graphics3D_Impl类的成员函数SwapBuffers是从父类ppapi::PPB_Graphics3D_Shared继承下来的。前面我们已经分析过ppapi::PPB_Graphics3D_Shared类的成员函数SwapBuffers的实现了,它最终会调用由子类实现的成员函数DoSwapBuffers,即PPB_Graphics3D_Impl类的成员函数DoSwapBuffers。
PPB_Graphics3D_Impl类的成员函数DoSwapBuffers的实现如下所示:
int32 PPB_Graphics3D_Impl::DoSwapBuffers() {
      ......

      if (bound_to_instance_) {
        // If we are bound to the instance, we need to ask the compositor
        // to commit our backing texture so that the graphics appears on the page.
        // When the backing texture will be committed we get notified via
        // ViewFlushedPaint().
        //
        // Don't need to check for NULL from GetPluginInstance since when we're
        // bound, we know our instance is valid.
        HostGlobals::Get()->GetInstance(pp_instance())->CommitBackingTexture();
        commit_pending_ = true;
      }

      ......

      return PP_OK_COMPLETIONPENDING;
    }
这个函数定义在文件external/chromium_org/content/renderer/pepper/ppb_graphics_3d_impl.cc中。
从前面的分析可以知道,当前正在处理的PPB_Graphics3D_Impl对象描述的OpenGL上下文此时处于绑定状态,也就是它的成员变量bound_to_instance_的值等于true。在这种情况下,PPB_Graphics3D_Impl类的成员函数DoSwapBuffers首先会通过HostGlobals类的静态成员函数Get获得当前Render进程中的一个HostGlobals单例对象。有了这个HostGlobals单例对象之后,就可以调用它的成员函数GetInstance获得与当前正在处理的PPB_Graphics3D_Impl对象进行绑定的一个Plugin Instance Proxy,也就是一个PepperPluginInstanceImpl对象。
有了上述PepperPluginInstanceImpl对象之后,PPB_Graphics3D_Impl类的成员函数DoSwapBuffers就可以调用它的成员函数CommitBackingTexture更新它在网页上的视图,如下所示:
void PepperPluginInstanceImpl::CommitBackingTexture() {
      ......
      gpu::Mailbox mailbox;
      uint32 sync_point = 0;
      bound_graphics_3d_->GetBackingMailbox(&mailbox, &sync_point);
      ......
      texture_layer_->SetTextureMailboxWithoutReleaseCallback(
          cc::TextureMailbox(mailbox, GL_TEXTURE_2D, sync_point));
      texture_layer_->SetNeedsDisplay();
    }
这个函数定义在文件external/chromium_org/content/renderer/pepper/pepper_plugin_instance_impl.cc。
从前面的分析可以知道,PepperPluginInstanceImpl类的成员变量bound_graphics_3d_指向的是一个PPB_Graphics3D_Impl对象。这个PPB_Graphics3D_Impl对象描述的是一个OpenGL上下文。这个OpenGL上下文就是当前正在处理的PepperPluginInstanceImpl对象绑定的OpenGL上下文。
PepperPluginInstanceImpl类的另外一个成员变量texture_layer_指向的是一个cc::TextureLayer对象。前面提到,网页中的每一个
有了上述PPB_Graphics3D_Impl对象之后,PepperPluginInstanceImpl类的成员函数CommitBackingTexture就可以调用它的成员函数GetBackingMailbox获得已经被交换到后端的缓冲区。这个缓冲区实际上是一个纹理缓冲区。这个纹理缓冲区将会作为
最后,PepperPluginInstanceImpl类的成员函数CommitBackingTexture调用上述cc::TextureLayer对象的成员函数SetNeedsDisplay将自己标记为需要更新。这样在下一个VSync信号到来的时候,前面设置为它的内容的纹理缓冲区就会被渲染和合成在网页的UI上。这个渲染和合成过程可以参考前面Chromium网页渲染机制简要介绍和学习计划这个系列的文章。
这样,我们就分析完成了Plugin执行3D渲染的过程,也就是Plugin为
至此,我们也分析完成了Chromium的Plugin机制。重新学习可以参考前面Chromium插件(Plugin)机制简要介绍和学习计划一文。更多的信息也可以关注老罗的新浪微博:http://weibo.com/shengyangluo。