Android包管理框架:APK的加载流程
我们前面说过APK可以分为代码与资源两部分,那么在加载APK时也会涉及代码的加载和资源的加载,代码的加载事实上对应的就是Android应用进程的创建流程,关于这一块的内容我们在文章01Android进程框架:进程的创建、启动与调度流程已经分析过,本篇文章 我们着重来分析资源的加载流程。
我们知道在代码中我们通常会通过getResource()去获取Resources对象,Resource对象是应用进程内的一个全局对象,它用来访问应用的资源。除了Resources对象我们还可以通过getAsset()获取 AssetManger来读取指定文件路径下的文件。Resource与AssetManger这对兄弟就构造了资源访问框架的基础。
那么AssetManager对象与Resources对象在哪里创建的呢?🤔
3.1 AssetManager的创建流程
我们知道每个启动的应用都需要先创建一个应用上下文Context,Context的实际实现类是ContextImpl,ContextImpl在创建的时候创建了Resources对象和AssetManager对象。
AssetManager对象创建序列图如下所示:
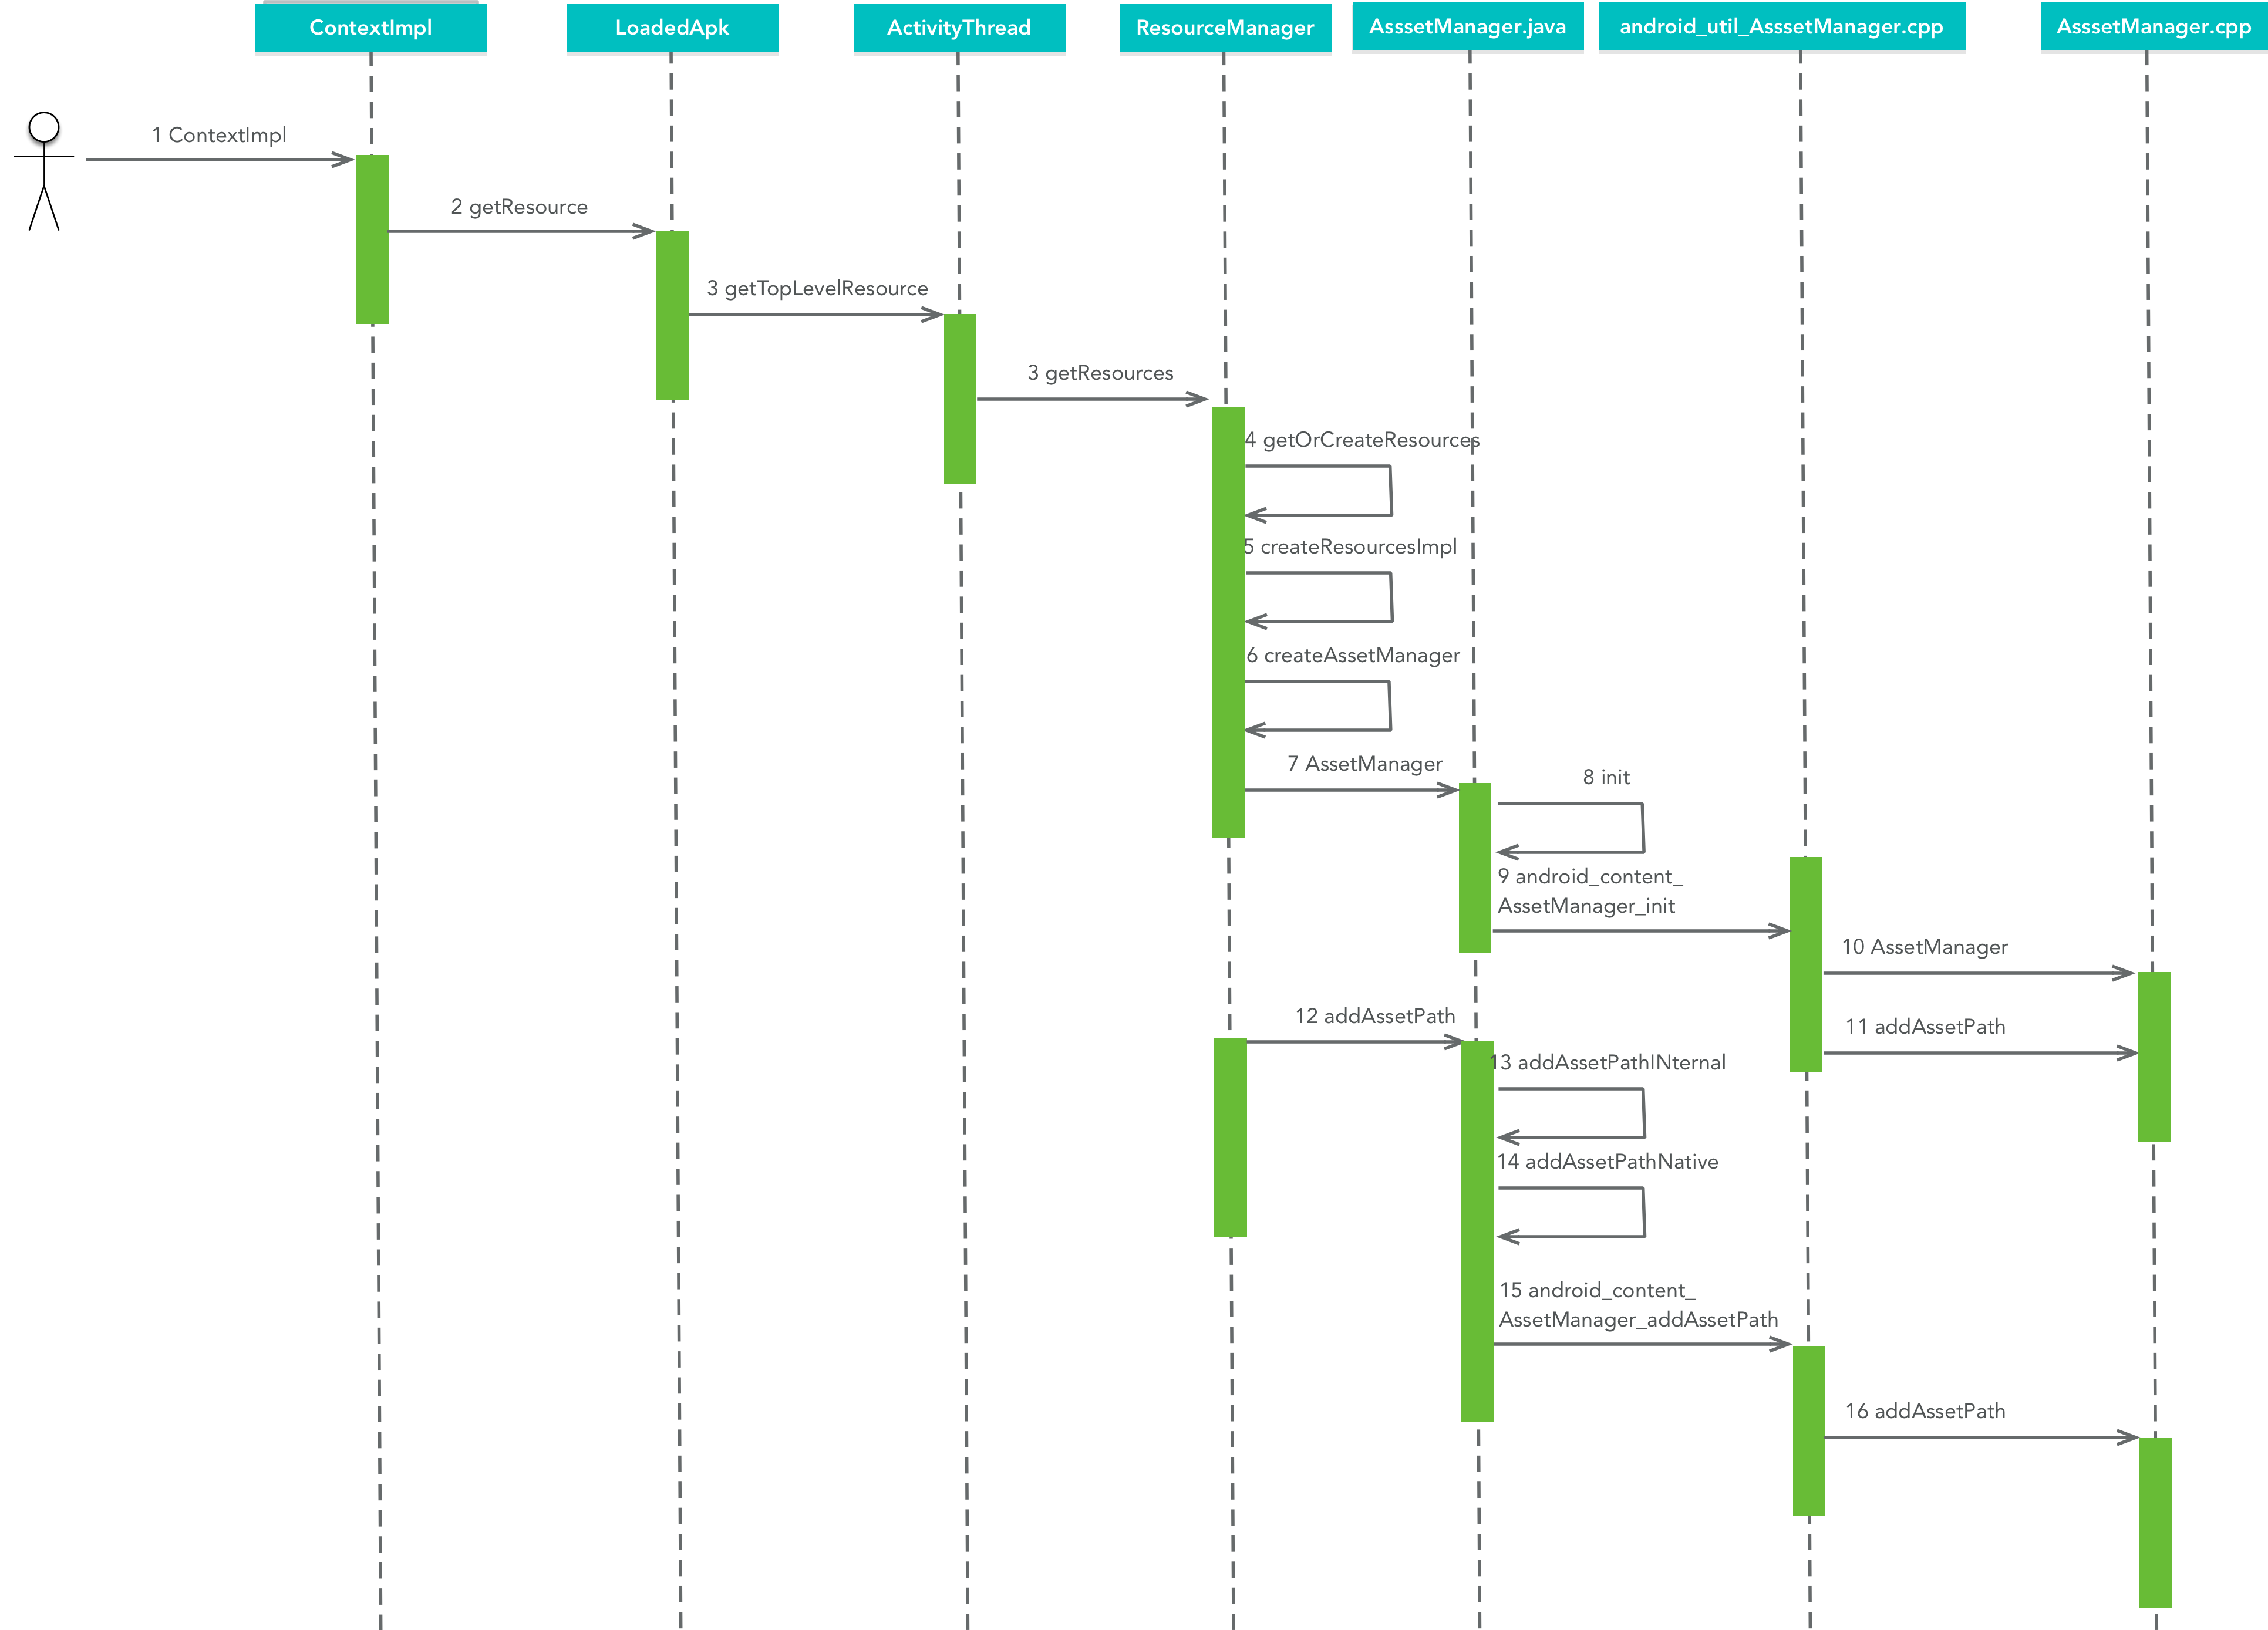
我们可以发现在整个流程AssetManager在Java和C++层都有一个实现,那么它们俩有什么关系呢?🤔
事实上实际的功能都是由C++层的AssetManag来完成的。每个Java层的AssetManager对象都一个long型的成员变量mObject,用来保存C++层 AssetManager对象的地址,通过这个变量将Java层的AssetManager对象与C++层的AssetManager对象关联起来。
public final class AssetManager implements AutoCloseable {
    // 通过这个变量将Java层的AssetManager对象与C++层的AssetManager对象关联起来。
    private long mObject;
}
从上述序列图中我们可以看出,最终调用Asset的构造函数来创建Asset对象,如下所示:
public final class AssetManager implements AutoCloseable {
      public AssetManager() {
          synchronized (this) {
              if (DEBUG_REFS) {
                  mNumRefs = 0;
                  incRefsLocked(this.hashCode());
              }
              init(false);
              if (localLOGV) Log.v(TAG, "New asset manager: " + this);
              //创建系统的AssetManager
              ensureSystemAssets();
          }
      }

      private static void ensureSystemAssets() {
          synchronized (sSync) {
              if (sSystem == null) {
                  AssetManager system = new AssetManager(true);
                  system.makeStringBlocks(null);
                  sSystem = system;
              }
          }
      }

      private AssetManager(boolean isSystem) {
          if (DEBUG_REFS) {
              synchronized (this) {
                  mNumRefs = 0;
                  incRefsLocked(this.hashCode());
              }
          }
          init(true);
          if (localLOGV) Log.v(TAG, "New asset manager: " + this);
      }

    private native final void init(boolean isSystem);
}
可以看到构造函数会先调用native方法init()去构造初始化AssetManager对象,可以发现它还调用了ensureSystemAssets()方法去创建系统AssetManager,为什么还会有个系统AssetManager呢?🤔
这是因为Android应用程序不仅要访问自己的资源,还需要访问系统的资源,系统的资源放在/system/framework/framework-res.apk文件中,它在应用进程中是通过一个单独的Resources对象(Resources.sSystem) 和一个单独的AssetManger(AssetManager.sSystem)对象来管理的。
我们接着来看native方法init()的实现,它实际上是调用android_util_AssetManager.cpp类的android_content_AssetManager_init()方法,如下所示;
👉 android_util_AssetManager.cpp
static void android_content_AssetManager_init(JNIEnv* env, jobject clazz, jboolean isSystem)
{
    if (isSystem) {
        verifySystemIdmaps();
    }
    //构建AssetManager对象
    AssetManager* am = new AssetManager();
    if (am == NULL) {
        jniThrowException(env, "java/lang/OutOfMemoryError", "");
        return;
    }

    //添加默认的资源路径,也就是系统资源的路径
    am->addDefaultAssets();

    ALOGV("Created AssetManager %p for Java object %p\n", am, clazz);
    env->SetLongField(clazz, gAssetManagerOffsets.mObject, reinterpret_cast<jlong>(am));
}
我们接着来看看AssetManger.cpp的ddDefaultAssets()方法。
static const char* kSystemAssets = "framework/framework-res.apk";

bool AssetManager::addDefaultAssets()
{
    const char* root = getenv("ANDROID_ROOT");
    LOG_ALWAYS_FATAL_IF(root == NULL, "ANDROID_ROOT not set");

    String8 path(root);
    path.appendPath(kSystemAssets);

    return addAssetPath(path, NULL, false /* appAsLib */, true /* isSystemAsset */);
}
ANDROID_ROOT指的就是/sysetm目录,全局变量kSystemAssets指向的是"framework/framework-res.apk",所以拼接以后就是我们前面说的系统资源的存放目录"/system/framework/framework-res.apk"
拼接好path后作为参数传入addAssetPath()方法,注意Java层的addAssetPath()方法实际调用的也是底层的此方法,如下所示:
static const char* kAppZipName = NULL; //"classes.jar";

bool AssetManager::addAssetPath(
        const String8& path, int32_t* cookie, bool appAsLib, bool isSystemAsset)
{
    AutoMutex _l(mLock);

    asset_path ap;

    String8 realPath(path);
    //kAppZipName如果不为NULL,一般将会被设置为classes.jar
    if (kAppZipName) {
        realPath.appendPath(kAppZipName);
    }

    //检查传入的path是一个文件还是一个目录,两者都不是的时候直接返回
    ap.type = ::getFileType(realPath.string());
    if (ap.type == kFileTypeRegular) {
        ap.path = realPath;
    } else {
        ap.path = path;
        ap.type = ::getFileType(path.string());
        if (ap.type != kFileTypeDirectory && ap.type != kFileTypeRegular) {
            ALOGW("Asset path %s is neither a directory nor file (type=%d).",
                 path.string(), (int)ap.type);
            return false;
        }
    }

    //资源路径mAssetPaths是否已经添加过参数path描述的一个APK的文件路径,如果
    //已经添加过,则不再往下处理。直接将path保存在输出参数cookie中
    for (size_t i=0; i<mAssetPaths.size(); i++) {
        if (mAssetPaths[i].path == ap.path) {
            if (cookie) {
                *cookie = static_cast<int32_t>(i+1);
            }
            return true;
        }
    }

    ALOGV("In %p Asset %s path: %s", this,
         ap.type == kFileTypeDirectory ? "dir" : "zip", ap.path.string());

    ap.isSystemAsset = isSystemAsset;
    //path所描述的APK资源路径没有被添加过,则添加到mAssetPaths中。
    mAssetPaths.add(ap);

    //...

    return true;
该方法的实现也很简单,就是把path描述的APK资源路径加入到资源目录数组mAssetsPath中去,mAssetsPath是AssetManger.cpp的成员变量,AssetManger.cpp有三个 比较重要的成员变量:
- mAssetsPath:资源存放目录。
- mResources:资源索引表。
- mConfig:设备的本地配置信息,包括设备大小,国家地区、语音等配置信息。
有了这些变量AssetManger就可以正常的工作了。AssetManger对象也就创建完成了。
ResroucesManager的createResroucesImpl()方法会先调用createAssetManager()方法创建AssetManger对象,然后再调用ResourcesImpl的构造方法创建ResourcesImpl对象。
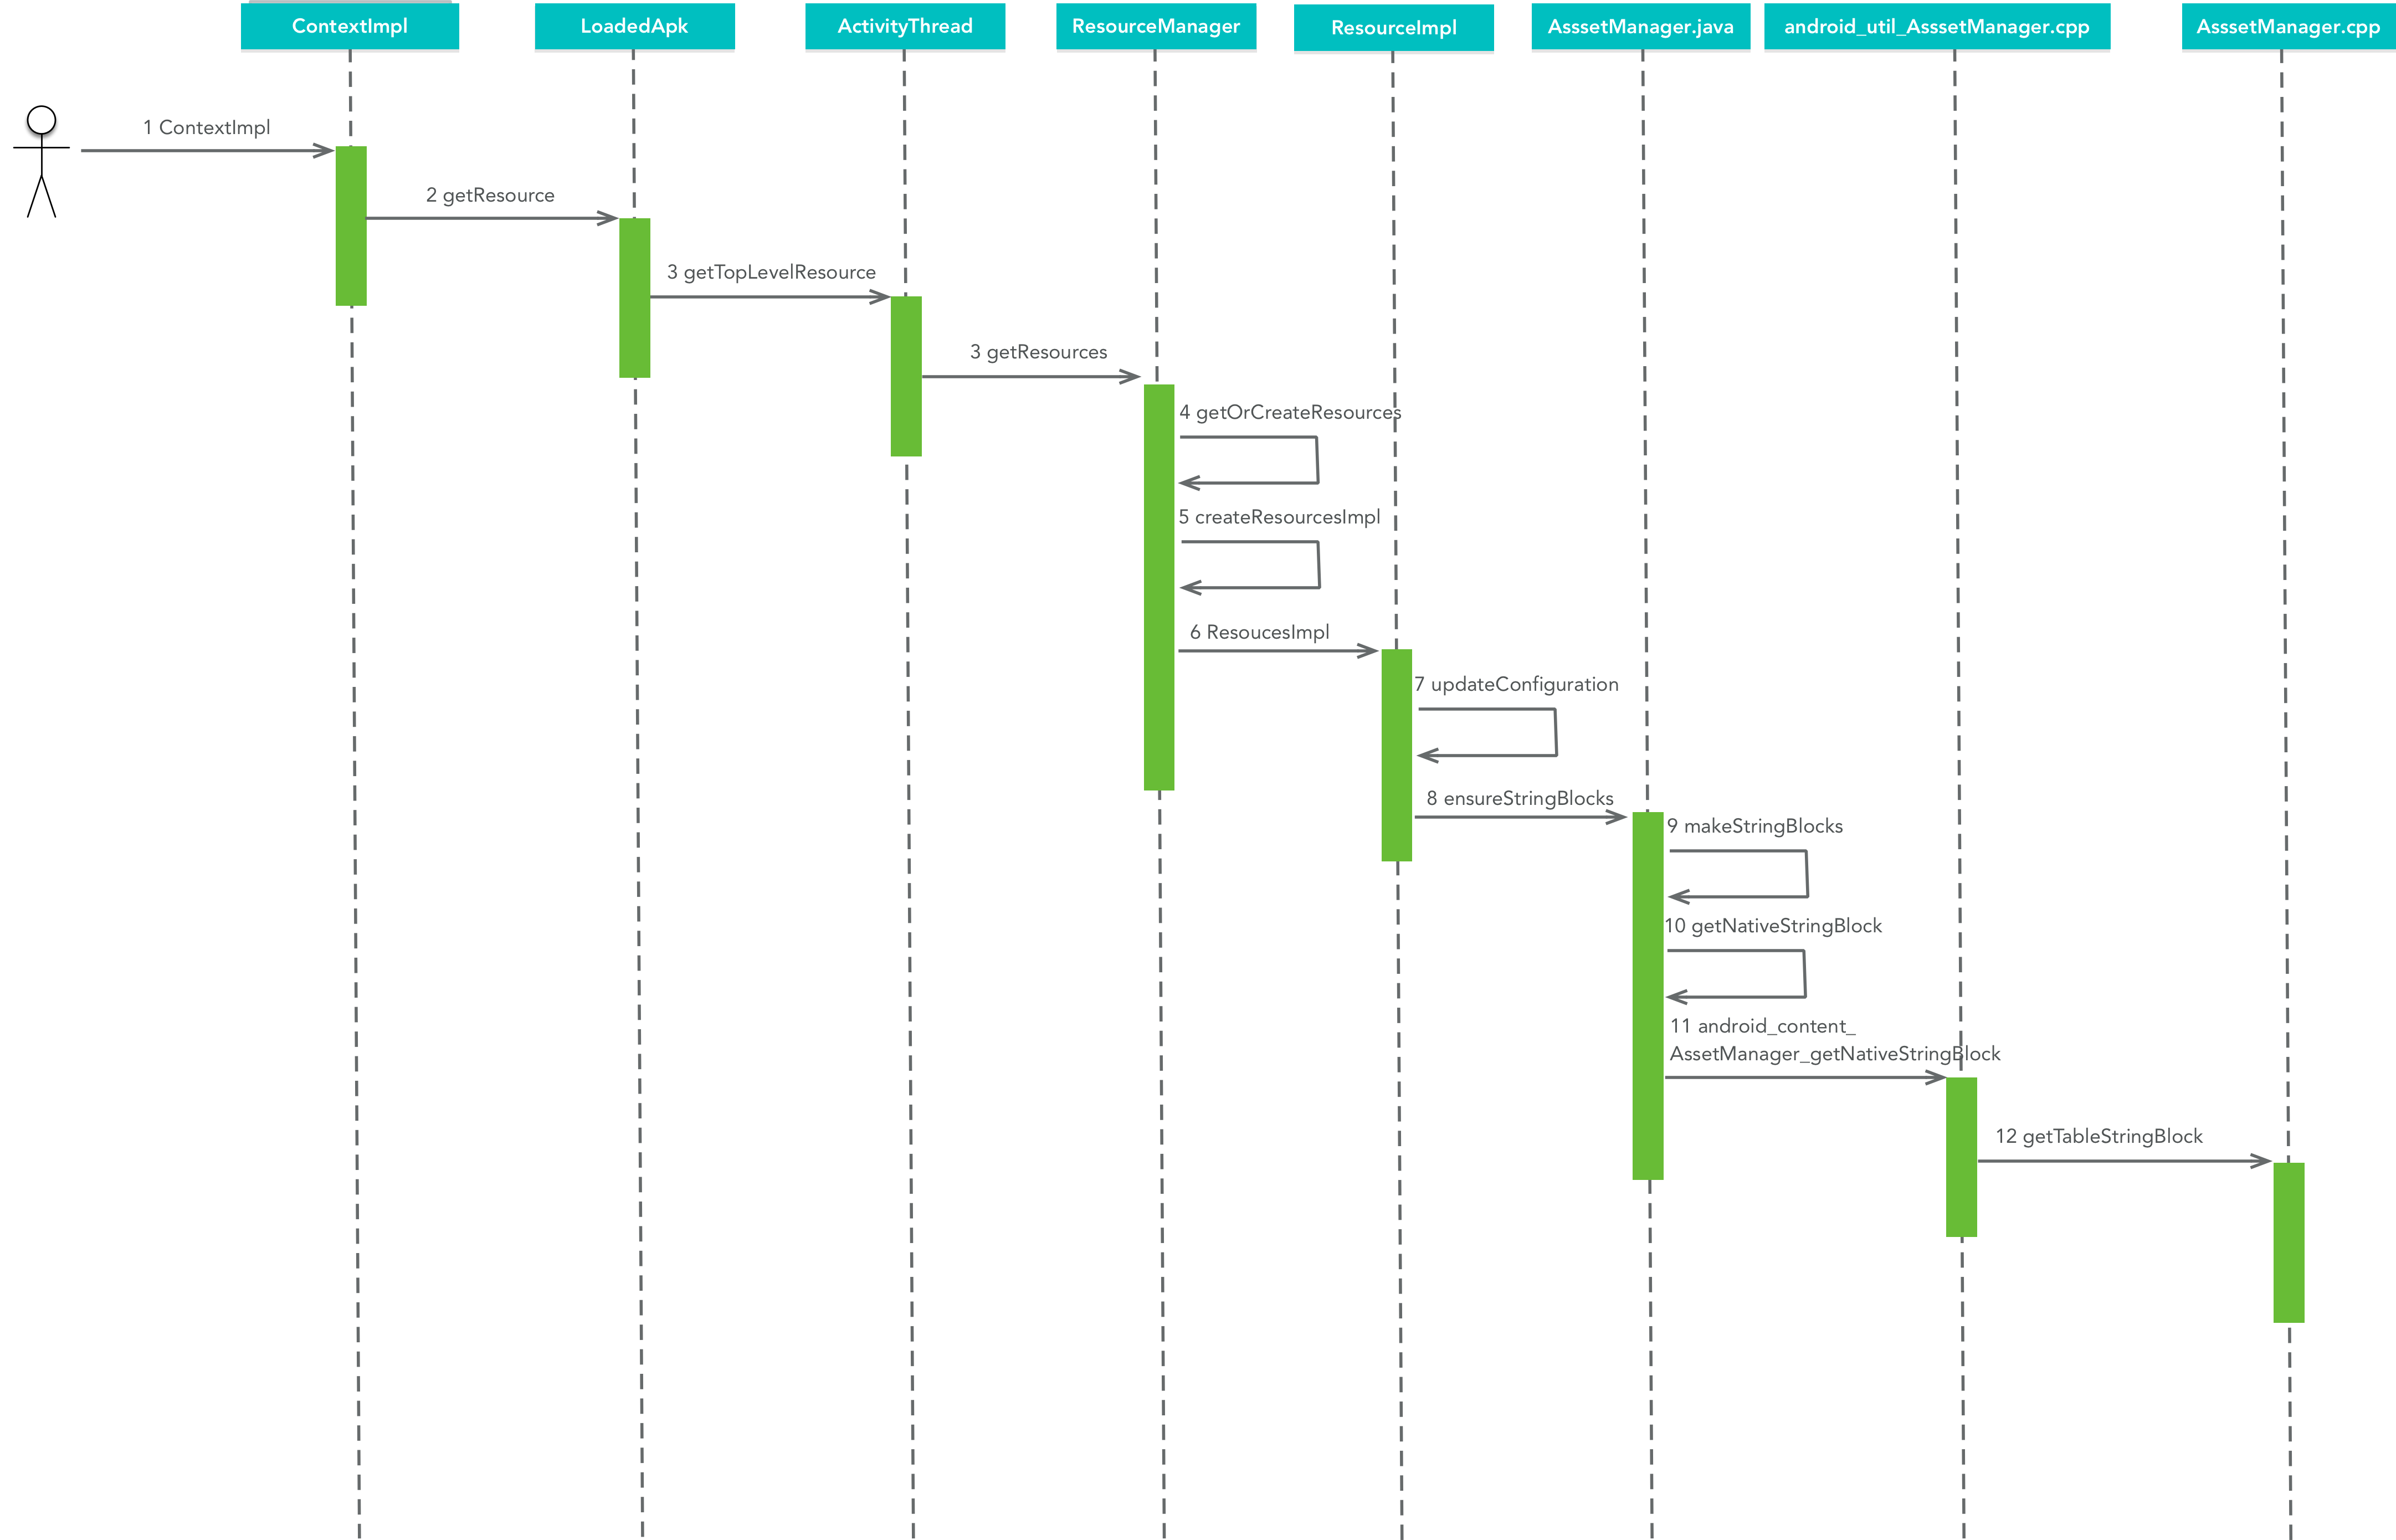
3.1 Resources的创建流程
Resources对象的创建序列图如下所示:
ResourcesImpl的构造方法如下所示:
public class ResourcesImpl {
   public ResourcesImpl(@NonNull AssetManager assets, @Nullable DisplayMetrics metrics,
            @Nullable Configuration config, @NonNull DisplayAdjustments displayAdjustments) {
        mAssets = assets;
        mMetrics.setToDefaults();
        mDisplayAdjustments = displayAdjustments;
        updateConfiguration(config, metrics, displayAdjustments.getCompatibilityInfo());
        mAssets.ensureStringBlocks();
    }
}
在这个方法里有两个重要的函数:
- updateConfiguration(config, metrics, displayAdjustments.getCompatibilityInfo()):首先是根据参数config和metrics来更新设备的当前配置信息,例如,屏幕大小和密码、国家地区和语言、键盘 配置情况等,接着再调用成员变量mAssets所指向的一个Java层的AssetManager对象的成员函数setConfiguration来将这些配置信息设置到与之关联的C++层的AssetManger。
- ensureStringBlocks():读取
我们重点来看看ensureStringBlocks()的实现。
public final class AssetManager implements AutoCloseable {

    @NonNull
    final StringBlock[] ensureStringBlocks() {
        synchronized (this) {
            if (mStringBlocks == null) {
                //读取字符串资源池,sSystem.mStringBlocks表示系统资源索引表的字符串常量池
                //前面我们已经创建的了系统资源的AssetManger sSystem,所以系统资源字符串资源池已经读取完毕。
                makeStringBlocks(sSystem.mStringBlocks);
            }
            return mStringBlocks;
        }
    }

    //seed表示是否要将系统资源索引表里的字符串资源池也一起拷贝出来
    /*package*/ final void makeStringBlocks(StringBlock[] seed) {
        //系统资源索引表个数
        final int seedNum = (seed != null) ? seed.length : 0;
        //总的资源索引表个数
        final int num = getStringBlockCount();
        mStringBlocks = new StringBlock[num];
        if (localLOGV) Log.v(TAG, "Making string blocks for " + this
                + ": " + num);
        for (int i=0; i<num; i++) {
            if (i < seedNum) {
                //系统预加载资源的时候,已经解析过framework-res.apk中的resources.arsc
                mStringBlocks[i] = seed[i];
            } else {
                //调用getNativeStringBlock(i)方法读取字符串资源池
                mStringBlocks[i] = new StringBlock(getNativeStringBlock(i), true);
            }
        }
    }

    private native final int getStringBlockCount();
    private native final long getNativeStringBlock(int block);
}
首先解释一下什么是StringBlocks,StringBlocks描述的是一个字符串资源池,Android里每一个资源索引表resources.arsc都包含一个字符串资源池。 getStringBlockCount() 方法返回的也就是这种资源池的个数。
上面我们已经说了resources.arsc的文件格式,接下来就会调用native方法getNativeStringBlock()去解析resources.arsc文件的内容,获取字符串 常量池,getNativeStringBlock()方法实际上就是将每一个资源包里面的resources.arsc的数据项值的字符串资源池数据块读取出来,并封装在C++层的StringPool对象中,然后Java层的makeStringBlocks()方法 再将该StringPool对象封装成Java层的StringBlock中。
关于C++层的具体实现,可以参考罗哥的这两篇博客:
如此,AssetManager和Resources对象的创建流程便分析完了,这两个对象构成了Android应用程序资源管理器的核心基础,资源的加载就是借由这两个对象来完成的。
3.3 资源的查找与解析流程
前面我们分析了AssetManager和Resources对象的创建流程,AssetManager根据文件名来查找资源,Resouces根据资源ID查找资源,如果资源ID对应的是个文件,那么会Resouces先根据资源ID查找 出文件名,AssetManger再根据文件名查找出具体的资源。
整个流程还是比较简单的,我们以layout.xml文件的查找流程为例来说明一下,具体序列图如下所示:
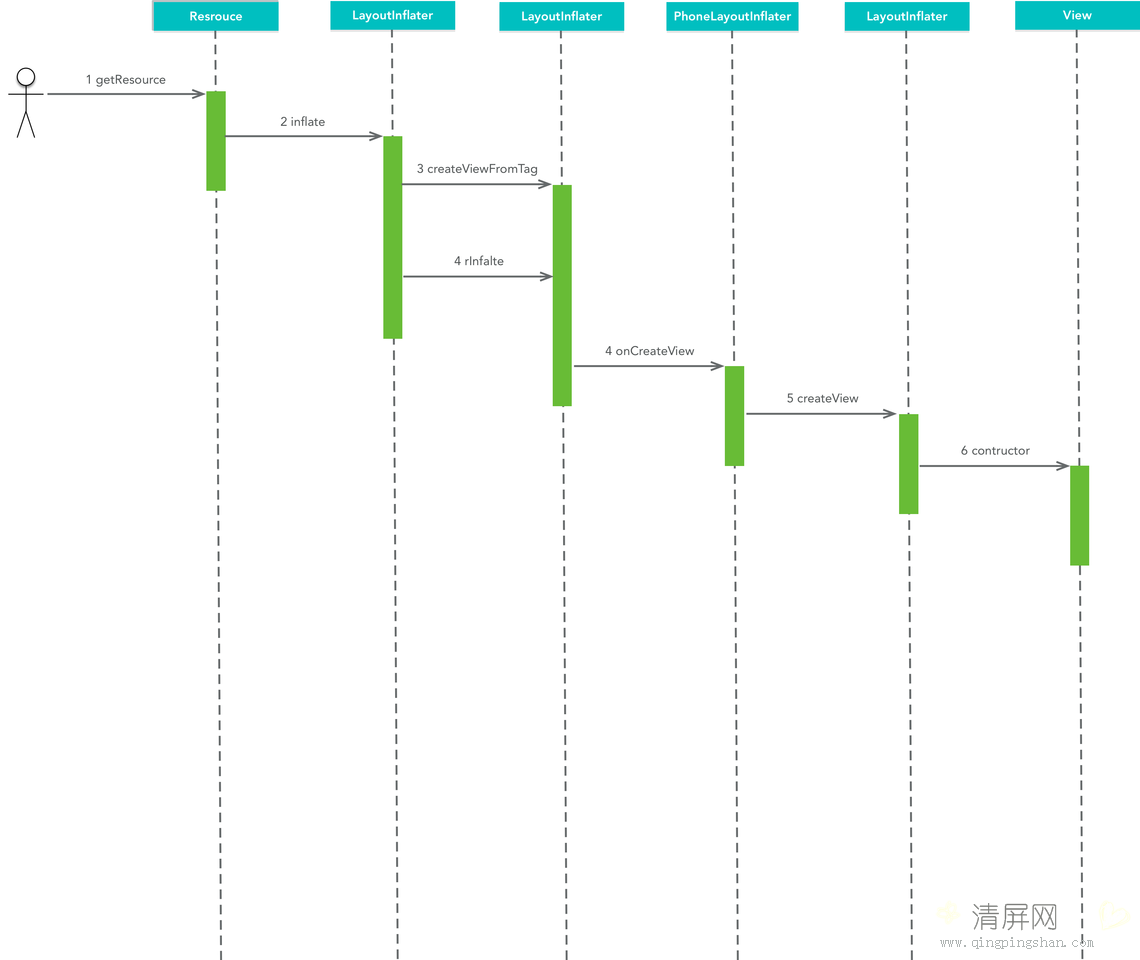
我们先来看看总的调度方法inflate(),这个也是我们最常用的
public View inflate(@LayoutRes int resource, @Nullable ViewGroup root, boolean attachToRoot)这个方法有三个参数:
int resource:布局ID,也就是要解析的xml布局文件,boolean attachToRoot表示是否要添加到父布局root中去。这里面还有个关键的参数root。它用来表示根布局,这个就很常见的,我们在用 这个方法的时候,有时候给root赋值了,有时候直接给了null(给null的时候IDE会有警告提示),这个root到底有什么作用呢?🤔
它主要有两个方面的作用:
- 当attachToRoot == true且root != null时,新解析出来的View会被add到root中去,然后将root作为结果返回。
- 当attachToRoot == false且root != null时,新解析的View会直接作为结果返回,而且root会为新解析的View生成LayoutParams并设置到该View中去。
- 当attachToRoot == false且root == null时,新解析的View会直接作为结果返回。
注意第二条和第三条是由区别的,你可以去写个例子试一下,当root为null时,新解析出来的View没有LayoutParams参数,这时候你设置的layout_width和layout_height是不生效的。
说到这里,有人可能有疑问了,Activity里的布局应该也是LayoutInflater加载的,我也没做什么处理,但是我设置的layout_width和layout_heigh参数都是可以生效的,这是为什么?🤔
这是因为Activity内部做了处理,我们知道Activity的setContentView()方法,实际上调用的PhoneWindow的setContentView()方法。它调用的时候将Activity的顶级DecorView(FrameLayout) 作为root传了进去,mLayoutInflater.inflate(layoutResID, mContentParent)实际调用的是inflate(resource, root, root != null),所以在调用Activity的setContentView()方法时 可以将解析出的View添加到顶级DecorView中,我们设置的layout_width和layout_height参数也可以生效。
具体代码如下:
@Override
public void setContentView(int layoutResID) {
    if (mContentParent == null) {
        installDecor();
    } else if (!hasFeature(FEATURE_CONTENT_TRANSITIONS)) {
        mContentParent.removeAllViews();
    }

    if (hasFeature(FEATURE_CONTENT_TRANSITIONS)) {
        final Scene newScene = Scene.getSceneForLayout(mContentParent, layoutResID,
                getContext());
        transitionTo(newScene);
    } else {

        mLayoutInflater.inflate(layoutResID, mContentParent);
    }
    mContentParent.requestApplyInsets();
    final Callback cb = getCallback();
    if (cb != null && !isDestroyed()) {
        cb.onContentChanged();
    }
    mContentParentExplicitlySet = true;
}
了解了inflate()方法各个参数的含义,我们正式来分析它的实现。
public abstract class LayoutInflater {

    public View inflate(@LayoutRes int resource, @Nullable ViewGroup root, boolean attachToRoot) {
        final Resources res = getContext().getResources();
        if (DEBUG) {
            Log.d(TAG, "INFLATING from resource: \"" + res.getResourceName(resource) + "\" ("
                    + Integer.toHexString(resource) + ")");
        }

        //获取xml资源解析器XmlResourceParser
        final XmlResourceParser parser = res.getLayout(resource);
        try {
            return inflate(parser, root, attachToRoot);//解析View
        } finally {
            parser.close();
        }
    }
}
可以发现在该方法里,主要完成了两件事情:
- 获取xml资源解析器XmlResourceParser。
- 解析View
我们先来看看XmlResourceParser是如何获取的。
从上面的序列图可以看出,调用了Resources的getLayout(resource)去获取对应的XmlResourceParser。getLayout(resource)又去调用了Resources的loadXmlResourceParser() 方法来完成XmlResourceParser的加载,如下所示:
public class Resources {

     XmlResourceParser loadXmlResourceParser(@AnyRes int id, @NonNull String type)
             throws NotFoundException {
         final TypedValue value = obtainTempTypedValue();
         try {
             final ResourcesImpl impl = mResourcesImpl;
             //1. 获取xml布局资源,并保存在TypedValue中。
             impl.getValue(id, value, true);
             if (value.type == TypedValue.TYPE_STRING) {
                 //2. 加载对应的loadXmlResourceParser解析器。
                 return impl.loadXmlResourceParser(value.string.toString(), id,
                         value.assetCookie, type);
             }
             throw new NotFoundException("Resource ID #0x" + Integer.toHexString(id)
                     + " type #0x" + Integer.toHexString(value.type) + " is not valid");
         } finally {
             releaseTempTypedValue(value);
         }
     }
}
可以发现这个方法又被分成了两步:
- 获取xml布局资源,并保存在TypedValue中。
- 加载对应的loadXmlResourceParser解析器。
从上面的序列图可以看出,资源的获取涉及到resources.arsc的解析过程,这个我们已经在Resources的创建流程简单聊过,这里就不再赘述。通过 getValue()方法获取到xml资源以后,就会调用ResourcesImpl的loadXmlResourceParser()方法对该布局资源进行解析,以便得到一个UI布局视图。
我们来看看它的实现。
3.3.1 获取XmlResourceParser
public class ResourcesImpl {

    XmlResourceParser loadXmlResourceParser(@NonNull String file, @AnyRes int id, int assetCookie,
               @NonNull String type)
               throws NotFoundException {
           if (id != 0) {
               try {
                   synchronized (mCachedXmlBlocks) {
                       //... 从缓存中查找xml资源

                       // Not in the cache, create a new block and put it at
                       // the next slot in the cache.
                       final XmlBlock block = mAssets.openXmlBlockAsset(assetCookie, file);
                       if (block != null) {
                           final int pos = (mLastCachedXmlBlockIndex + 1) % num;
                           mLastCachedXmlBlockIndex = pos;
                           final XmlBlock oldBlock = cachedXmlBlocks[pos];
                           if (oldBlock != null) {
                               oldBlock.close();
                           }
                           cachedXmlBlockCookies[pos] = assetCookie;
                           cachedXmlBlockFiles[pos] = file;
                           cachedXmlBlocks[pos] = block;
                           return block.newParser();
                       }
                   }
               } catch (Exception e) {
                   final NotFoundException rnf = new NotFoundException("File " + file
                           + " from xml type " + type + " resource ID #0x" + Integer.toHexString(id));
                   rnf.initCause(e);
                   throw rnf;
               }
           }

           throw new NotFoundException("File " + file + " from xml type " + type + " resource ID #0x"
                   + Integer.toHexString(id));
       }
}
我们先来看看这个方法的四个形参:
- String file:xml文件的路径
- int id:xml文件的资源ID
- int assetCookie:xml文件的资源缓存
- String type:资源类型
ResourcesImpl会缓存最近解析的4个xml资源,如果不在缓存里则调用AssetManger的openXmlBlockAsset()方法创建一个XmlBlock。XmlBlock是已编译的xml文件的一个包装类。
AssetManger的openXmlBlockAsset()方法的实现如下所示:
public final class AssetManager implements AutoCloseable {
   /*package*/ final XmlBlock openXmlBlockAsset(int cookie, String fileName)
       throws IOException {
       synchronized (this) {
           //...
           long xmlBlock = openXmlAssetNative(cookie, fileName);
           if (xmlBlock != 0) {
               XmlBlock res = new XmlBlock(this, xmlBlock);
               incRefsLocked(res.hashCode());
               return res;
           }
       }
       //...
   }
}
可以看出该方法会调用native方法openXmlAssetNative()去代开fileName指定的xml文件,成功打开该文件后,会得到C++层的ResXMLTree对象的地址xmlBlock,然后将xmlBlock封装进 XmlBlock中返回给调用者。ResXMLTreed对象会存放打开后xml资源的内容。
上述序列图里的AssetManger.cpp的方法的具体实现也就是一个打开资源文件的过程,资源文件一般存放在APK中,APK是一个zip包,所以最终会调用openAssetFromZipLocked()方法打开xml文件。
XmlBlock封装完成后,会调用XmlBlock对象的newParser()方法去构建一个XmlResourceParser对象,实现如下所示:
final class XmlBlock {
    public XmlResourceParser newParser() {
        synchronized (this) {
            //mNative指向的是C++层的ResXMLTree对象的地址
            if (mNative != 0) {
                return new Parser(nativeCreateParseState(mNative), this);
            }
            return null;
        }
    }

    private static final native long nativeCreateParseState(long obj);
}
mNative指向的是C++层的ResXMLTree对象的地址,native方法nativeCreateParseState()根据这个地址找到ResXMLTree对象,利用ResXMLTree对象对象构建一个ResXMLParser对象,并将ResXMLParser对象 的地址封装进Java层的Parser对象中,构建一个Parser对象。所以他们的对应关系如下所示:
- XmlBlock <--> ResXMLTree
- Parser <--> ResXMLParser
就是建立了Java层与C++层的对应关系,实际的实现还是由C++层完成。
等获取了XmlResourceParser对象以后就可以调用inflate(XmlPullParser parser, @Nullable ViewGroup root, boolean attachToRoot) 方法进行View的解析了,在解析View时 ,会先去调用rInflate()方法解析View树,然后再调用createViewFromTag()方法创建具体的View,我们来详细的看一看。
3.3.2 解析View树
- 解析merge标签,rInflate()方法会将merge下面的所有子View直接添加到根容器中,这里我们也理解了为什么merge标签可以达到简化布局的效果。
- 不是merge标签那么直接调用createViewFromTag()方法解析成布局中的视图,这里的参数name就是要解析视图的类型,例如:ImageView。
- 调用generateLayoutParams()f方法生成布局参数,如果attachToRoot为false,即不添加到根容器里,为View设置布局参数。
- 调用rInflateChildren()方法解析当前View下面的所有子View。
- 如果根容器不为空,且attachToRoot为true,则将解析出来的View添加到根容器中,如果根布局为空或者attachToRoot为false,那么解析出来的额View就是返回结果。返回解析出来的结果。
接下来,我们分别看下View树解析以及View的解析。
public abstract class LayoutInflater {

    public View inflate(XmlPullParser parser, @Nullable ViewGroup root, boolean attachToRoot) {
           synchronized (mConstructorArgs) {
               Trace.traceBegin(Trace.TRACE_TAG_VIEW, "inflate");

               final Context inflaterContext = mContext;
               final AttributeSet attrs = Xml.asAttributeSet(parser);

               //Context对象
               Context lastContext = (Context) mConstructorArgs[0];
               mConstructorArgs[0] = inflaterContext;

               //存储根视图
               View result = root;

               try {
                   // 获取根元素
                   int type;
                   while ((type = parser.next()) != XmlPullParser.START_TAG &&
                           type != XmlPullParser.END_DOCUMENT) {
                       // Empty
                   }

                   if (type != XmlPullParser.START_TAG) {
                       throw new InflateException(parser.getPositionDescription()
                               + ": No start tag found!");
                   }

                   final String name = parser.getName();

                   if (DEBUG) {
                       System.out.println("**************************");
                       System.out.println("Creating root view: "
                               + name);
                       System.out.println("**************************");
                   }

                   //1. 解析merge标签,rInflate()方法会将merge下面的所有子View直接添加到根容器中,这里
                   //我们也理解了为什么merge标签可以达到简化布局的效果。
                   if (TAG_MERGE.equals(name)) {
                       if (root == null || !attachToRoot) {
                           throw new InflateException("<merge /> can be used only with a valid "
                                   + "ViewGroup root and attachToRoot=true");
                       }

                       rInflate(parser, root, inflaterContext, attrs, false);
                   } else {
                       //2. 不是merge标签那么直接调用createViewFromTag()方法解析成布局中的视图,这里的参数name就是要解析视图的类型,例如:ImageView
                       final View temp = createViewFromTag(root, name, inflaterContext, attrs);

                       ViewGroup.LayoutParams params = null;

                       if (root != null) {
                           if (DEBUG) {
                               System.out.println("Creating params from root: " +
                                       root);
                           }
                           //3. 调用generateLayoutParams()f方法生成布局参数,如果attachToRoot为false,即不添加到根容器里,为View设置布局参数
                           params = root.generateLayoutParams(attrs);
                           if (!attachToRoot) {
                               // Set the layout params for temp if we are not
                               // attaching. (If we are, we use addView, below)
                               temp.setLayoutParams(params);
                           }
                       }

                       if (DEBUG) {
                           System.out.println("-----> start inflating children");
                       }

                       //4. 调用rInflateChildren()方法解析当前View下面的所有子View
                       rInflateChildren(parser, temp, attrs, true);

                       if (DEBUG) {
                           System.out.println("-----> done inflating children");
                       }

                       //如果根容器不为空,且attachToRoot为true,则将解析出来的View添加到根容器中
                       if (root != null && attachToRoot) {
                           root.addView(temp, params);
                       }

                       //如果根布局为空或者attachToRoot为false,那么解析出来的额View就是返回结果
                       if (root == null || !attachToRoot) {
                           result = temp;
                       }
                   }

               } catch (XmlPullParserException e) {
                   final InflateException ie = new InflateException(e.getMessage(), e);
                   ie.setStackTrace(EMPTY_STACK_TRACE);
                   throw ie;
               } catch (Exception e) {
                   final InflateException ie = new InflateException(parser.getPositionDescription()
                           + ": " + e.getMessage(), e);
                   ie.setStackTrace(EMPTY_STACK_TRACE);
                   throw ie;
               } finally {
                   // Don't retain static reference on context.
                   mConstructorArgs[0] = lastContext;
                   mConstructorArgs[1] = null;

                   Trace.traceEnd(Trace.TRACE_TAG_VIEW);
               }

               return result;
           }
     }
}
上面我们已经提到View树的解析是有rInflate()方法来完成的,我们接着来看看View树是如何被解析的。
public abstract class LayoutInflater {

    void rInflate(XmlPullParser parser, View parent, Context context,
            AttributeSet attrs, boolean finishInflate) throws XmlPullParserException, IOException {

        //1. 获取树的深度,执行深度优先遍历
        final int depth = parser.getDepth();
        int type;

        //2. 逐个进行元素解析
        while (((type = parser.next()) != XmlPullParser.END_TAG ||
                parser.getDepth() > depth) && type != XmlPullParser.END_DOCUMENT) {

            if (type != XmlPullParser.START_TAG) {
                continue;
            }

            final String name = parser.getName();

            if (TAG_REQUEST_FOCUS.equals(name)) {
                //3. 解析添加ad:focusable="true"的元素,并获取View焦点。
                parseRequestFocus(parser, parent);
            } else if (TAG_TAG.equals(name)) {
                //4. 解析View的tag。
                parseViewTag(parser, parent, attrs);
            } else if (TAG_INCLUDE.equals(name)) {
                //5. 解析include标签,注意include标签不能作为根元素。
                if (parser.getDepth() == 0) {
                    throw new InflateException("<include /> cannot be the root element");
                }
                parseInclude(parser, context, parent, attrs);
            } else if (TAG_MERGE.equals(name)) {
                //merge标签必须为根元素
                throw new InflateException("<merge /> must be the root element");
            } else {
                //6. 根据元素名进行解析,生成View。
                final View view = createViewFromTag(parent, name, context, attrs);
                final ViewGroup viewGroup = (ViewGroup) parent;
                final ViewGroup.LayoutParams params = viewGroup.generateLayoutParams(attrs);
                //7. 递归调用解析该View里的所有子View,也是深度优先遍历,rInflateChildren内部调用的也是rInflate()方
                //法,只是传入了新的parent View
                rInflateChildren(parser, view, attrs, true);
                //8. 将解析出来的View添加到它的父View中。
                viewGroup.addView(view, params);
            }
        }

        if (finishInflate) {
            //9. 回调根容器的onFinishInflate()方法,这个方法我们应该很熟悉。
            parent.onFinishInflate();
        }
    }

    //rInflateChildren内部调用的也是rInflate()方法,只是传入了新的parent View
    final void rInflateChildren(XmlPullParser parser, View parent, AttributeSet attrs,
            boolean finishInflate) throws XmlPullParserException, IOException {
        rInflate(parser, parent, parent.getContext(), attrs, finishInflate);
    }

}
上述方法描述了整个View树的解析流程,我们来概括一下:
- 获取树的深度,执行深度优先遍历.
- 逐个进行元素解析。
- 解析添加ad:focusable="true"的元素,并获取View焦点。
- 解析View的tag。
- 解析include标签,注意include标签不能作为根元素,而merge必须作为根元素。
- 根据元素名进行解析,生成View。
- 递归调用解析该View里的所有子View,也是深度优先遍历,rInflateChildren内部调用的也是rInflate()方法,只是传入了新的parent View。
- 将解析出来的View添加到它的父View中。
- 回调根容器的onFinishInflate()方法,这个方法我们应该很熟悉。
你可以看到,负责解析单个View的正是createViewFromTag()方法,我们再来分析下这个方法。
3.3.3 创建View
public abstract class LayoutInflater {

        View createViewFromTag(View parent, String name, Context context, AttributeSet attrs,
                boolean ignoreThemeAttr) {

            //1. 解析view标签。注意是小写view,这个不太常用,下面会说。
            if (name.equals("view")) {
                name = attrs.getAttributeValue(null, "class");
            }

            //2. 如果标签与主题相关,则需要将context与themeResId包裹成ContextThemeWrapper。
            if (!ignoreThemeAttr) {
                final TypedArray ta = context.obtainStyledAttributes(attrs, ATTRS_THEME);
                final int themeResId = ta.getResourceId(0, 0);
                if (themeResId != 0) {
                    context = new ContextThemeWrapper(context, themeResId);
                }
                ta.recycle();
            }

            //3. BlinkLayout是一种会闪烁的布局,被包裹的内容会一直闪烁,像QQ消息那样。
            if (name.equals(TAG_1995)) {
                // Let's party like it's 1995!
                return new BlinkLayout(context, attrs);
            }

            try {
                View view;

                //4. 用户可以设置LayoutInflater的Factory来进行View的解析,但是默认情况下
                //这些Factory都是为空的。
                if (mFactory2 != null) {
                    view = mFactory2.onCreateView(parent, name, context, attrs);
                } else if (mFactory != null) {
                    view = mFactory.onCreateView(name, context, attrs);
                } else {
                    view = null;
                }
                if (view == null && mPrivateFactory != null) {
                    view = mPrivateFactory.onCreateView(parent, name, context, attrs);
                }

                //5. 默认情况下没有Factory,而是通过onCreateView()方法对内置View进行解析,createView()
                //方法进行自定义View的解析。
                if (view == null) {
                    final Object lastContext = mConstructorArgs[0];
                    mConstructorArgs[0] = context;
                    try {
                        //这里有个小技巧,因为我们在使用自定义View的时候是需要在xml指定全路径的,例如:
                        //com.guoxiaoxing.CustomView,那么这里就有个.了,可以利用这一点判定是内置View
                        //还是自定义View,Google的工程师很机智的。😎
                        if (-1 == name.indexOf('.')) {
                            //内置View解析
                            view = onCreateView(parent, name, attrs);
                        } else {
                            //自定义View解析
                            view = createView(name, null, attrs);
                        }
                    } finally {
                        mConstructorArgs[0] = lastContext;
                    }
                }

                return view;
            } catch (InflateException e) {
                throw e;

            } catch (ClassNotFoundException e) {
                final InflateException ie = new InflateException(attrs.getPositionDescription()
                        + ": Error inflating class " + name, e);
                ie.setStackTrace(EMPTY_STACK_TRACE);
                throw ie;

            } catch (Exception e) {
                final InflateException ie = new InflateException(attrs.getPositionDescription()
                        + ": Error inflating class " + name, e);
                ie.setStackTrace(EMPTY_STACK_TRACE);
                throw ie;
            }
        }
}
单个View的解析流程也很简单,我们来梳理一下:
- 解析View标签。
- 如果标签与主题相关,则需要将context与themeResId包裹成ContextThemeWrapper。
- BlinkLayout是一种会闪烁的布局,被包裹的内容会一直闪烁,像QQ消息那样。
- 用户可以设置LayoutInflater的Factory来进行View的解析,但是默认情况下这些Factory都是为空的。
- 默认情况下没有Factory,而是通过onCreateView()方法对内置View进行解析,createView()方法进行自定义View的解析。这里有个小技巧,因为 我们在使用自定义View的时候是需要在xml指定全路径的,例如:com.guoxiaoxing.CustomView,那么这里就有个.了,可以利用这一点判定是内置View 还是自定义View,Google的工程师很机智的。😎
关于view标签
<view
    class="RelativeLayout"
    android:layout_width="match_parent"
    android:layout_height="match_parent"/>
在使用时,相当于所有控件标签的父类一样,可以设置class属性,这个属性会决定view这个节点会是什么控件。
关于BlinkLayout
这个也是个冷门的控件,本质上是一个FrameLayout,被它包裹的控件会像电脑版的QQ小企鹅那样一直闪烁。
<blink
    android:layout_width="wrap_content"
    android:layout_height="wrap_content">

    <TextView
        android:layout_width="wrap_content"
        android:layout_height="wrap_content"
        android:text="这个控件会一直闪烁"/>

</blink>
关于onCreateView()与createView()
这两个方法在本质上都是一样的,只是onCreateView()会给内置的View前面加一个前缀,例如:android.widget,方便开发者在写内置View的时候,不用谢全路径名。 前面我们也提到了LayoutInflater是一个抽象类,我们实际使用的PhoneLayoutInflater,这个类的实现很简单,它重写了LayoutInflater的onCreatView()方法,该 方法就是做了一个给内置View加前缀的事情。
public class PhoneLayoutInflater extends LayoutInflater {
    private static final String[] sClassPrefixList = {
        "android.widget.",
        "android.webkit.",
        "android.app."
    };

    @Override protected View onCreateView(String name, AttributeSet attrs) throws ClassNotFoundException {

        //循环遍历三种前缀,尝试创建View
        for (String prefix : sClassPrefixList) {
            try {
                View view = createView(name, prefix, attrs);
                if (view != null) {
                    return view;
                }
            } catch (ClassNotFoundException e) {
                // In this case we want to let the base class take a crack
                // at it.
            }
        }
        return super.onCreateView(name, attrs);
    }
    public LayoutInflater cloneInContext(Context newContext) {
        return new PhoneLayoutInflater(this, newContext);
    }
}
这样一来,真正的View构建还是在createView()方法里完成的,createView()主要根据完整的类的路径名利用反射机制构建View对象,我们具体来 看看createView()方法的实现。
public abstract class LayoutInflater {

    public final View createView(String name, String prefix, AttributeSet attrs)
                throws ClassNotFoundException, InflateException {

            //1. 从缓存中读取构造函数。
            Constructor<? extends View> constructor = sConstructorMap.get(name);
            if (constructor != null && !verifyClassLoader(constructor)) {
                constructor = null;
                sConstructorMap.remove(name);
            }
            Class<? extends View> clazz = null;

            try {
                Trace.traceBegin(Trace.TRACE_TAG_VIEW, name);

                if (constructor == null) {
                    // Class not found in the cache, see if it's real, and try to add it

                    //2. 没有在缓存中查找到构造函数,则构造完整的路径名,并加装该类。
                    clazz = mContext.getClassLoader().loadClass(
                            prefix != null ? (prefix + name) : name).asSubclass(View.class);

                    if (mFilter != null && clazz != null) {
                        boolean allowed = mFilter.onLoadClass(clazz);
                        if (!allowed) {
                            failNotAllowed(name, prefix, attrs);
                        }
                    }
                    //3. 从Class对象中获取构造函数,并在sConstructorMap做下缓存,方便下次使用。
                    constructor = clazz.getConstructor(mConstructorSignature);
                    constructor.setAccessible(true);
                    sConstructorMap.put(name, constructor);
                } else {
                    //4. 如果sConstructorMap中有当前View构造函数的缓存,则直接使用。
                    if (mFilter != null) {
                        // Have we seen this name before?
                        Boolean allowedState = mFilterMap.get(name);
                        if (allowedState == null) {
                            // New class -- remember whether it is allowed
                            clazz = mContext.getClassLoader().loadClass(
                                    prefix != null ? (prefix + name) : name).asSubclass(View.class);

                            boolean allowed = clazz != null && mFilter.onLoadClass(clazz);
                            mFilterMap.put(name, allowed);
                            if (!allowed) {
                                failNotAllowed(name, prefix, attrs);
                            }
                        } else if (allowedState.equals(Boolean.FALSE)) {
                            failNotAllowed(name, prefix, attrs);
                        }
                    }
                }

                Object[] args = mConstructorArgs;
                args[1] = attrs;

                //5. 利用构造函数,构建View对象。
                final View view = constructor.newInstance(args);
                if (view instanceof ViewStub) {
                    // Use the same context when inflating ViewStub later.
                    final ViewStub viewStub = (ViewStub) view;
                    viewStub.setLayoutInflater(cloneInContext((Context) args[0]));
                }
                return view;

            } catch (NoSuchMethodException e) {
                final InflateException ie = new InflateException(attrs.getPositionDescription()
                        + ": Error inflating class " + (prefix != null ? (prefix + name) : name), e);
                ie.setStackTrace(EMPTY_STACK_TRACE);
                throw ie;

            } catch (ClassCastException e) {
                // If loaded class is not a View subclass
                final InflateException ie = new InflateException(attrs.getPositionDescription()
                        + ": Class is not a View " + (prefix != null ? (prefix + name) : name), e);
                ie.setStackTrace(EMPTY_STACK_TRACE);
                throw ie;
            } catch (ClassNotFoundException e) {
                // If loadClass fails, we should propagate the exception.
                throw e;
            } catch (Exception e) {
                final InflateException ie = new InflateException(
                        attrs.getPositionDescription() + ": Error inflating class "
                                + (clazz == null ? "<unknown>" : clazz.getName()), e);
                ie.setStackTrace(EMPTY_STACK_TRACE);
                throw ie;
            } finally {
                Trace.traceEnd(Trace.TRACE_TAG_VIEW);
            }
        }
}
好了,讲到这里一个布局xml资源文件的查找和解析流程就分析完了。