Android组件管理框架:Android应用上下文Context
提到Context大家并不陌生,它是Android里的一个上帝类,启动四大组件、获取资源、获取类加载器等重要功能都通过Context 来完成,Activity、Service与Application也都派生自Context,Broadcast Receiver与Content Provider与Context 也有着密切的联系。
Context类图如下所示:
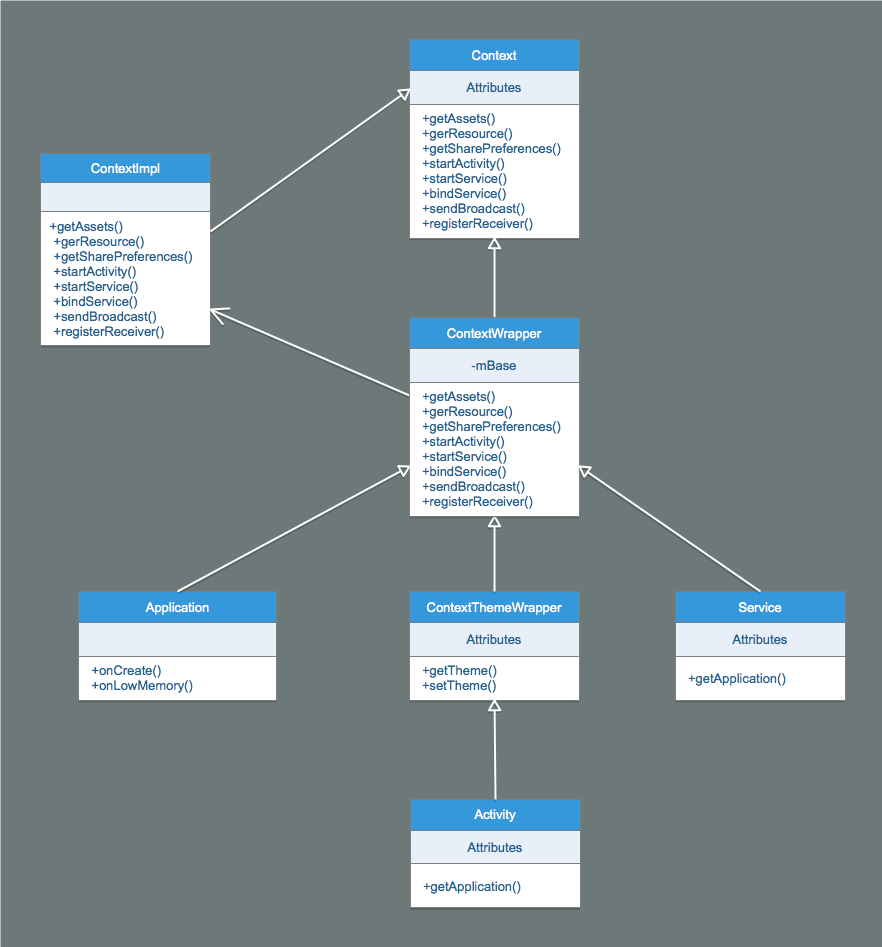
可以发现Context是个抽象类,它的具体实现类是ContextImpl,ContextWrapper是个包装类,内部的成员变量mBase指向的也是个ContextImpl对象,ContextImpl完成了 实际的功能,Activity、Service与Application都直接或者间接的继承ContextWrapper。
我们知道Context表示的应用的上下文环境,四大组件都与Context有密切的关系,在创建组件的时候会同时创建Context,并将两者进行绑定,我们来看看四大组件与 Context之间的关系。
一 Context与四大组件的关系
1.1 Activity的创建流程
public final class ActivityThread {

    private Activity performLaunchActivity(ActivityClientRecord r, Intent customIntent) {
            // System.out.println("##### [" + System.currentTimeMillis() + "] ActivityThread.performLaunchActivity(" + r + ")");

            ActivityInfo aInfo = r.activityInfo;
            // 1. 获取LoadedApk对象。
            if (r.packageInfo == null) {
                r.packageInfo = getPackageInfo(aInfo.applicationInfo, r.compatInfo,
                        Context.CONTEXT_INCLUDE_CODE);
            }

            ComponentName component = r.intent.getComponent();
            if (component == null) {
                component = r.intent.resolveActivity(
                    mInitialApplication.getPackageManager());
                r.intent.setComponent(component);
            }

            if (r.activityInfo.targetActivity != null) {
                component = new ComponentName(r.activityInfo.packageName,
                        r.activityInfo.targetActivity);
            }

            // 2. 创建Activity对象。
            Activity activity = null;
            try {
                java.lang.ClassLoader cl = r.packageInfo.getClassLoader();
                activity = mInstrumentation.newActivity(
                        cl, component.getClassName(), r.intent);
                StrictMode.incrementExpectedActivityCount(activity.getClass());
                r.intent.setExtrasClassLoader(cl);
                r.intent.prepareToEnterProcess();
                if (r.state != null) {
                    r.state.setClassLoader(cl);
                }
            } catch (Exception e) {
                if (!mInstrumentation.onException(activity, e)) {
                    throw new RuntimeException(
                        "Unable to instantiate activity " + component
                        + ": " + e.toString(), e);
                }
            }

            try {
                // 3. 创建Application对象。
                Application app = r.packageInfo.makeApplication(false, mInstrumentation);

                // ...log

                if (activity != null) {
                    // 4. 创建ContextImpl对象。
                    Context appContext = createBaseContextForActivity(r, activity);
                    CharSequence title = r.activityInfo.loadLabel(appContext.getPackageManager());
                    Configuration config = new Configuration(mCompatConfiguration);
                    if (r.overrideConfig != null) {
                        config.updateFrom(r.overrideConfig);
                    }
                    if (DEBUG_CONFIGURATION) Slog.v(TAG, "Launching activity "
                            + r.activityInfo.name + " with config " + config);
                    Window window = null;
                    if (r.mPendingRemoveWindow != null && r.mPreserveWindow) {
                        window = r.mPendingRemoveWindow;
                        r.mPendingRemoveWindow = null;
                        r.mPendingRemoveWindowManager = null;
                    }
                    activity.attach(appContext, this, getInstrumentation(), r.token,
                            r.ident, app, r.intent, r.activityInfo, title, r.parent,
                            r.embeddedID, r.lastNonConfigurationInstances, config,
                            r.referrer, r.voiceInteractor, window);

                    if (customIntent != null) {
                        activity.mIntent = customIntent;
                    }
                    r.lastNonConfigurationInstances = null;
                    activity.mStartedActivity = false;
                    int theme = r.activityInfo.getThemeResource();
                    if (theme != 0) {
                        activity.setTheme(theme);
                    }

                    activity.mCalled = false;
                    if (r.isPersistable()) {
                        // 5. 执行Activity的onCreate()回调方法。
                        mInstrumentation.callActivityOnCreate(activity, r.state, r.persistentState);
                    } else {
                        mInstrumentation.callActivityOnCreate(activity, r.state);
                    }
                    if (!activity.mCalled) {
                        throw new SuperNotCalledException(
                            "Activity " + r.intent.getComponent().toShortString() +
                            " did not call through to super.onCreate()");
                    }
                    r.activity = activity;
                    r.stopped = true;
                    if (!r.activity.mFinished) {
                        activity.performStart();
                        r.stopped = false;
                    }
                    if (!r.activity.mFinished) {
                        if (r.isPersistable()) {
                            if (r.state != null || r.persistentState != null) {
                                mInstrumentation.callActivityOnRestoreInstanceState(activity, r.state,
                                        r.persistentState);
                            }
                        } else if (r.state != null) {
                            mInstrumentation.callActivityOnRestoreInstanceState(activity, r.state);
                        }
                    }
                    if (!r.activity.mFinished) {
                        activity.mCalled = false;
                        if (r.isPersistable()) {
                            mInstrumentation.callActivityOnPostCreate(activity, r.state,
                                    r.persistentState);
                        } else {
                            mInstrumentation.callActivityOnPostCreate(activity, r.state);
                        }
                        if (!activity.mCalled) {
                            throw new SuperNotCalledException(
                                "Activity " + r.intent.getComponent().toShortString() +
                                " did not call through to super.onPostCreate()");
                        }
                    }
                }
                r.paused = true;

                mActivities.put(r.token, r);

            } catch (SuperNotCalledException e) {
                throw e;

            } catch (Exception e) {
                if (!mInstrumentation.onException(activity, e)) {
                    throw new RuntimeException(
                        "Unable to start activity " + component
                        + ": " + e.toString(), e);
                }
            }

            return activity;
        }
}
Activity的创建流程如下所示:
- 获取LoadedApk对象。
- 创建Activity对象。
- 创建Application对象。
- 创建ContextImpl对象。
- 执行Activity的onCreate()回调方法。
1.2 Service的创建流程
public final class ActivityThread {

    private void handleCreateService(CreateServiceData data) {
            // If we are getting ready to gc after going to the background, well
            // we are back active so skip it.
            unscheduleGcIdler();

            // 1. 获取LoadedApk对象。
            LoadedApk packageInfo = getPackageInfoNoCheck(
                    data.info.applicationInfo, data.compatInfo);
            Service service = null;
            try {
                // 2. 创建Service对象。
                java.lang.ClassLoader cl = packageInfo.getClassLoader();
                service = (Service) cl.loadClass(data.info.name).newInstance();
            } catch (Exception e) {
                if (!mInstrumentation.onException(service, e)) {
                    throw new RuntimeException(
                        "Unable to instantiate service " + data.info.name
                        + ": " + e.toString(), e);
                }
            }

            try {
                if (localLOGV) Slog.v(TAG, "Creating service " + data.info.name);
                // 3. 创建ContextImpl对象。
                ContextImpl context = ContextImpl.createAppContext(this, packageInfo);
                context.setOuterContext(service);

                // 4. 创建Application对象。
                Application app = packageInfo.makeApplication(false, mInstrumentation);
                service.attach(context, this, data.info.name, data.token, app,
                        ActivityManagerNative.getDefault());
                // 5. 执行Service的onCreate()回调方法。
                service.onCreate();
                mServices.put(data.token, service);
                try {
                    ActivityManagerNative.getDefault().serviceDoneExecuting(
                            data.token, SERVICE_DONE_EXECUTING_ANON, 0, 0);
                } catch (RemoteException e) {
                    throw e.rethrowFromSystemServer();
                }
            } catch (Exception e) {
                if (!mInstrumentation.onException(service, e)) {
                    throw new RuntimeException(
                        "Unable to create service " + data.info.name
                        + ": " + e.toString(), e);
                }
            }
        }
}
Service的创建流程如下所示:
- 获取LoadedApk对象。
- 创建Service对象。
- 创建ContextImpl对象。
- 创建Application对象。
- 执行Service的onCreate()回调方法。
1.3 静态广播的创建流程
public final class ActivityThread {

    private void handleReceiver(ReceiverData data) {
            // If we are getting ready to gc after going to the background, well
            // we are back active so skip it.
            unscheduleGcIdler();

            String component = data.intent.getComponent().getClassName();
            // 1. 获取LoadedApk对象。
            LoadedApk packageInfo = getPackageInfoNoCheck(
                    data.info.applicationInfo, data.compatInfo);

            IActivityManager mgr = ActivityManagerNative.getDefault();

            BroadcastReceiver receiver;
            try {
                // 2. 创建BroadcastReceiver对象。
                java.lang.ClassLoader cl = packageInfo.getClassLoader();
                data.intent.setExtrasClassLoader(cl);
                data.intent.prepareToEnterProcess();
                data.setExtrasClassLoader(cl);
                receiver = (BroadcastReceiver)cl.loadClass(component).newInstance();
            } catch (Exception e) {
                // ...log
            }

            try {
                // 3. 创建Application对象。
                Application app = packageInfo.makeApplication(false, mInstrumentation);

                // ...log

                // 4. 获取ContextImpl对象。
                ContextImpl context = (ContextImpl)app.getBaseContext();
                sCurrentBroadcastIntent.set(data.intent);
                receiver.setPendingResult(data);
                // 5. 回调onReceive()方法。
                receiver.onReceive(context.getReceiverRestrictedContext(),
                        data.intent);
            } catch (Exception e) {
                // ...log
            } finally {
                sCurrentBroadcastIntent.set(null);
            }

            if (receiver.getPendingResult() != null) {
                data.finish();
            }
        }
}
静态广播的创建流程如下所示:
- 获取LoadedApk对象。
- 创建BroadcastReceiver对象。
- 创建Application对象。
- 获取ContextImpl对象。
- 回调onReceive()方法。
1.4 Content Provider的创建流程
public final class ActivityThread {

     private IActivityManager.ContentProviderHolder installProvider(Context context,
                IActivityManager.ContentProviderHolder holder, ProviderInfo info,
                boolean noisy, boolean noReleaseNeeded, boolean stable) {
            ContentProvider localProvider = null;
            IContentProvider provider;
            if (holder == null || holder.provider == null) {
                if (DEBUG_PROVIDER || noisy) {
                    Slog.d(TAG, "Loading provider " + info.authority + ": "
                            + info.name);
                }
                Context c = null;
                ApplicationInfo ai = info.applicationInfo;
                if (context.getPackageName().equals(ai.packageName)) {
                    c = context;
                } else if (mInitialApplication != null &&
                        mInitialApplication.getPackageName().equals(ai.packageName)) {
                    c = mInitialApplication;
                } else {
                    try {
                        // 1. 创建ContextImpl对象。
                        c = context.createPackageContext(ai.packageName,
                                Context.CONTEXT_INCLUDE_CODE);
                    } catch (PackageManager.NameNotFoundException e) {
                        // Ignore
                    }
                }
                if (c == null) {
                    // ...log
                    return null;
                }
                try {
                    // 2. 创建Content Provider对象。
                    final java.lang.ClassLoader cl = c.getClassLoader();
                    localProvider = (ContentProvider)cl.
                        loadClass(info.name).newInstance();
                    provider = localProvider.getIContentProvider();
                    if (provider == null) {
                        // ...log
                        return null;
                    }
                    if (DEBUG_PROVIDER) Slog.v(
                        TAG, "Instantiating local provider " + info.name);
                    // 3. 将ContextImpl对象绑定到Content Provider。
                    localProvider.attachInfo(c, info);
                } catch (java.lang.Exception e) {
                    // ...log
                    return null;
                }
            } else {
                provider = holder.provider;
                if (DEBUG_PROVIDER) Slog.v(TAG, "Installing external provider " + info.authority + ": "
                        + info.name);
            }

            IActivityManager.ContentProviderHolder retHolder;

            synchronized (mProviderMap) {
                if (DEBUG_PROVIDER) Slog.v(TAG, "Checking to add " + provider
                        + " / " + info.name);
                IBinder jBinder = provider.asBinder();
                if (localProvider != null) {
                    ComponentName cname = new ComponentName(info.packageName, info.name);
                    ProviderClientRecord pr = mLocalProvidersByName.get(cname);
                    if (pr != null) {
                        // ...log
                        provider = pr.mProvider;
                    } else {
                        holder = new IActivityManager.ContentProviderHolder(info);
                        holder.provider = provider;
                        holder.noReleaseNeeded = true;
                        pr = installProviderAuthoritiesLocked(provider, localProvider, holder);
                        mLocalProviders.put(jBinder, pr);
                        mLocalProvidersByName.put(cname, pr);
                    }
                    retHolder = pr.mHolder;
                } else {
                    ProviderRefCount prc = mProviderRefCountMap.get(jBinder);
                    if (prc != null) {
                        // ...log
                        if (!noReleaseNeeded) {
                            incProviderRefLocked(prc, stable);
                            try {
                                ActivityManagerNative.getDefault().removeContentProvider(
                                        holder.connection, stable);
                            } catch (RemoteException e) {
                                //do nothing content provider object is dead any way
                            }
                        }
                    } else {
                        ProviderClientRecord client = installProviderAuthoritiesLocked(
                                provider, localProvider, holder);
                        if (noReleaseNeeded) {
                            prc = new ProviderRefCount(holder, client, 1000, 1000);
                        } else {
                            prc = stable
                                    ? new ProviderRefCount(holder, client, 1, 0)
                                    : new ProviderRefCount(holder, client, 0, 1);
                        }
                        mProviderRefCountMap.put(jBinder, prc);
                    }
                    retHolder = prc.holder;
                }
            }

            return retHolder;
        }
}- 创建ContextImpl对象。
- 创建Content Provider对象。
- 将ContextImpl对象绑定到Content Provider。
通过上面的分析我们知道在四大组件创建的过程中,都需要创建ContextImpl对象与Application对象,Application对象都是通过LoadedApk的makeApplication()方法来完成的,但 是ContextImpl对象的创建方法却各不相同,我们来看一看。
1.5 Application的创建流程
通过上述内容可以发现,对于四大组件,Application的创建和获取方式也是不尽相同的,具体说来:
- Activity:通过LoadedApk的makeApplication()方法创建。
- Service:通过LoadedApk的makeApplication()方法创建。
- 静态广播:通过其回调方法onReceive()方法的第一个参数指向Application。
- ContentProvider:无法获取Application,因此此时Application不一定已经初始化。
LoadedApk的makeApplication()方法如下所示:
public final class LoadedApk {

       public Application makeApplication(boolean forceDefaultAppClass,
                Instrumentation instrumentation) {
            // Application只会创建一次,如果Application对象已经存在则不再创建,一个APK对应一个
            // LoadedApk对象,一个LoadedApk对象对应一个Application对象。
            if (mApplication != null) {
                return mApplication;
            }

            Trace.traceBegin(Trace.TRACE_TAG_ACTIVITY_MANAGER, "makeApplication");

            Application app = null;

            String appClass = mApplicationInfo.className;
            if (forceDefaultAppClass || (appClass == null)) {
                appClass = "android.app.Application";
            }

            try {
                // 1. 创建加载Application的ClassLoader对象。
                java.lang.ClassLoader cl = getClassLoader();
                if (!mPackageName.equals("android")) {
                    Trace.traceBegin(Trace.TRACE_TAG_ACTIVITY_MANAGER,
                            "initializeJavaContextClassLoader");
                    initializeJavaContextClassLoader();
                    Trace.traceEnd(Trace.TRACE_TAG_ACTIVITY_MANAGER);
                }
                // 2. 创建ContextImpl对象。
                ContextImpl appContext = ContextImpl.createAppContext(mActivityThread, this);
                // 3. 创建Application对象。
                app = mActivityThread.mInstrumentation.newApplication(
                        cl, appClass, appContext);
                // 4. 将Application对象设置给ContextImpl。
                appContext.setOuterContext(app);
            } catch (Exception e) {
                if (!mActivityThread.mInstrumentation.onException(app, e)) {
                    Trace.traceEnd(Trace.TRACE_TAG_ACTIVITY_MANAGER);
                    throw new RuntimeException(
                        "Unable to instantiate application " + appClass
                        + ": " + e.toString(), e);
                }
            }
            // 5. 将Application对象添加到ActivityThread的Application列表中。
            mActivityThread.mAllApplications.add(app);
            mApplication = app;

            if (instrumentation != null) {
                try {
                    // 6. 执行Application的回调方法onCreate()。
                    instrumentation.callApplicationOnCreate(app);
                } catch (Exception e) {
                    if (!instrumentation.onException(app, e)) {
                        Trace.traceEnd(Trace.TRACE_TAG_ACTIVITY_MANAGER);
                        throw new RuntimeException(
                            "Unable to create application " + app.getClass().getName()
                            + ": " + e.toString(), e);
                    }
                }
            }

            // Rewrite the R 'constants' for all library apks.
            SparseArray<String> packageIdentifiers = getAssets(mActivityThread)
                    .getAssignedPackageIdentifiers();
            final int N = packageIdentifiers.size();
            for (int i = 0; i < N; i++) {
                final int id = packageIdentifiers.keyAt(i);
                if (id == 0x01 || id == 0x7f) {
                    continue;
                }

                rewriteRValues(getClassLoader(), packageIdentifiers.valueAt(i), id);
            }

            Trace.traceEnd(Trace.TRACE_TAG_ACTIVITY_MANAGER);

            return app;
        }
}
Application的创建流程如下所示:
- 创建加载Application的ClassLoader对象。
- 创建ContextImpl对象。
- 创建Application对象。
- 将Application对象设置给ContextImpl。
- 将Application对象添加到ActivityThread的Application列表中。
- 执行Application的回调方法onCreate()。
👉 注:Application只会创建一次,如果Application对象已经存在则不再创建,一个APK对应一个LoadedApk对象,一个LoadedApk对象 对应一个Application对象。
Application对象的构建时通过Instrumentation的newApplication()方法完成的。
public class Instrumentation {
   static public Application newApplication(Class<?> clazz, Context context)
           throws InstantiationException, IllegalAccessException,
           ClassNotFoundException {
       Application app = (Application)clazz.newInstance();
       app.attach(context);
       return app;
   }
}
这里我们再注意一下ContextImpl的setOuterContext()方法,它用来设置外部Context,但是不同场景下设置的对象不同,具体说来:
- makeApplication():Outer Context设置的是Application。
- createBaseContextForActivity():Outer Context设置的是Activity。
- handleCreateService():Outer Context设置的是Service。
- BroadcastReceiver/Provider:Outer Context设置的是默认的ContextImpl。
二 Context的创建流程
前面说过四大组件获取ContextImpl对象的方式是各不相同的,具体说来:
- Activity:ContextImpl的createActivityContext()方法。
- Service:ContextImpl的createAppContext()方法。
- 静态广播:ContextImpl的getBaseContext()方法。
- Content Provider:ContextImpl的createPackageContext()方法。
我们分别来看看。
2.1 Activity Context的创建流程
Activity Context的创建是通过createBaseContextForActivity()方法来完成,如下所示:
public final class ActivityThread {

     private Context createBaseContextForActivity(ActivityClientRecord r, final Activity activity) {
            int displayId = Display.DEFAULT_DISPLAY;
            try {
                displayId = ActivityManagerNative.getDefault().getActivityDisplayId(r.token);
            } catch (RemoteException e) {
                throw e.rethrowFromSystemServer();
            }

            // 1. 创建ContextImpl对象。
            ContextImpl appContext = ContextImpl.createActivityContext(
                    this, r.packageInfo, r.token, displayId, r.overrideConfig);
            // 2. 设置Outer Context。
            appContext.setOuterContext(activity);
            // 3. 设置Base Context。
            Context baseContext = appContext;

            final DisplayManagerGlobal dm = DisplayManagerGlobal.getInstance();
            // ... debug code
            return baseContext;
        }
}- 创建ContextImpl对象。
- 设置Outer Context。
- 设置Base Context。
ContextImpl对象的构建其实就是将ActivityThread、LoadedApk、activityToke、displayId、Configuration等重要信息 传递给ContextImpl,这样ContextImpl就拥有了一个应用的所有信息,具体如下所示:
class ContextImpl extends Context {

     static ContextImpl createActivityContext(ActivityThread mainThread,
               LoadedApk packageInfo, IBinder activityToken, int displayId,
               Configuration overrideConfiguration) {
           if (packageInfo == null) throw new IllegalArgumentException("packageInfo");
           return new ContextImpl(null, mainThread, packageInfo, activityToken, null, 0,
                   null, overrideConfiguration, displayId);
       }
}
2.2 Service Context的创建流程
创建Service Context,创建Service的时候用的就是这个方法来创建ContextImpl对象。
class ContextImpl extends Context {

    static ContextImpl createAppContext(ActivityThread mainThread, LoadedApk packageInfo) {
        if (packageInfo == null) throw new IllegalArgumentException("packageInfo");
        return new ContextImpl(null, mainThread,
                packageInfo, null, null, 0, null, null, Display.INVALID_DISPLAY);
    }
}
可以发现Activity Context在构建的时候比Service Context多传了activityToken和overrideConfiguration对象。
2.3 静态广播 Context的创建流程
class ContextWraper extends Context {
   public Context getBaseContext() {
        return mBase;
    }
}
这个mBase指向的也是ContextImpl对象,它是在构造ContextWraper对象的时候传递进来的。这个ContextImpl对象实际上是Activity或者 Service的ContextImpl对象,下面我们会具体讲。
2.4 Content Provider Context的创建流程
创建Content Provider Context。
class ContextImpl extends Context {
       @Override
       public Context createPackageContext(String packageName, int flags)
               throws NameNotFoundException {
           return createPackageContextAsUser(packageName, flags,
                   mUser != null ? mUser : Process.myUserHandle());
       }

       @Override
       public Context createPackageContextAsUser(String packageName, int flags, UserHandle user)
               throws NameNotFoundException {
           if (packageName.equals("system") || packageName.equals("android")) {
               return new ContextImpl(this, mMainThread, mPackageInfo, mActivityToken,
                       user, flags, mDisplay, null, Display.INVALID_DISPLAY);
           }

           // 1. 获取LoadedApk对象。
           LoadedApk pi = mMainThread.getPackageInfo(packageName, mResources.getCompatibilityInfo(),
                   flags | CONTEXT_REGISTER_PACKAGE, user.getIdentifier());
           if (pi != null) {
               // 2. 构造ContextImpl对象。
               ContextImpl c = new ContextImpl(this, mMainThread, pi, mActivityToken,
                       user, flags, mDisplay, null, Display.INVALID_DISPLAY);
               if (c.mResources != null) {
                   return c;
               }
           }

           // Should be a better exception.
           throw new PackageManager.NameNotFoundException(
                   "Application package " + packageName + " not found");
       }
}
Content Provider Context在构建的时候多传了一个UserHandle对象,该对象用来描述当前设备的用户信息。
2.5 Application Context的创建流程
创建Application Context。
class ContextImpl extends Context {

    static ContextImpl createAppContext(ActivityThread mainThread, LoadedApk packageInfo) {
        if (packageInfo == null) throw new IllegalArgumentException("packageInfo");
        return new ContextImpl(null, mainThread,
                packageInfo, null, null, 0, null, null, Display.INVALID_DISPLAY);
    }
}
Application Context与Service Context的创建都是调用createAppContext()方法。
可以发现,除了静态广播直接调用getBaseContext()获取ContextImpl对象以外,其他的都是通过ContextImpl的构造方法来构建ContextImpl对象,如下所示:
class ContextImpl extends Context {

     private ContextImpl(ContextImpl container, ActivityThread mainThread,
                LoadedApk packageInfo, IBinder activityToken, UserHandle user, int flags,
                Display display, Configuration overrideConfiguration, int createDisplayWithId) {
            mOuterContext = this;

            // 1. 创建默认的应用目录/data/data/packageName。
            if ((flags & (Context.CONTEXT_CREDENTIAL_PROTECTED_STORAGE
                    | Context.CONTEXT_DEVICE_PROTECTED_STORAGE)) == 0) {
                final File dataDir = packageInfo.getDataDirFile();
                if (Objects.equals(dataDir, packageInfo.getCredentialProtectedDataDirFile())) {
                    flags |= Context.CONTEXT_CREDENTIAL_PROTECTED_STORAGE;
                } else if (Objects.equals(dataDir, packageInfo.getDeviceProtectedDataDirFile())) {
                    flags |= Context.CONTEXT_DEVICE_PROTECTED_STORAGE;
                }
            }

            // 2. 复制mMainThread、mActivityToken、mPackageInfo、mResourcesManager等重要成员变量。
            mMainThread = mainThread;
            mActivityToken = activityToken;
            mFlags = flags;

            if (user == null) {
                user = Process.myUserHandle();
            }
            mUser = user;

            mPackageInfo = packageInfo;
            mResourcesManager = ResourcesManager.getInstance();

            final int displayId = (createDisplayWithId != Display.INVALID_DISPLAY)
                    ? createDisplayWithId
                    : (display != null) ? display.getDisplayId() : Display.DEFAULT_DISPLAY;

            CompatibilityInfo compatInfo = null;
            if (container != null) {
                compatInfo = container.getDisplayAdjustments(displayId).getCompatibilityInfo();
            }
            if (compatInfo == null) {
                compatInfo = (displayId == Display.DEFAULT_DISPLAY)
                        ? packageInfo.getCompatibilityInfo()
                        : CompatibilityInfo.DEFAULT_COMPATIBILITY_INFO;
            }

            // 3. 构建Resouces对象。
            Resources resources = packageInfo.getResources(mainThread);
            if (resources != null) {
                if (displayId != Display.DEFAULT_DISPLAY
                        || overrideConfiguration != null
                        || (compatInfo != null && compatInfo.applicationScale
                                != resources.getCompatibilityInfo().applicationScale)) {

                    if (container != null) {
                        // This is a nested Context, so it can't be a base Activity context.
                        // Just create a regular Resources object associated with the Activity.
                        resources = mResourcesManager.getResources(
                                activityToken,
                                packageInfo.getResDir(),
                                packageInfo.getSplitResDirs(),
                                packageInfo.getOverlayDirs(),
                                packageInfo.getApplicationInfo().sharedLibraryFiles,
                                displayId,
                                overrideConfiguration,
                                compatInfo,
                                packageInfo.getClassLoader());
                    } else {
                        // This is not a nested Context, so it must be the root Activity context.
                        // All other nested Contexts will inherit the configuration set here.
                        resources = mResourcesManager.createBaseActivityResources(
                                activityToken,
                                packageInfo.getResDir(),
                                packageInfo.getSplitResDirs(),
                                packageInfo.getOverlayDirs(),
                                packageInfo.getApplicationInfo().sharedLibraryFiles,
                                displayId,
                                overrideConfiguration,
                                compatInfo,
                                packageInfo.getClassLoader());
                    }
                }
            }
            mResources = resources;

            // 4. 创建Display对象。
            mDisplay = (createDisplayWithId == Display.INVALID_DISPLAY) ? display
                    : mResourcesManager.getAdjustedDisplay(displayId, mResources.getDisplayAdjustments());

            if (container != null) {
                mBasePackageName = container.mBasePackageName;
                mOpPackageName = container.mOpPackageName;
            } else {
                mBasePackageName = packageInfo.mPackageName;
                ApplicationInfo ainfo = packageInfo.getApplicationInfo();
                if (ainfo.uid == Process.SYSTEM_UID && ainfo.uid != Process.myUid()) {
                    // Special case: system components allow themselves to be loaded in to other
                    // processes.  For purposes of app ops, we must then consider the context as
                    // belonging to the package of this process, not the system itself, otherwise
                    // the package+uid verifications in app ops will fail.
                    mOpPackageName = ActivityThread.currentPackageName();
                } else {
                    mOpPackageName = mBasePackageName;
                }
            }

            // 5. 创建ContentResolver对象。
            mContentResolver = new ApplicationContentResolver(this, mainThread, user);
        }
}
我们首先来看看这个构造函数的参数,如下所示:
- ContextImpl container:容器Context,一般置为null。
- ActivityThread mainThread:主线程ActivityThread。
- LoadedApk packageInfo:解析后的APK对象。
- IBinder activityToken:Activity Token用来和ActivityManagerService通信。
- UserHandle user:用户信息,一般置为null。
- int flags:Context标志位。
- Display display:Display对象,描述屏幕相关信息。
- Configuration overrideConfiguration:应用配置信息。
- int createDisplayWithId:Display Id。
ContextImpl对象的构建流程如下所示:
- 创建默认的应用目录/data/data/packageName。
- 复制mMainThread、mActivityToken、mPackageInfo、mResourcesManager等重要成员变量。
- 构建Resouces对象。
- 创建Display对象。
理解完Context的创建流程,我们再来看看它是如何和组件进行绑定的。
三 Context的绑定流程
3.1 Activity与Context的绑定流程
public class Activity extends ContextThemeWrapper
        implements LayoutInflater.Factory2,
        Window.Callback, KeyEvent.Callback,
        OnCreateContextMenuListener, ComponentCallbacks2,
        Window.OnWindowDismissedCallback, WindowControllerCallback,
        AutofillManager.AutofillClient {

        final void attach(Context context, ActivityThread aThread,
                Instrumentation instr, IBinder token, int ident,
                Application application, Intent intent, ActivityInfo info,
                CharSequence title, Activity parent, String id,
                NonConfigurationInstances lastNonConfigurationInstances,
                Configuration config, String referrer, IVoiceInteractor voiceInteractor,
                Window window, ActivityConfigCallback activityConfigCallback) {
            attachBaseContext(context);
            // ...
        }
}
调用ContextWrapper的attachBaseContext()方法将ContextImpl对象赋值给ContextWrapper的成员变量mBase.
3.2 Service与Context的绑定流程
public abstract class Service extends ContextWrapper implements ComponentCallbacks2 {

        public final void attach(
                Context context,
                ActivityThread thread, String className, IBinder token,
                Application application, Object activityManager) {
            attachBaseContext(context);
            mThread = thread;           // NOTE:  unused - remove?
            mClassName = className;
            mToken = token;
            mApplication = application;
            mActivityManager = (IActivityManager)activityManager;
            mStartCompatibility = getApplicationInfo().targetSdkVersion
                    < Build.VERSION_CODES.ECLAIR;
        }
}
调用ContextWrapper的attachBaseContext()方法将ContextImpl对象赋值给ContextWrapper的成员变量mBase.
3.3 静态广播与Context的绑定流程
静态广播与Context的绑定与其他组件不同,它是在执行自己onReceive()方法时,通过ContextImpl对象的getReceiverRestrictedContext() 获取到自己的Context,在传递给调用者,如下所示:
receiver.onReceive(context.getReceiverRestrictedContext(),
            data.intent);
上述方法调用ContextImpl的getReceiverRestrictedContext()方法构建了一个ReceiverRestrictedContext对象,ReceiverRestrictedContext 是ContextImpl的内部类,继承于ContextWrapper,定义了注册广播等的一些操作。
class ContextImpl extends Context {
      final Context getReceiverRestrictedContext() {
          if (mReceiverRestrictedContext != null) {
              return mReceiverRestrictedContext;
          }
          return mReceiverRestrictedContext = new ReceiverRestrictedContext(getOuterContext());
      }
}
3.4 Content Provider与Context的绑定流程
public abstract class ContentProvider implements ComponentCallbacks2 {

    private void attachInfo(Context context, ProviderInfo info, boolean testing) {
        mNoPerms = testing;

        /*
         * Only allow it to be set once, so after the content service gives
         * this to us clients can't change it.
         */
        if (mContext == null) {
            // 1. 将创建的ContextImpl赋值赋值给Content Provider成员变量mContent。
            mContext = context;
            if (context != null) {
                mTransport.mAppOpsManager = (AppOpsManager) context.getSystemService(
                        Context.APP_OPS_SERVICE);
            }
            mMyUid = Process.myUid();
            if (info != null) {
                setReadPermission(info.readPermission);
                setWritePermission(info.writePermission);
                setPathPermissions(info.pathPermissions);
                mExported = info.exported;
                mSingleUser = (info.flags & ProviderInfo.FLAG_SINGLE_USER) != 0;
                setAuthorities(info.authority);
            }
            // 2.执行Content Provider的回调方法onCreate()。
            ContentProvider.this.onCreate();
        }
    }
}
ContentProvider与Context的绑定就是将创建的ContextImpl赋值赋值给Content Provider成员变量mContent。
3.5 Application与Context的绑定流程
Application也有一个与ContextImpl对象绑定的过程,如下所示:
public class Application extends ContextWrapper implements ComponentCallbacks2 {
    /* package */ final void attach(Context context) {
        attachBaseContext(context);
        mLoadedApk = ContextImpl.getImpl(context).mPackageInfo;
    }
}
绑定的过程也是调用ContextWrapper的attachBaseContext()方法将ContextImpl对象赋值给ContextWrapper的成员变量mBase.