SEAndroid安全机制中的进程安全上下文关联分析
前面一篇文章分析了文件安全上下文关联过程。但是在SEAndroid中,除了要给文件关联安全上下文外,还需要给进程关联安全上下文,因为只有当进程和文件都关联安全上下文之后,SEAndroid安全策略才能发挥作用。也就是说,当一个进程试图访问一个文件时,SEAndroid会将进程和文件的安全上下文提取出来,根据安全策略规则,决定是否允许访问。本文就详细分析SEAndroid的进程安全上下文的关联过程。
在传统的Linux系统中,每一个应用程序都对应有一个可执行文件。在这种情况下,我们就可以在安全策略中设定一个规则:当一个可执行文件加载到一个进程中执行时,该进程的安全上下文就设置为指定的值。也就是说,我们可以在安全策略中静态地为进程设置安全上下文。然而,这种进程安全上下文设置方式不适合于Android系统中的应用程序进程。从前面Android系统进程Zygote启动过程的源代码分析和Android应用程序进程启动过程的源代码分析这两篇文章可以知道,Android系统中的应用程序进程都是由Zygote进程fork出来。这些应用程序进程被Zygote进程fork出来之后,不像传统Linux的应用程序进程一样,会通过exec系统调用将对应的可执行文件加载起来执行。这样就会使得Zygote进程及其创建的所有应用程序进程对应的可执行文件均为/system/bin/app_process。由于我们却需要给不同的应用程序设置不同的安全上下文,以便给它们赋予不同的安全权限,因此我们需要在应用程序进程创建出来之后动态地设置它的安全上下文。
根据上面的描述,我们就总结出,在SEAndroid安全机制中,进程的安全上下文设置分为静态和动态两种方式,如图1所示:
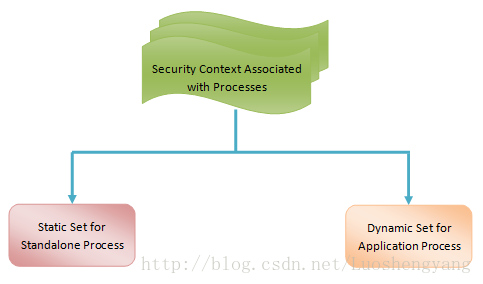
图1 SEAndroid安全机制中的进程安全上下文关联方式
接下来,我们就分别描述这两种进程安全上下文设置方式。
1. 为独立进程静态地设置安全上下文
Android系统的第一个进程是init,其它所有的进程都是由init进程直接或者间接fork出来的。我们在前面SEAndroid安全机制中的文件安全上下文关联分析一篇文章提到,一个新创建的文件的安全上下文在默认情况下来自于其父目录。与此类似,一个新创建的进程的安全上下文在默认情况下来自于其父进程。因此,我们就先看看系统中的第一个进程init的安全上下文是如何设置的。
查看init进程的启动脚本system/core/rootdir/init.rc,可以看到以下的内容:
on early-init
        ......

        # Set the security context for the init process.
        # This should occur before anything else (e.g. ueventd) is started.
        setcon u:r:init:s0

        ......
这段脚本的意思是init进程启动之后就马上调用函数setcon将自己的安全上下文设置为"u:r:init:s0",即将init进程的domain指定为init。
接下来我们再看看init这个domain的定义,在external/sepolicy/init.te文件中:
# init switches to init domain (via init.rc).
    type init, domain;
    permissive init;
    # init is unconfined.
    unconfined_domain(init)
    tmpfs_domain(init)
    # add a rule to handle unlabelled mounts
    allow init unlabeled:filesystem mount;
第一个type语句将domain设置为init的属性,这意味着init是用来描述进程的安全上下文的。
第二个permissive语句指定当domain为init的进程违反SEAndroid安全策略访问资源时,只进行日志输出,而不是拒绝执行。由于这里列出来的内容是来自Android 4.3的,而Android 4.3开启的是Permissive的SEAndroid模式,因此这里会看到这样的一个permissive语句。
第三个unconfined_domain语句是一个宏,定义在external/sepolicy/te_macros文件中,用来指定init是一个不受限制的domain,即它可以访问系统中的大部分资源。它的定义如下所示:
#####################################
    # unconfined_domain(domain)
    # Allow the specified domain to do anything.
    #
    define(`unconfined_domain', `
    typeattribute $1 mlstrustedsubject;
    typeattribute $1 unconfineddomain;
    ')
第四个tmpfs_domain语句也是定义在external/sepolicy/te_macros文件中的一个宏,用来指定当domain为init的进程在type为tmpfs的目录中创建文件时,将新创建的文件的type设置为init_tmpfs,并且允许domain为init的进程对它们进行读和执行。它的定义如下所示:
#####################################
    # tmpfs_domain(domain)
    # Define and allow access to a unique type for
    # this domain when creating tmpfs / shmem / ashmem files.
    define(`tmpfs_domain', `
    type $1_tmpfs, file_type;
    type_transition $1 tmpfs:file $1_tmpfs;
    # Map with PROT_EXEC.
    allow $1 $1_tmpfs:file { read execute execmod };
    ')
第5个allow语句允许domain为init的进程mount未指定安全上下文的文件系统时,将其安全上下文设置为unlabeled。
上面列出的脚本就指明了init进程的安全上下文,以及它所具有的SEAndroid权限。接下来我们就再来看看负责创建应用程序进程的Zygote进程的安全上下文的设置过程。
Zygote进程是由init进程创建的,它的启动命令定义在文件system/core/rootdir/init.rc中,如下所示:
service zygote /system/bin/app_process -Xzygote /system/bin --zygote --start-system-server
        class main
        socket zygote stream 660 root system
        onrestart write /sys/android_power/request_state wake
        onrestart write /sys/power/state on
        onrestart restart media
        onrestart restart netd
这意味着Zygote进程对应的可执行文件为/system/bin/app_process。
通过检查external/sepolicy/file_contexts,我们可以发现文件/system/bin/app_process的安全上下文为"u:object_r:zygote_exec:s0",如下所示:
/system/bin/app_process u:object_r:zygote_exec:s0也就是说,文件/system/bin/app_process的type为zygote_exec。
在external/sepolicy/zygote.te文件中,定义了一个名称为zygote的domain,以及名称为zygote_exec的type,如下所示:
# zygote
    type zygote, domain;
    type zygote_exec, exec_type, file_type;

    permissive zygote;
    init_daemon_domain(zygote)
    unconfined_domain(zygote)
第一个type语句将domain设置为zygote的属性,表明zygote是用来描述进程的安全上下文的。
第二个type语句将exec_type和file_type设置为zygote_exec的属性,表明zygote_exec是用来描述可执行文件的安全上下文的。
第三个permissive语句同样是表明当domain为zygote的进程违反SEAndroid安全策略访问资源时,只进行日志输出,而不是拒绝执行。
第四个init_daemon_domain语句是一个宏,定义在文件external/sepolicy/te_macros中,用来设置zygote这个domain的权限,它的定义如下所示:
#####################################
    # init_daemon_domain(domain)
    # Set up a transition from init to the daemon domain
    # upon executing its binary.
    define(`init_daemon_domain', `
    domain_auto_trans(init, $1_exec, $1)
    tmpfs_domain($1)
    ')
宏init_daemon_domain由另外两个宏tmpfs_domain和domain_auto_trans组成。宏tmpfs_domain的作用在前面已经分析过了,接下来我们重点关注宏domain_auto_trans的定义,也是在文件external/sepolicy/te_macros中,如下所示:
#####################################
    # domain_auto_trans(olddomain, type, newdomain)
    # Automatically transition from olddomain to newdomain
    # upon executing a file labeled with type.
    #
    define(`domain_auto_trans', `
    # Allow the necessary permissions.
    domain_trans($1,$2,$3)
    # Make the transition occur by default.
    type_transition $1 $2:process $3;
    ')
第二个type_transition语句指定当一个domain为init的进程创建一个子进程执行一个type为zygote_exec的文件时,将该子进程的domain设置为zygote,而不是继承父进程的domain。
第一个domain_trans语句是一个宏,也是定义在external/sepolicy/te_macros中,用来允许进程的domain从init修改为zygote,它的定义如下所示:
#####################################
    # domain_trans(olddomain, type, newdomain)
    # Allow a transition from olddomain to newdomain
    # upon executing a file labeled with type.
    # This only allows the transition; it does not
    # cause it to occur automatically - use domain_auto_trans
    # if that is what you want.
    #
    define(`domain_trans', `
    # Old domain may exec the file and transition to the new domain.
    allow $1 $2:file { getattr open read execute };
    allow $1 $3:process transition;
    # New domain is entered by executing the file.
    allow $3 $2:file { entrypoint read execute };
    # New domain can send SIGCHLD to its caller.
    allow $3 $1:process sigchld;
    # Enable AT_SECURE, i.e. libc secure mode.
    dontaudit $1 $3:process noatsecure;
    # XXX dontaudit candidate but requires further study.
    allow $1 $3:process { siginh rlimitinh };
    ')
其中,最重要的是以下两个allow语句:
allow $1 $3:process transition;
    allow $3 $2:file { entrypoint read execute };
第一个allow语句允许domain为init的进程将domain修改为zygote。
第二个allow语句允许type为zygote_exec的可执行文件作为进入zygote这个domain的入口点。
概括来说,在external/sepolicy/zygote.te文件中,通过init_daemon_domain指明了Zygote进程的domain为zygote。我们可以从Zygote进程的创建过程来理解这些安全策略。首先, Zygote进程是由init进程fork出来的。在fork出来的时候,Zygote进程的domain来自于父进程init的domain,即此时Zygote进程的domain为init。接下来,刚刚fork出来的Zygote进程会通过系统接口exec将文件/system/bin/app_process加载进来执行。由于上面提到的allow和type_transition规则的存在,使得文件/system/bin/app_process被exec到刚刚fork出来的Zygote进程的时候,它的domain自动地从init转换为zygote。这样我们就可以给init进程和Zygote进程设置不同的domain,以便可以给它们赋予不同的SEAndroid安全权限。
回到external/sepolicy/zygote.te文件中,最后一个unconfined_domain语句同样是将zygote这个domain设置为一个不受限的domain,以便它可以访问系统中的大部分资源。
这样,我们就以init和Zygote进程的安全上下文设置过程为例,说明了那些对应有不同可执行文件的进程的安全上下文的关联过程了。这些进程的安全上下文的设置方式与传统的Linux系统的应用程序进程的设置方式是一致的。接下来我们就再来分析Android系统的应用程序进程的安全上下文的关联过程。
2. 为应用程序进程设置安全上下文
从前面Android应用程序进程启动过程的源代码分析一篇文章可以知道,应用程序进程是由ActivityManagerService请求Zygote进程创建的。ActivityManagerService在请求Zygote进程创建应用程序进程的时候,会传递很多参数,例如应用程序在安装时分配到的uid和gid。增加了SEAndroid安全机制之后,ActivityManagerService传递给Zygote进程的参数包含了一个seinfo。这个seinfo与我们在前面SEAndroid安全机制中的文件安全上下文关联分析一文中介绍的seinfo是一样的,不过它的作用是用来设置应用程序进程的安全上下文,而不是设置应用程序数据文件的安全上下文。接下来我们就分析应用程序进程的安全上下文设置过程。
从前面Android应用程序进程启动过程的源代码分析一文的Step 1可以知道,当ActivityMangerService需要创建应用程序进程的时候,就会调用ActivityMangerService类的成员函数startProcessLocked,它的实现如下所示:
public final class ActivityManagerService  extends ActivityManagerNative
            implements Watchdog.Monitor, BatteryStatsImpl.BatteryCallback {
        ......

        private final void startProcessLocked(ProcessRecord app,
                String hostingType, String hostingNameStr) {
            ......

            try {
                ......

                // Start the process.  It will either succeed and return a result containing
                // the PID of the new process, or else throw a RuntimeException.
                Process.ProcessStartResult startResult = Process.start("android.app.ActivityThread",
                        app.processName, uid, uid, gids, debugFlags, mountExternal,
                        app.info.targetSdkVersion, app.info.seinfo, null);

                ......
            } catch (RuntimeException e) {
                ......
            }
        }

        ......
    }
这个函数定义在文件frameworks/base/services/java/com/android/server/am/ActivityManagerService.java中。
参数app指向的是一个ProcessRecord对象,用来描述正在创建的应用程序进程。其中,它的成员变量info指向的是一个ApplicationInfo对象。从前面SEAndroid安全机制中的文件安全上下文关联分析一文可以知道,这个ApplicationInfo对象有一个类型为String的成员变量seinfo,是在应用程序安装的时候通过解析文件mac_permissions.xml获得的。
ActivityManagerService类的成员函数startProcessLocked通过调用Process类的静态成员函数start来创建应用程序进程,其中就包含了要创建的应用程序进程的各种参数。从前面Android应用程序进程启动过程的源代码分析一篇文章可以知道,这些参数会通过Socket IPC传递给Zygote进程。最后,Zygote进程会通过调用ZygoteConnection类的成员函数runOnce来执行创建应用程序进程的工作。
ZygoteConnection类的成员函数runOnce的实现如下所示:
class ZygoteConnection {
        ......

        boolean runOnce() throws ZygoteInit.MethodAndArgsCaller {
            ......

            try {
                args = readArgumentList();
                ......
            } catch (IOException ex) {
                ......
            }

            ......

            try {
                parsedArgs = new Arguments(args);
                ......

                pid = Zygote.forkAndSpecialize(parsedArgs.uid, parsedArgs.gid, parsedArgs.gids,
                        parsedArgs.debugFlags, rlimits, parsedArgs.mountExternal, parsedArgs.seInfo,
                        parsedArgs.niceName);
            } catch (IOException ex) {
                ......
            } catch (ErrnoException ex) {
                ......
            } catch (IllegalArgumentException ex) {
                ......
            } catch (ZygoteSecurityException ex) {
                ......
            }

        ......
        }

        ......
    }
这个函数定义在文件frameworks/base/core/java/com/android/internal/os/ZygoteConnection.java中。
ZygoteConnection类的成员函数runOnce首先是通过调用另外一个成员函数readArgumentList读取ActivityManagerService发送过来的应用程序进程创建参数args,接着再创建一个Arguments对象来解析该参数。解析后得到的参数传递给Zygote类的静态成员函数forkAndSpecialize,以便后者可以执行创建应用程序进程的工作。
Zygote类的静态成员函数forkAndSpecialize的实现如下所示:
public class Zygote {
        ......

        public static int forkAndSpecialize(int uid, int gid, int[] gids, int debugFlags,
                int[][] rlimits, int mountExternal, String seInfo, String niceName) {
            preFork();
            int pid = nativeForkAndSpecialize(
                    uid, gid, gids, debugFlags, rlimits, mountExternal, seInfo, niceName);
            postFork();
            return pid;
        }

        native public static int nativeForkAndSpecialize(int uid, int gid, int[] gids, int debugFlags,
                int[][] rlimits, int mountExternal, String seInfo, String niceName);

        ......
    }
这个函数定义在文件libcore/dalvik/src/main/java/dalvik/system/Zygote.java中。
Zygote类的静态成员函数forkAndSpecialize的实现很简单,它通过调用另外一个JNI函数nativeForkAndSpecialize来执行创建应用程序进程的工作。
Zygote类的JNI函数nativeForkAndSpecialize的由C++层的函数Dalvik_dalvik_system_Zygote_forkAndSpecialize来实现,如下所示:
static void Dalvik_dalvik_system_Zygote_forkAndSpecialize(const u4* args,
        JValue* pResult)
    {
        pid_t pid;

        pid = forkAndSpecializeCommon(args, false);

        RETURN_INT(pid);
    }
这个函数定义在文件dalvik/vm/native/dalvik_system_Zygote.cpp中。
注意,Zygote类的JNI函数nativeForkAndSpecialize在调用的过程中,传递进来的参数都被保存在函数Dalvik_dalvik_system_Zygote_forkAndSpecialize的参数args指向的一块内存中。
函数Dalvik_dalvik_system_Zygote_forkAndSpecialize通过调用另外一个函数forkAndSpecializeCommon来执行创建应用程序进程的工作,它的实现如下所示:
static pid_t forkAndSpecializeCommon(const u4* args, bool isSystemServer)
    {
        pid_t pid;

        uid_t uid = (uid_t) args[0];
        gid_t gid = (gid_t) args[1];
        ......
        char *seInfo = NULL;
        char *niceName = NULL;

        if (isSystemServer) {
            ......
        } else {
            ......
            StringObject* seInfoObj = (StringObject*)args[6];
            if (seInfoObj) {
                seInfo = dvmCreateCstrFromString(seInfoObj);
                ......
            }
            StringObject* niceNameObj = (StringObject*)args[7];
            if (niceNameObj) {
                niceName = dvmCreateCstrFromString(niceNameObj);
                ......
            }

            ......
        }

        ......

        pid = fork();

        if (pid == 0) {
            ......

           err = setSELinuxContext(uid, isSystemServer, seInfo, niceName);
           ......
        }

        ......

        return pid;
    }
这个函数定义在文件dalvik/vm/native/dalvik_system_Zygote.cpp中。
参数isSystemServer表示当前创建的是System Server进程还是应用程序进程。在我们这个场景中,它的值等于false,表示要创建的是应用程序进程。从参数args指向的内存可以获得各种各样的参数,例如uid、gid、seinfo和nice name等。
获得了要创建的进程的各种参数之后,函数forkAndSpecializeCommon就通过系统调用fork创建出了一个子进程。注意,这时候函数forkAndSpecializeCommon是在Zygote进程中执行的。因此,这里创建出来的子进程的安全上下文继承于Zygote进程。从前面的分析可以知道,这个安全上下文为"u:r:zygote:s0"。
如果这时候我们什么也不做的话,那么创建出来的应用程序进程的安全上下文就会一直被设置为"u:r:zygote:s0",这样会使得应用程序具有Zygote进程一样的SEAndroid安全权限。这是不允许的,因此,接下来需要通过调用函数setSELinuxContext来修改刚刚创建出来的应用程序进程的安全上下文。
函数setSELinuxContext的实现如下所示:
static int setSELinuxContext(uid_t uid, bool isSystemServer,
                                 const char *seInfo, const char *niceName)
    {
    #ifdef HAVE_ANDROID_OS
        return selinux_android_setcontext(uid, isSystemServer, seInfo, niceName);
    #else
        return 0;
    #endif
    }
这个函数定义在文件dalvik/vm/native/dalvik_system_Zygote.cpp中。
函数setSELinuxContext的实现很简单,它通过调用libselinux提供的函数selinux_android_setcontext来设置刚刚创建出来的应用程序进程的安全上下文。
函数selinux_android_setcontext的实现如下所示:
int selinux_android_setcontext(uid_t uid,
                       int isSystemServer,
                       const char *seinfo,
                       const char *pkgname)
    {
        char *orig_ctx_str = NULL, *ctx_str;
        context_t ctx = NULL;
        int rc;

        if (is_selinux_enabled() <= 0)
            return 0;

        __selinux_once(once, seapp_context_init);

        rc = getcon(&ctx_str);
        ......

        ctx = context_new(ctx_str);
        orig_ctx_str = ctx_str;
        ......

        rc = seapp_context_lookup(SEAPP_DOMAIN, uid, isSystemServer, seinfo, pkgname, ctx);
        ......

        ctx_str = context_str(ctx);
        ......

        rc = security_check_context(ctx_str);
        ......

        if (strcmp(ctx_str, orig_ctx_str)) {
            rc = setcon(ctx_str);
            ......
        }

        rc = 0;
    out:
        ......
        return rc;

        ......
    }
这个函数定义在文件external/libselinux/src/android.c中。
参数isSystemServer表示当前创建的是System Server进程还是应用程序进程。在我们这个场景中,它的值等于false,表示要创建的是应用程序进程。从参数args指向的内存可以获得各种各样的参数,例如uid、gid、seinfo和nice name等。
获得了要创建的进程的各种参数之后,函数forkAndSpecializeCommon就通过系统调用fork创建出了一个子进程。注意,这时候函数forkAndSpecializeCommon是在Zygote进程中执行的。因此,这里创建出来的子进程的安全上下文来继承于Zygote进程。从前面的分析可以知道,这个安全上下文为"u:r:zygote:s0"。
如果这时候我们什么也不做的话,那么创建出来的应用程序进程的安全上下文就会一直被设置为"u:r:zygote:s0",这样会使得应用程序具有Zygote进程一样的SEAndroid安全权限。这是不允许的,因此,接下来需要通过调用函数setSELinuxContext来修改刚刚创建出来的应用程序进程的安全上下文。
函数setSELinuxContext的实现如下所示:
static int setSELinuxContext(uid_t uid, bool isSystemServer,
                                 const char *seInfo, const char *niceName)
    {
    #ifdef HAVE_ANDROID_OS
        return selinux_android_setcontext(uid, isSystemServer, seInfo, niceName);
    #else
        return 0;
    #endif
    }
这个函数定义在文件dalvik/vm/native/dalvik_system_Zygote.cpp中。
函数setSELinuxContext的实现很简单,它通过调用libselinux提供的函数selinux_android_setcontext来设置刚刚创建出来的应用程序进程的安全上下文。
函数selinux_android_setcontext的实现如下所示:
int selinux_android_setcontext(uid_t uid,
                       int isSystemServer,
                       const char *seinfo,
                       const char *pkgname)
    {
        char *orig_ctx_str = NULL, *ctx_str;
        context_t ctx = NULL;
        int rc;

        if (is_selinux_enabled() <= 0)
            return 0;

        __selinux_once(once, seapp_context_init);

        rc = getcon(&ctx_str);
        ......

        ctx = context_new(ctx_str);
        orig_ctx_str = ctx_str;
        ......

        rc = seapp_context_lookup(SEAPP_DOMAIN, uid, isSystemServer, seinfo, pkgname, ctx);
        ......

        ctx_str = context_str(ctx);
        ......

        rc = security_check_context(ctx_str);
        ......

        if (strcmp(ctx_str, orig_ctx_str)) {
            rc = setcon(ctx_str);
            ......
        }

        rc = 0;
    out:
        ......
        return rc;

        ......
    }
函数selinux_android_setcontext的执行过程如下所示:
A. 调用函数is_selinux_enabled检查系统是否启用了SELinux。如果没有启用的话,那就什么也不用做就返回。否则的话,就继续往下执行。
B. 调用函数seapp_context_init读取和解析我们在前面SEAndroid安全机制框架分析一文提到的seapp_contexts文件。注意,__selinux_once是一个宏,它实际上是利用了pthread库提供的函数pthread_once保证函数seapp_context_init在进程内有且仅有一次会被调用到,适合用来执行初始化工作。
C. 调用函数getcon获得当前进程的安全上下文,保存在变量ctx_str。
D. 调用函数context_new在原来的安全上下文的基础上创建一个新的安全上下文ctx,以便可以获得原来安全上下文的SELinux用户、角色和安全级别等信息。
E. 调用函数seapp_context_lookup根据传进来的参数seinfo在seapp_contexts文件中找到对应的Domain,并且将其设置为新的安全上下文ctr的Domain。
F. 调用函数context_str获得新创建的安全上下文的字符串描述,以便可以调用函数security_check_context来验证新创建的安全上下文的正确性。如果不正确的话,就出错返回。否则的话,继续往下执行。
G. 比较原来的安全上下文和新创建的安全上下文。如果不一致的话,那么就调用函数setcon将当前进程的安全上下文设置为新创建的安全上下文。
在上面的几个步骤中,最重要的就是B、E和G三步。其中,B和E这两步在前面SEAndroid安全机制中的文件安全上下文关联分析一文中已经分析过了,因此接下来我们主要分析函数setcon的实现。
函数setcon通过以下三个宏来定义,如下所示:
#define setselfattr_def(fn, attr) \
        int set##fn(const security_context_t c) \
        { \
            return setprocattrcon(c, 0, #attr); \
        }

    #define all_selfattr_def(fn, attr) \
        getselfattr_def(fn, attr)    \
        setselfattr_def(fn, attr)

    all_selfattr_def(con, current)
这三个宏定义在文件external/libselinux/src/procattr.c中。
从这三个宏的定义就可以看出,函数setcon最终通过调用另外一个函数setprocattrcon来设置当前进程的安全上下文,其中,第一个参数c描述的是要设置的安全上下文,第三个参数的值等于"current"。
函数setprocattrcon的实现如下所示:
static int setprocattrcon(security_context_t context,
                  pid_t pid, const char *attr)
    {
        char *path;
        int fd, rc;
        pid_t tid;
        ssize_t ret;
        int errno_hold;

        if (pid > 0)
            rc = asprintf(&path, "/proc/%d/attr/%s", pid, attr);
        else {
            tid = gettid();
            rc = asprintf(&path, "/proc/self/task/%d/attr/%s", tid, attr);
        }
        if (rc < 0)
            return -1;

        fd = open(path, O_RDWR);
        free(path);
        if (fd < 0)
            return -1;
        if (context)
            do {
                ret = write(fd, context, strlen(context) + 1);
            } while (ret < 0 && errno == EINTR);
        else
            do {
                ret = write(fd, NULL, 0);   /* clear */
            } while (ret < 0 && errno == EINTR);
        errno_hold = errno;
        close(fd);
        errno = errno_hold;
        if (ret < 0)
            return -1;
        else
            return 0;
    }
这个函数定义在文件external/libselinux/src/procattr.c中。
函数setcon实际上就是打开proc文件系统中的/proc/self/task/
这样,新创建的应用程序进程的安全上下文就设置好了。
这个系列的文章学习到这里,我们就分析完成进程和文件的安全上下文的设置过程了。回忆前面SEAndroid安全机制简要介绍和学习计划一文,我们提出了一个问题,如何将设备上的/system/bin/gpsd文件下载到PC上来。
通过常用的adb pull命令是无法将开启了SEAndroid安全机制的设备上将/system/bin/gpsd文件读取下来的。这是因为adb pull命令是通过运行在设备上的adbd守护进程来读取/system/bin/gpsd文件,并且传回来给PC的,而守护进程adbd没有权限读取文件/system/bin/gpsd。
我们通过ls -Z和ps -Z命令可以来观察/system/bin/gpsd文件和adbd守护进程的安全上下文:
./adb shell ls -Z /system/bin/gpsd
    -rwxr-xr-x root     shell             u:object_r:gpsd_exec:s0 gpsd
    $ ./adb shell ps -Z | grep 'adbd'
    u:r:adbd:s0                    shell     1978  1     /sbin/adbd
这意味着domain为adbd的进程无法读取type为gpsd_exec的文件。
实际上我们是可以在PC上通过执行adb shell cat命令来读取设备上的/system/bin/gpsd文件的,如下所示:
./adb shell cat /system/bin/gpsd > ./gpsd上面的命令实际上是通过shell启动cat程序,并且通过这个cat进程来读取文件/system/bin/gpsd的内容。
从前面的分析可以知道,cat进程的安全上下文来自于其父进程shell,因此,我们通过在设备上执行ps -Z命令观察一下shell进程的安全上下文:
$ ps -Z
    u:r:shell:s0                   shell     23486 1978  /system/bin/sh
这意味着domain为shell的进程可以读取type为gpsd_exec的文件。
在SEAndroid中,shell和adbd这两个domain的区别是什么呢?我们可以通过一个称为apol的工具做一个简要分析。
首先我们要从设备上读取一个sepolicy文件,如下所示:
./adb pull /sepolicy  ./sepolicy
    2372 KB/s (558936 bytes in 0.230s)
读取出来的sepolicy文件实际上描述的就是设备使用的SEAndroid安全策略,我们可以通过apol工具对它进行分析。
接着我们打开apol工具,并且从File菜单中点击Open项打开上述sepolicy文件。切换到Policy Components选项卡,在左则的Types列表中找到adbd项,双击查看它的属性,如图2所示:
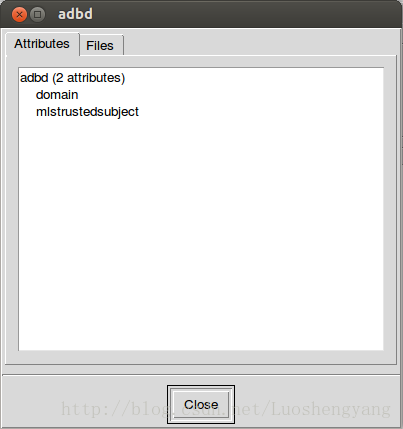
图2 adbd属性
这意味着adbd这个domain具有两个属性domain和mlstrustedsubject。
用同样的方法查看domain为shell的属性,如图3所示:
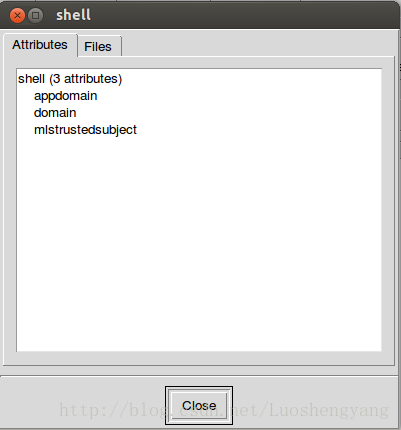
图3 shell属性
这意味着shell这个domain有三个属性appdomain、domain和mlstructedsubject。与adbd相比,shell多了一个appdomain属性。这又意味着具有appdomain属性的domain具有读取type为gpsd_exec的文件的权限。
再用同样的方法查看type为gpsd_exec的属性,如图4所示:
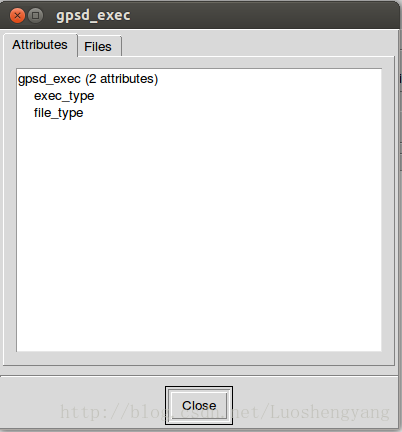
图4 gpsd_exec属性
这意味着gpsd_exec这个type有两个属性exec_type和file_type。
我们将apol工具切换到Policy Rules选项卡,在Source type/attribute和Target type/attribute编辑框中分别填入"appdomain"和"gpsd_exec",检查具有appdomain属性的进程是否可以读取具有exec_file属性的文件的权限,点击右边的New Search按钮,结果如图5所示:
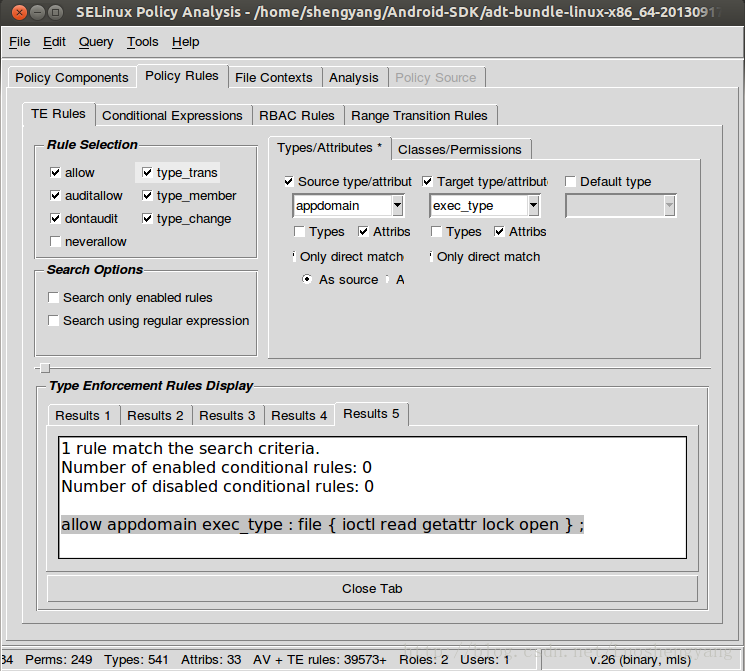
图5 具有属性appdomain的进程对具有属性exec_type的文件的SEAndroid安全权限
这意味着具有属性appdomain的进程对具有属性exec_type的文件具有读取的权限。也就是说,设备上的shell进程能读取/system/bin/gpsd文件的内容,是因为它的domain具有appdomain属性,而设备上的adbd进程的domain是不具有这个属性的。
通过回答前面SEAndroid安全机制简要介绍和学习计划一文提出的问题,我们介绍了如何通过apol工具来分析设备上的SEAndroid安全策略。这是一个非常有用的工具,希望大家可以掌握。在接下来的两篇文章中,我们就继续学习SEAndroid安全机制是如何支持Android系统的属性访问以及Binder IPC调用的,敬请关注!更多信息可以关注老罗的新浪微博:http://weibo.com/shengyangluo。